In this tutorial let’s Create a RestAPI using spring boot and JPA and send data get requests from API using postman and insert the data into a database table, In parallel will learn how can we create an automatic database and table using JPA and spring boot.
Steps to create RestAPI into spring boot and store the data in the database.
- Create a spring boot maven project or create by spring initializer.
- Add required maven dependencies into POM.XML
- Add database parameters(URL, username, and password ) into the application.properties file.
- Create Packages, Controllers, repositories, and Entity classes.
- Send a request from Postmen with “request body” in JSON format.
- Get the Output.
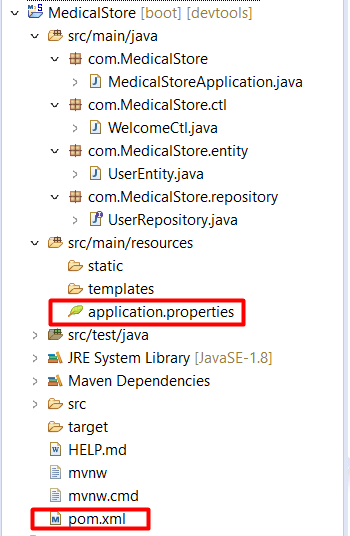
Project Structure:
Create a Rest API in Spring boot to save data into the database
Create a maven project that will generate a pom.xml, Add some required dependencies for spring boot, JPA, MYSQL, and Lombok into pom.xml. Below is the code snippet for reference.
pom.xml
<?xml version="1.0" encoding="UTF-8"?>
<project xmlns="http://maven.apache.org/POM/4.0.0" xmlns:xsi="http://www.w3.org/2001/XMLSchema-instance"
    xsi:schemaLocation="http://maven.apache.org/POM/4.0.0 https://maven.apache.org/xsd/maven-4.0.0.xsd">
    <modelVersion>4.0.0</modelVersion>
    <parent>
        <groupId>org.springframework.boot</groupId>
        <artifactId>spring-boot-starter-parent</artifactId>
        <version>2.7.2</version>
        <relativePath/> <!-- lookup parent from repository -->
    </parent>
    <groupId>com</groupId>
    <artifactId>MedicalStore</artifactId>
    <version>0.0.1-SNAPSHOT</version>
    <name>MedicalStore</name>
    <description>Online Pharmacy Management Project in Spring boot</description>
    <properties>
        <java.version>1.8</java.version>
    </properties>
    <dependencies>
        <dependency>
            <groupId>org.springframework.boot</groupId>
            <artifactId>spring-boot-starter-data-jpa</artifactId>
        </dependency>
        <dependency>
            <groupId>org.springframework.boot</groupId>
            <artifactId>spring-boot-starter-web</artifactId>
        </dependency>

        <dependency>
            <groupId>org.springframework.boot</groupId>
            <artifactId>spring-boot-devtools</artifactId>
            <scope>runtime</scope>
            <optional>true</optional>
        </dependency>
        <dependency>
            <groupId>mysql</groupId>
            <artifactId>mysql-connector-java</artifactId>
            <scope>runtime</scope>
        </dependency>
        <dependency>
            <groupId>org.springframework.boot</groupId>
            <artifactId>spring-boot-configuration-processor</artifactId>
            <optional>true</optional>
        </dependency>
        <dependency>
            <groupId>org.projectlombok</groupId>
            <artifactId>lombok</artifactId>
            <optional>true</optional>
        </dependency>
        <dependency>
            <groupId>org.springframework.boot</groupId>
            <artifactId>spring-boot-starter-test</artifactId>
            <scope>test</scope>
        </dependency>
    </dependencies>

    <build>
        <plugins>
            <plugin>
                <groupId>org.springframework.boot</groupId>
                <artifactId>spring-boot-maven-plugin</artifactId>
                <configuration>
                    <excludes>
                        <exclude>
                            <groupId>org.projectlombok</groupId>
                            <artifactId>lombok</artifactId>
                        </exclude>
                    </excludes>
                </configuration>
            </plugin>
        </plugins>
    </build>

</project>
Database configuration(application.properties)
Another automatic generated file is “application.properties” which will responsible for the configuration of the project, this example will do only configuration for the database.
“spring.datasource.url” is used to define the database connection URL. “createDatabaseIfNotExist=true” will create automatic database if its not exist.
“spring.datasource.driver-class-name” is used to define the database driver name.
“spring.datasource.username” and “spring.datasource.password” is used to define the username and password of the database. below is the complete database configuration code with JPA.
spring.datasource.url=jdbc:mysql://localhost:3306/medicalstorespreact?createDatabaseIfNotExist=true
spring.datasource.driver-class-name=com.mysql.cj.jdbc.Driver
spring.datasource.username=root
spring.datasource.password=root
spring.jpa.database-platform = org.hibernate.dialect.MySQL8Dialect
spring.jpa.generate-ddl=true
spring.jpa.hibernate.ddl-auto = update
Define Entity Classes
Create a Java Class(UserEntity.java), That contains the user attributes, getter, and setter for the user.
@Entity annotation will make the class as a entity class.
@Getter and @Setter annotation create getter and setter for all the attributes this is the beauty of Lombok.
@Table(name = “user”) is used to entity class with database table name as “user”.
@Id annotation will make the column a unique key.
@Column(name = “id” ) annotation will map it with column name “id”.
@GeneratedValue(strategy = GenerationType.IDENTITY) is used to autoincrement the unique key.
UserEntity.java
package com.MedicalStore.entity;

import javax.persistence.Column;
import javax.persistence.Entity;
import javax.persistence.GeneratedValue;
import javax.persistence.GenerationType;
import javax.persistence.Id;
import javax.persistence.Table;

import lombok.Getter;
import lombok.Setter;

@Entity
@Getter
@Setter
@Table(name = "user")
public class UserEntity {

    @Id
    @Column(name = "id" )
    @GeneratedValue(strategy = GenerationType.IDENTITY)
    private long id;

    @Column(name = "firstname",length = 755)
    private String firstName;

    @Column(name = "lastname",length = 755)
    private String lastName;

    @Column(name = "email",length = 755)
    private String email;

    @Column(name = "phonenumber",length = 755)
    private String phoneNumber;

    @Column(name = "login",length = 755)
    private String login;

    @Column(name = "password",length = 755)
    private String Password;

    @Override
    public String toString() {
        return "UserEntity [id=" + id + ", firstName=" + firstName + ", lastName=" + lastName + ", email=" + email
                + ", phoneNumber=" + phoneNumber + ", login=" + login + ", Password=" + Password + "]";
    }


}
Define Controllers in Spring boot
Create a java class(WelcomeCtl .java), below welcome controller contains two methods DisplayMessage() and
package com.MedicalStore.ctl;

import org.springframework.beans.factory.annotation.Autowired;
import org.springframework.web.bind.annotation.RequestBody;
import org.springframework.web.bind.annotation.RequestMapping;
import org.springframework.web.bind.annotation.RequestParam;
import org.springframework.web.bind.annotation.RestController;

import com.MedicalStore.entity.UserEntity;
import com.MedicalStore.repository.UserRepository;

@RestController
public class WelcomeCtl {

    @Autowired
    private UserRepository userRepository;

    @RequestMapping("/welcome")
    public String DisaplayMessage(@RequestParam(value= "msg", required = true) String msg) {
        return msg;
    }


    @RequestMapping("/save")
    public UserEntity save(@RequestBody UserEntity user) {
        System.out.println(user);
        UserEntity save = userRepository.save(user);
        return save;
    }

}
Create Repository classes
Repository classes extend JAPRepository which contains the method to perform database transactions. We have to create an object of Datarepositroy that will be @Autowired as a reference.
package com.MedicalStore.repository;

import org.springframework.data.jpa.repository.JpaRepository;

import com.MedicalStore.entity.UserEntity;

public interface UserRepository extends JpaRepository<UserEntity, Long>{

}
Application file
this will be your mail file and work as a runner when we run this class as “Java Application” or “Spring boot app”. It will start the server.
package com.MedicalStore;

import org.springframework.boot.SpringApplication;
import org.springframework.boot.autoconfigure.SpringBootApplication;

@SpringBootApplication
public class MedicalStoreApplication {

    public static void main(String[] args) {
        SpringApplication.run(MedicalStoreApplication.class, args);
    }

}
Run the Spring boot application with the tomcat server. Create a request URL, with port number and request mapping.
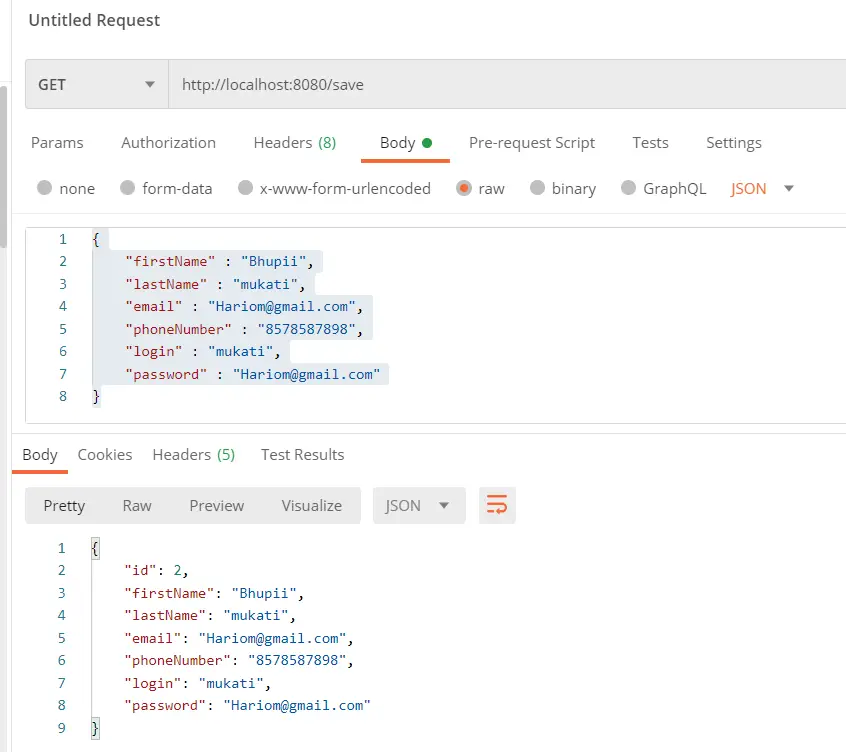
Send a Get Request from the postman
- Open postman and create a new request.
- Enter the URL “http://localhost:8080/save” and body data in JSON format.
{
    "firstName" : "Bhupii",
    "lastName" : "mukati",
    "email" : "Hariom@gmail.com",
    "phoneNumber" : "8578587898",
    "login" : "mukati",
    "password" : "Hariom@gmail.com"
}
- Send a get request from the postman
- Check the response.
- Refresh the database table and check data is inserted into the database.