In this tutorial, I will create a simple angularJS application to create a dynamic data table, where users can Add, Edit, Delete and Update the Table rows dynamically and the data will be displayed in the table view.
To create a dynamic table we simply need HTML, JSS, and CSS code for the same in AngularJS
Create a Dynamic Datatable into AngularJS
HTML Code
We created a Table with a header and a dynamic Table row with Fields using ng-repeat‘personalDetails’ is the object which has fname, lname & email
These headers and fields are also used to add or remove the rows and columns in the final output.
We create ng-submit (ng-submit=”addNew(personalDetails)”) to push the data to the object.
    <body ng-app="myapp" ng-controller="ListController">
    <div class="container">
        <div class="row">
            <div class="col-md-12">
                <div class="panel panel-default">
                    <div class="panel-body">
                        <form ng-submit="addNew()">
                            <table class="table table-striped table-bordered">
                                <thead>
                                    <tr>
                                        <th><input type="checkbox" ng-model="selectedAll" ng-click="checkAll()" /></th>
                                        <th>Firstname</th>
                                        <th>Lastname</th>
                                        <th>Email</th>
                                    </tr>
                                </thead>
                                <tbody>
                                    <tr ng-repeat="personalDetail in personalDetails">
                                        <td>
                                            <input type="checkbox" ng-model="personalDetail.selected"/></td>
                                        <td>
                                            <input type="text" class="form-control" ng-model="personalDetail.fname" required/></td>
                                        <td>
                                            <input type="text" class="form-control" ng-model="personalDetail.lname" required/></td>
                                        <td>
                                            <input type="email" class="form-control" ng-model="personalDetail.email" required/></td>
                                    </tr>
                                </tbody>
                            </table>
                            <div class="form-group">
                                <input ng-hide="!personalDetails.length" type="button" class="btn btn-danger pull-right" ng-click="remove()" value="Remove">
                                <input type="submit" class="btn btn-primary addnew pull-right" value="Add New">
                            </div>
                        </form>
                    </div>
                </div>
            </div>
        </div>
    </div>
</body>
JavaScript
$scope.personalDetails is the other type of object which stores all personal details like email age, gender and every type of personal information that a user wants to store. There are three functions $scope.addNew, $scope.remove and $scope.checkAll
which are used to add, remove or edit the fields according to the user’s choice.
var app = angular.module("myapp", []);
    app.controller("ListController", ['$scope', function($scope) {
        $scope.personalDetails = [
            {
                'fname':'khyati',
                'lname':'shankhwar',
                'email':'khyati@shankhwar.com'
            },
            {
                'fname':'sejal',
                'lname':'singh',
                'email':'sejal@singh.com'
            },
            {
                'fname':'nidhi',
                'lname':'singh',
                'email':'nidhi@singh.com'
            }];

            $scope.addNew = function(personalDetails){
                $scope.personalDetails.push({
                    'fname': personalDetails.fname,
                    'lname': personalDetails.lname,
                    'email': personalDetails.email,
                });
                $scope.PD = {};
            };

            $scope.remove = function(){
                var newDataList=[];
                $scope.selectedAll = false;
                angular.forEach($scope.personalDetails, function(selected){
                    if(!selected.selected){
                        newDataList.push(selected);
                    }
                });
                $scope.personalDetails = newDataList;
            };

            $scope.checkAll = function () {
                if (!$scope.selectedAll) {
                    $scope.selectedAll = true;
                } else {
                    $scope.selectedAll = false;
                }
                angular.forEach($scope.personalDetails, function (personalDetails) {
                    personalDetails.selected = $scope.selectedAll;
                });
            };
    }]);
CSS
We can modify the design of the interface as per our wish.
If you want to add a different font along with font size, background color, border size, and ratio, then you can edit them as well in the CSS code.
For the beginner purpose, we are using margin as 20px, right margin as 10px, and background color as white which is the default color in the interface.
.btn-primary{
    margin-right: 10px;
}
.container{
  margin: 20px 0;
}
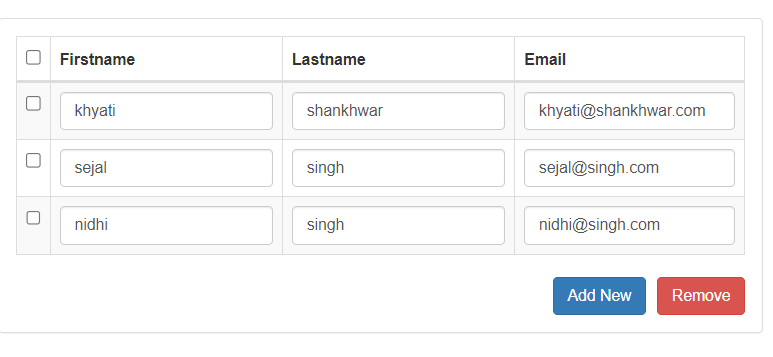
Output of the above coding
We can easily add or remove the data of any person according to our wish.