Now that we have covered all the basics of JavaScript, we will use its implementation in this tutorial in some good JavaScript Problems along with a brief use of HTML.
In this tutorial, we will create a dynamic table using JavaScript. Along with that, we will be implementing the JavaScript snippet inside an HTML body.
So before we jump into the actual code itself, we must get familiar with some HTML tags and elements and JavaScript Methods which we have already discussed in the previous HTML Tutorial and JavaScript Tutorial in detail.
HTML
<head> tag
- This head tag is the place where the metadata(data about the stored data of the document) is stored. It is the first element in an HTML document.
<body> tag
- This body tag is the place that is the core area of the HTML document.
- It includes the content of the page.
- It is used just once on an HTML page.
<h2> tag
- This h2 tag is the heading of the HTML page. The value 2 specifies the degree of heading.
- There can be multiple headings in one document of different degrees (from higher to lower). Eg: <h1>,<h2>,<h3>,<h4>, and so on.
<input> tag
- This input tag is the parent tag of the forms used in an HTML document.
- It can fetch and store diverse inputs.
- For example: <input type=”text” >, <input type=”password” >, <input type=”checkbox” >,<input type=”radio” >,<input type=”submit” >, and so on.
<button> tag
- This button tag specifies the clickable button in an HTML page with a particular attribute associated with it.
- There are a number of type attributes that the button tag can contain.
- For example: autofocus, form_id, name,value, and so on.
<p> tag
- This p tag is responsible for inserting a paragraph section in an HTML page.
<div> tag
- This div tag is used as a division in an HTML document.
- It can contain HTML elements that can be styled using CSS or integrated with functions using JavaScript in an HTML page.
<style> tag
- This style tag is used to contain or link CSS styling of the HTML page using attributes such as media, type, and scoped.
- It is usually placed inside the head element.
<small> tag
- This small tag is used to insert a hint or comment or side note which is not necessarily of use but can be helpful.
JavaScript
onclick event
- The onclick is an event handler in JavaScript which is used to perform a task when a user clicks the corresponding button on the page. We will understand the use of this event handler in the example given below.
function()
- A function is a block of code used to perform a logical task in a program that can be invoked multiple times after it is declared. We have already covered the function in detail in the JavaScript Functions tutorial.
document.getElementById()
- The document.getElementById() method in HTML DOM (Document Object Model), is the most common and easiest way of accessing the form elements in a HTML document.
The if Statement
- The if statement is used in JavaScript for decision making based on the evaluation of condition/s. We have already covered the if statement in detail in the JavaScript Flow Control Tutorial.
The for Loop
- The for loop is used to iterate a block of code multiple times as desired by the developer. We have already covered the for loop in detail in the JavaScript Flow Control Tutorial.
How to create dynamic table using JavaScript?
Code:
<!doctype html>
<html>
<head>
    <title>Create dynamic table in JavaScript</title>
    <style>

      .input{
          border:none;
          font-size:10px;
      }
      .input:focus{
          outline:none;
      }
    </style>

</head>
<body>
    <h2 style="text-align:left">Create dynamic table in JavaScript</h2>
    <input type="number" id='rows' placeholder="Enter rows">
    <input type="number" id='cols' placeholder="Enter cols">
    <button id='fetch'>Create</button>
    <p><small style='color:lightgray'>Note: If you leave the values blank, 10x10 table will be created by default.</small></p>
    <div id='container'></div>
    <script type="text/javascript">
      document.getElementById('fetch').onclick=function(){
          var rows=document.getElementById('rows').value
          var cols=document.getElementById('cols').value
          if(rows=="" || rows==null)
          rows=10
          if(cols=="" || cols==null)
          cols=10
          var output='<table border="2" cellspacing="1" cellpadding="8" class="table">'

          function createTable(rows,cols){
              for(var i=1;i<=rows;i++){
                  output=output+'<tr>'
                  for(var j=1;j<=cols;j++){
                      output=output+'<td>'+'<input class="input" type="text" placeholder="input data">'+'</td>'
                  }
                  output=output+'</tr>'
              }
              output=output+'</table>'
              document.getElementById('container').innerHTML=output
         }
         createTable(rows,cols)
      }

    </script>
</body>
</html>
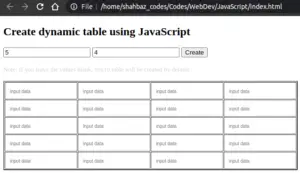
Output:
Explanation:
The HTML Markup
- In line 4, first we will write the HTML code for the title of the HTML page using <title> tag inside.
- From 5 to 14, we styled the input cell border using <style> tag with attributes like border, outline, and font-size.
- In line 18, we have used the <h2> tag for writing the heading Create dynamic table using JavaScript.
- In <h2> tag, we have styled using the text-align:left to place the heading on the left side of the HTML page.
- In line 21, we have used <button> tag to submit input from the user using the id=’fetch’ attribute.
- Also, we will put a text Create to be displayed on the button on the HTML page.
- In line 22, we have used <p> tag for inserting a paragraph in the body with <small> tag to display a note to the user.
- The note will be useful to inform the user that in case no values are entered, the HTML page will create a 10×10 table by default.
- In line 23, we have used the <div> tag to integrate the JavaScript function in it to generate table.
- In <div> tag, we have used id=’container’ attribute that will contain the entered value by the user as input.
The JavaScript Manipulation
- In line 25, we have used document.getElementById() method which returns the input element object with ID ‘fetch’. So, we can now access the input elements.
- Also, we have used onlick event handler with the getElementById() method to call the JavaScript function.
- In line 26 and 27, variables rows and cols are defined and values fetched from the user input is assigned in them respectively using getElementById().value to generate the dynamic table further.
- From line 28 to 31, we used the if statement to make sure that if no values are entered, then by default the values of both rows and cols will be equal to 10.
- In line 32, we defined a variable output and assigned a table to it.
- Also, in line 32, we styled the table using some attributes like border, cellspacing, and cellpadding.
- Now, in line 34, we will finally create a JavaScript function createTable() with parameters rows and cols.
- In line 35, inside the function, we will create a for loop for rows of the table.
- In line 36, inside the first for loop, between each iteration, the output will generate rows for row elements using <tr>.
- In line 37, inside the first for loop, we will create another for loop for columns in each row.
- In line 38, inside the column loop, between each iteration, the output will generate columns in each row and store data using <td>, and also take data input from the user using <input> with type attribute stating a text input data.
- After the loops are closed, the output is updated each time in line 40 and line 42.
- In line 43, we will update the ID ‘container’ using the output from the function.
- In line 45, we finally call the createTable() function.
There are many different approaches for creating a dynamic table using JavaScript. In the next example, we will create a dynamic table using ArrayList in JavaScript.
