In this article, we will look at a simple example to demonstrate the use of the JSP page in the Spring Boot application.
JSP is Java Server Pages which is used to create dynamic web pages by inserting Java code into HTML pages by making use of Special JSP tags. If you want to know what is JSP check this tutorial Introduction of JSP in Java.
Example to add JSP page in Spring Boot
Step 1: Open IDE STS- Spring Tool Suite
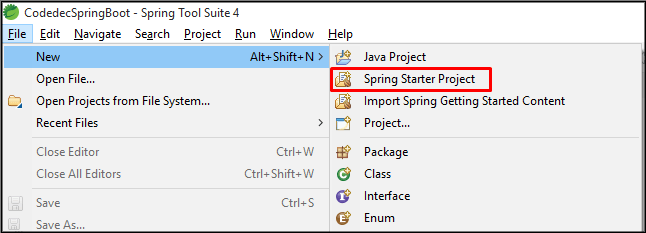
Step 2: Go to File > Spring Starter Project.
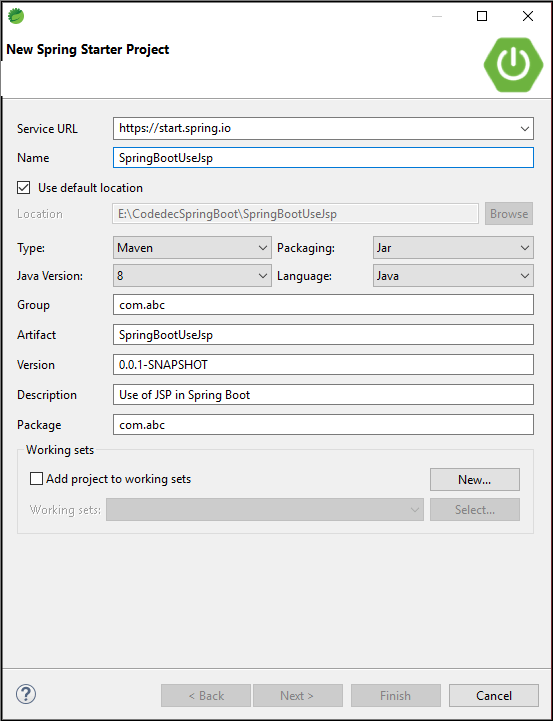
Step 3: Now, Fill all the fields as shown below and click Next.
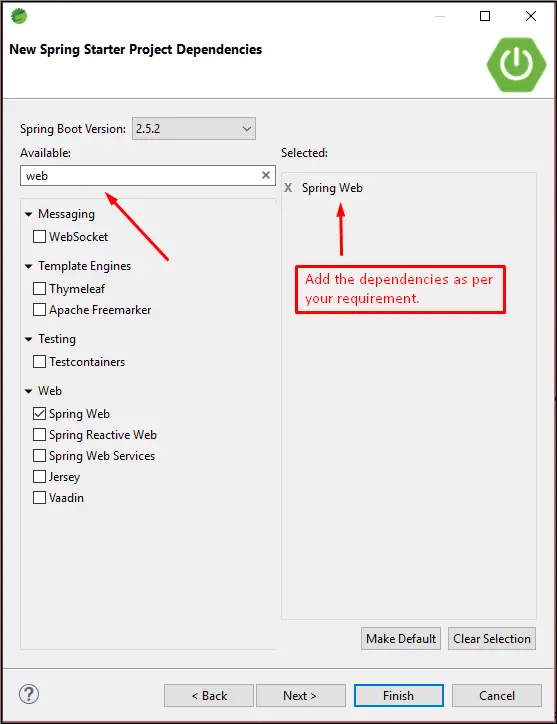
Step 4: Now, Add the dependencies as per your requirement, I have added Spring Web Dependency and click Next > Finish.
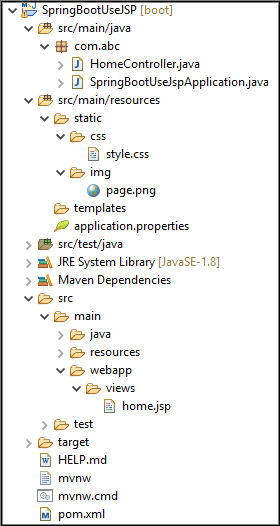
Step 5: Now, It will take time to load the project. Now, create the folder webapp folder in src/main and add a view folder in webapp. Add a JSP page inside src/main/webapp/view folder.
Step 6: Add the static resources such as CSS & image folder inside src/main/resources/static.
Step 7: Create a HomeController inside the com. abc package which will act as a request handler. See the following project structure:
Step 8: Now, Here the important part is to enable JSP with Spring boot you have to add the tomcat-embed-jasper dependency which is JSP Engine in Tomcat.
<dependencies>
    <dependency>
      <groupId>org.springframework.boot</groupId>
      <artifactId>spring-boot-starter-web</artifactId>
    </dependency>

    <dependency>
      <groupId>org.springframework.boot</groupId>
      <artifactId>spring-boot-starter-test</artifactId>
      <scope>test</scope>
    </dependency>
     <!-- JSTL for JSP -->
        <dependency>
            <groupId>javax.servlet</groupId>
            <artifactId>jstl</artifactId>
        </dependency>

        <!-- Need this to compile JSP -->
        <dependency>
            <groupId>org.apache.tomcat.embed</groupId>
            <artifactId>tomcat-embed-jasper</artifactId>
            <scope>provided</scope>
        </dependency>

  </dependencies>
Step 9: As we know, in Spring MVC, we need lots of configurations to resolve JSP pages. In Spring boot, lots of configurations are automatically done for you. So here just add the prefix and suffix in the application. properties.
server.port= 8888
spring.mvc.view.prefix=/views/
spring.mvc.view.suffix=.jsp
Step 10: Create a method home() that will return the String home which is the name of your JSP file.
package com.abc;

import org.springframework.stereotype.Controller;
import org.springframework.web.bind.annotation.RequestMapping;

@Controller
public class HomeController {
  @RequestMapping("/")
  public String home() {
    return "home";
  }

}
- @Controller is a specialization of @Component which helps you to auto-detect classes through classpath scanning.
- @RequestMapping is used to map the request to the particular handler classes or handler method.
Step 11: Create a home. jsp page inside the views folder.
<%@ page language="java" contentType="text/html; charset=ISO-8859-1"
  pageEncoding="ISO-8859-1"%>
<%@ taglib prefix="spring" uri="http://www.springframework.org/tags"%>
<%@ taglib prefix="c" uri="http://java.sun.com/jsp/jstl/core"%>
<!DOCTYPE html>
<html>
<head>
<meta charset="ISO-8859-1">
<!-- Bootstrap CDN -->
<link
  href="https://cdn.jsdelivr.net/npm/bootstrap@5.0.2/dist/css/bootstrap.min.css"
  rel="stylesheet"
  integrity="sha384-EVSTQN3/azprG1Anm3QDgpJLIm9Nao0Yz1ztcQTwFspd3yD65VohhpuuCOmLASjC"
  crossorigin="anonymous">
<script
  src="https://cdn.jsdelivr.net/npm/bootstrap@5.0.2/dist/js/bootstrap.bundle.min.js"
  integrity="sha384-MrcW6ZMFYlzcLA8Nl+NtUVF0sA7MsXsP1UyJoMp4YLEuNSfAP+JcXn/tWtIaxVXM"
  crossorigin="anonymous"></script>
<!-- Access the style.css -->
<c:url value="/css/style.css" var="pageCSS" />
<link href="${pageCSS}" rel="stylesheet">
<link>
<title>JSP in Spring Boot</title>
</head>
<body>
  <!-- Adding Bootstarp Navbar -->
  <!-- Navbar starts here -->
  <nav class="navbar navbar-expand-lg navbar-dark bg-success">
    <div class="container-fluid">
      <a class="navbar-brand" href="#">Codedec</a>
      <button class="navbar-toggler" type="button"
        data-bs-toggle="collapse" data-bs-target="#navbarSupportedContent"
        aria-controls="navbarSupportedContent" aria-expanded="false"
        aria-label="Toggle navigation">
        <span class="navbar-toggler-icon"></span>
      </button>
      <div class="collapse navbar-collapse" id="navbarSupportedContent">
        <ul class="navbar-nav me-auto mb-2 mb-lg-0">
          <li class="nav-item"><a class="nav-link active"
            aria-current="page" href="#">Spring Boot</a></li>
          <li class="nav-item"><a class="nav-link active" href="#">Spring
              Security</a></li>

        </ul>
        <ul class="navbar-nav navbar-right">
          <li class="nav-item"><a class="nav-link active"
            aria-current="page" href="#">Hey !</a></li>
        </ul>
      </div>
    </div>
  </nav>
  <!-- Navbar end here -->

  <div class="container mt-5">
    <div class="container">
      <div class="row">
        <div class="col-sm-4">
          <h1>Spring Boot</h1>
          <h3>- adding JSP View</h3>
          <h3>- adding Static Resources</h3>


        </div>
        <div class="col-sm-8">
          <!-- Adding static Image -->
          <img alt="Not found" src="/img/page.png">
        </div>

      </div>
    </div>

  </div>
</body>
</html>
Step 12: Include static resources such as CSS/Images add them inside the src/main/resources/static folder.
style.css
@charset "ISO-8859-1";
body{
  background: #f0f4c3;
}
h1{
  color: #558b2f;
}
h3{
  color: black;
}
Step 13: Run the SpringBootUseJspApplication file.
package com.abc;

import org.springframework.boot.SpringApplication;
import org.springframework.boot.autoconfigure.SpringBootApplication;

@SpringBootApplication
public class SpringBootUseJspApplication {

  public static void main(String[] args) {
    SpringApplication.run(SpringBootUseJspApplication.class, args);
  }

}
Step 14: If everything goes well, then go to localhost:8888/ and see the following output.
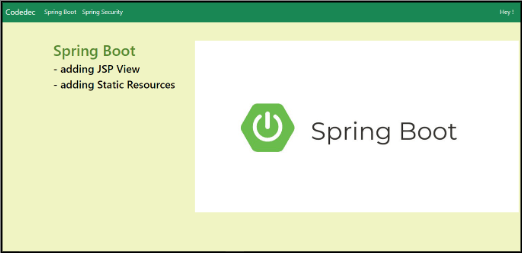
In this way, we add JSP and static resources inside the Spring boot app.