In the Java programming language, till now we have created so many applications whether it is a console application or a web-based application. Sometimes or maybe quite a number of times you must have encountered that you have to write the same code again and again i.e nothing but the boiler code.
Boilers code are nothing but the code which is often repeated many times such as getters and setters, equals(), toString(), etc. A popular programming language such as Kotlin, Scala which are similar to Java doesn’t need this code which is why these languages are famous. So, in order to make Java overcome this drawback, Lombok was introduced.
Introduction to Lombok
Project Lombak is the Java library tool that is created to remove boilerplate code and save the developers time during development. This library replaces the boilerplate code with easy-to-use annotations.
Consider as a developer you are creating POJO(Plain Old Java Objects) classes. Here, you have to write the fields, its setters and getters its toString() method also which just increases the Lines of code in your program. But if we use the Lombok library tool it will replace all these codes with annotation and hence will save space and increase readability.
Now, there might be the question here that while using IDE’s it is easy to generate these boilerplate codes, so why one will use Lombok? The answer here is yes, IDE’s will generate the code but it will be present in your source code but if we use the Lombok Library tool, all the boilerplates codes will be available at compile time.
Let us see How to configure Project Lombok in your IDE’s.
How to configure Lombok into Eclipse IDE?
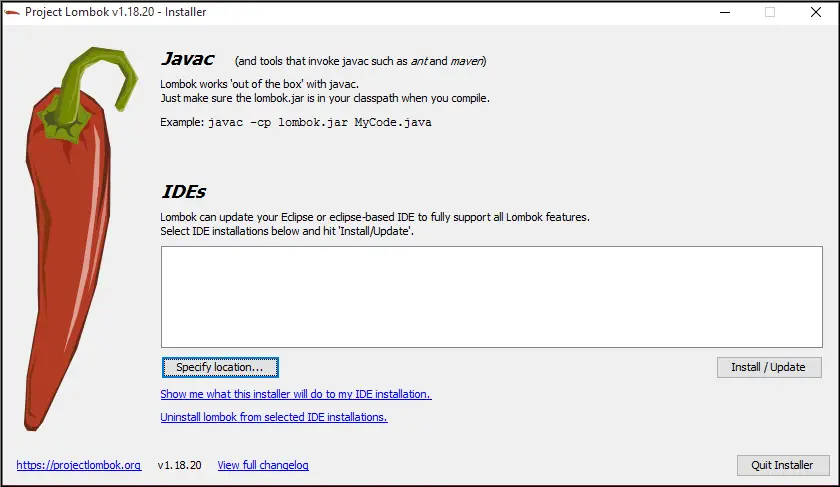
- Go to https://projectlombok.org/download and download the Jar file.
- Go to the location where your jar file is downloaded. Double click on it. Now, it shows you the following screen.
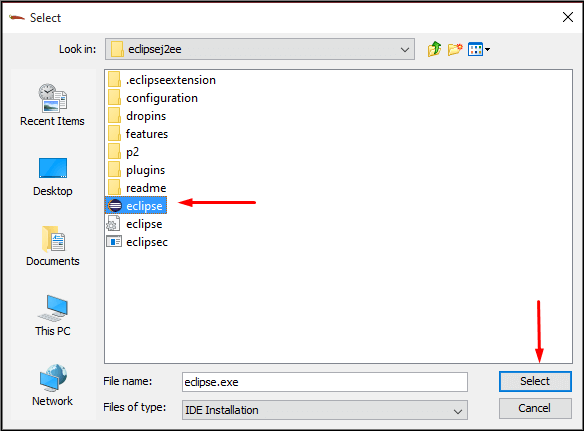
3. Click on the Specify Location and select the eclipse.exe file as shown below.
4. Now, click on install to start the installation process and at last click on quit installer.
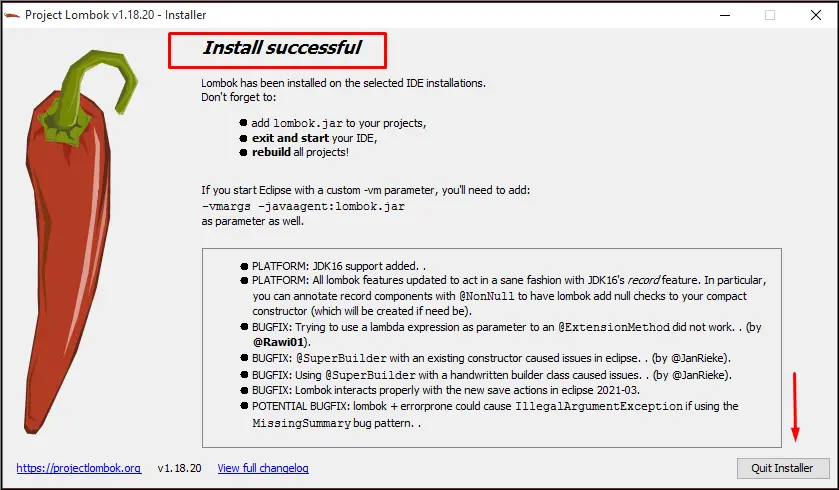
Thus, this is a quick and easy way to configure Lombok in your IDE. Now, let us look at the annotation in the Lombok library.
Lombok Annotation
Lombok annotations are pretty straight forward i.e we can understand by seeing the name only. So, let us see the annotations list.
- @Setters and @Getters: These annotations are used to generate setters and getters. It can be applied on the fields as well as on the class level.
import lombok.Getter;
import lombok.Setter;

public class Person {

  private @Getter @Setter int personId;
  private @Getter @Setter String personName;
  private @Getter @Setter String personAddr;
  private @Getter @Setter String personAge;

  public static void main(String[] args) {
    Person person = new Person();
    person.setPersonId(1);
    person.setPersonName("Hey! I am using Lombok Library Tool");
    System.out.println("Person Id: "+person.getPersonId()+
        "\nPerson Name: "+person.getPersonName());
  }
}
2. @NoArgsConstructor: This annotation is used to generate a constructor with no argument i.e default constructor.
import lombok.NoArgsConstructor;

@NoArgsConstructor
public class Person {

  private int personId;
  private String personName;
  private String personAddr;
  private String personAge;

  public static void main(String[] args) {
    Person person = new Person();
    System.out.println("Using Lombok Annotation");

  }
}
3. @AllArgsConstructor: This annotation is used to generate parameterized constructor.
import lombok.AllArgsConstructor;

@AllArgsConstructor
public class Person {

  private int personId;
  private String personName;
  private String personAddr;
  private String personAge;

  public static void main(String[] args) {
    Person person = new Person(1,"A","abc","55");
    System.out.println("Using Lombok Annotation");

  }
}
4. @ToString(): This annotation is used to override the toString() method of the Object class and generates a default implementation of it.
import lombok.ToString;

@ToString
public class Person {

  private int personId;
  private String personName;
  private String personAddr;
  private String personAge;

  public static void main(String[] args) {
    Person person = new Person();
    System.out.println("Using Lombok Annotation");

  }
}
5. @EqualsAndHashCode: This annotation is used to override the equals() and hashCode() method and generate a default implementation of it.
import lombok.EqualsAndHashCode;

@EqualsAndHashCode
public class Person {

  private int personId;
  private String personName;
  private String personAddr;
  private String personAge;

  public static void main(String[] args) {
    Person person = new Person();
    System.out.println("Using Lombok Annotation");

  }
}
6. @Data: This annotation is the combination of @Setter, @Getter, @EqualsAndHashCode, @RequiredArgsConstructor, and @ToString annotations.
import lombok.Data;

@Data
public class Person {

  private int personId;
  private String personName;
  private String personAddr;
  private String personAge;

  public static void main(String[] args) {
    Person person = new Person();
    System.out.println("Using Lombok Annotation");

  }
}
Following is the image of code that demonstrates the use of all Lombok annotations also the code is written below the image.
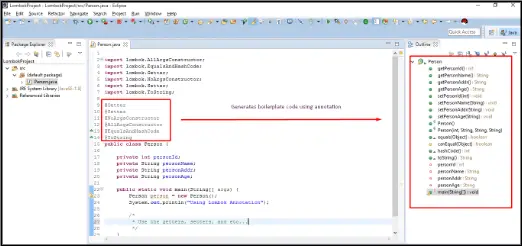
Person.java
import lombok.AllArgsConstructor;
import lombok.EqualsAndHashCode;
import lombok.Getter;
import lombok.NoArgsConstructor;
import lombok.Setter;
import lombok.ToString;

@Getter
@Setter
@NoArgsConstructor
@AllArgsConstructor
@EqualsAndHashCode
@ToString
public class Person {

  private int personId;
  private String personName;
  private String personAddr;
  private String personAge;

  public static void main(String[] args) {
    Person person = new Person();
    System.out.println("Using Lombok Annotation");

    /*
     * Use the getters, setters, and etc...
     */
  }
}
Thus, this was all about the Lombok Library Tool which you as a developer can use to avoid boilerplate code.
Note: In the case of your IDE, the Lombok is not working(means the annotation is not coming), So you need to add the Jar into the classpath.