In the previous article, we have seen how to get data from the form using @RequestParam Annotation you can check it here How to get form data in Spring MVC with RequestParam. In this article, we will understand How to handle forms using Spring MVC Form Tag Library.
The Views which are most often used with Spring technologies are Java Server Pages(JSP). Spring Framework provides us with some Tag Library to use on JSPs pages.
The advantage of using Tag Library is it automatically sets and gets data to the Java Bean object. So, we don’t have to set and get the data. This makes it easy to use.
How to configure Form-Tag Library?
The form tag is present in the spring-webmvc.jar file. The following directive you have to add to the JSP page to enable.
<%@ taglib prefix="f" uri="http://www.springframework.org/tags/form"%>
As we know, while creating any normal form we have to use the input field, check box, dropdown and etc. Here, spring provides everything inside this form-tag library. Let us see one by one
Form Tag |
Description |
| f: form | It contains all other form tags. |
| f: input | It is like the input tag of HTML and uses for the text fields. |
| f: radiobutton | It is used for radio buttons |
| f: checkbox | It is used for checkboxes value |
| f: password | It is used for the password input field |
| f: select | It is used for drop-down list |
| f: textarea | It is used for multiline text field |
| f: hidden | It is used for hidden input field |
Form Tag
The Form Tag is the parent tag of all the tags. It contains the action, methods, and modelAttribute. Here, in modelAttribute is the name of the model attribute under which the form object is exposed.
<f:form action="form" modelAttribute="student" method="post">
Text Field Tag
The Text field tag is like the input tag of HTML which accepts text value.
<f:input path="name" />
Note: The path here indicates the attribute which binds the form field to the bean property. i.e both the name of the path in form, as well as the bean property, should be the same.
Radio Button Tag
This tag works in a similar way as Radio Buttons where we can select only one option at a time.
Male <f:radiobutton path="gender" value="male" />
Female <f:radiobutton path="gender" value="female" />
Check Box Tag
This tag selects multiple options at the same time.
C <f:checkbox path="skills" value="C" />
C++<f:checkbox path="skills" value="C++" />
Mysql <f:checkbox path="skills" value="Mysql" />
Select Tag
This tag is used for drop-down values.
<f:select path="course">
  <f:option value="Java" label="Java" />
  <f:option value="SQL" label="SQL" />
  <f:option value="Python" label="Python" />
</f:select>
In order to start with the Example, we will first understand the @ModelAttribute Annotation
@ModelAttribute is an annotation that binds a method parameter or return value to a named model attribute and then it exposes itself to view.
Example of Form Handling/Processing in Spring MVC
.Create a Spring Project Go to File> New > Other > Search maven > Select Maven Project > Next > Search Filter org.apche.maven.archetypes/webapp > Next > Enter Group Id & Archetype id > Finish.
Now, Create a pom.xml file to add all the dependencies needed for Spring MVC Configuration
<project xmlns="http://maven.apache.org/POM/4.0.0"
  xmlns:xsi="http://www.w3.org/2001/XMLSchema-instance"
  xsi:schemaLocation="http://maven.apache.org/POM/4.0.0 http://maven.apache.org/maven-v4_0_0.xsd">
  <modelVersion>4.0.0</modelVersion>
  <groupId>co</groupId>
  <artifactId>SpringMVCExample</artifactId>
  <packaging>war</packaging>
  <version>0.0.1-SNAPSHOT</version>
  <name>SpringMVCExample Maven Webapp</name>
  <url>http://maven.apache.org</url>
  <dependencies>
    <dependency>
      <groupId>junit</groupId>
      <artifactId>junit</artifactId>
      <version>3.8.1</version>
      <scope>test</scope>
    </dependency>
    <!-- https://mvnrepository.com/artifact/org.springframework/spring-context -->
    <dependency>
      <groupId>org.springframework</groupId>
      <artifactId>spring-context</artifactId>
      <version>5.3.5</version>
    </dependency>
    <!-- https://mvnrepository.com/artifact/org.springframework/spring-web -->
    <dependency>
      <groupId>org.springframework</groupId>
      <artifactId>spring-web</artifactId>
      <version>5.3.5</version>
    </dependency>
    <!-- https://mvnrepository.com/artifact/org.springframework/spring-core -->
    <dependency>
      <groupId>org.springframework</groupId>
      <artifactId>spring-core</artifactId>
      <version>5.3.5</version>
    </dependency>
    <!-- https://mvnrepository.com/artifact/org.springframework/spring-beans -->
    <dependency>
      <groupId>org.springframework</groupId>
      <artifactId>spring-beans</artifactId>
      <version>5.3.5</version>
    </dependency>
    <!-- https://mvnrepository.com/artifact/javax.servlet/jstl -->
    <dependency>
      <groupId>javax.servlet</groupId>
      <artifactId>jstl</artifactId>
      <version>1.2</version>
    </dependency>

    <!-- https://mvnrepository.com/artifact/javax.servlet.jsp/javax.servlet.jsp-api -->
    <dependency>
      <groupId>javax.servlet.jsp</groupId>
      <artifactId>javax.servlet.jsp-api</artifactId>
      <version>2.3.3</version>
      <scope>provided</scope>
    </dependency>
    <!-- https://mvnrepository.com/artifact/javax.servlet/javax.servlet-api -->
    <dependency>
      <groupId>javax.servlet</groupId>
      <artifactId>javax.servlet-api</artifactId>
      <version>4.0.1</version>
      <scope>provided</scope>
    </dependency>
    <!-- https://mvnrepository.com/artifact/org.springframework/spring-webmvc -->
    <dependency>
      <groupId>org.springframework</groupId>
      <artifactId>spring-webmvc</artifactId>
      <version>5.3.5</version>
    </dependency>
  </dependencies>
  <build>
    <finalName>SpringMVCExample</finalName>
  </build>
</project>
Create a Spring-servlet.xml file. As we are building a Spring MVC application so we will need to store spring-related information in a file. So, it provides a file called [anyName]-servlet.xml. It contains information on configuration.
- Here, we have used <context:component-scan> detects the annotation by package scanning.
- It tells Spring to scan which package to search for Controller, Beans, or any component.
- @Component, @Controller, @Repository, @Service, @Service, and etc. are ones that <context:component-scan> can detect.
- To resolves views such as JSP, we have used InternalResourceViewResolver.
<?xml version="1.0" encoding="UTF-8"?>
<beans xmlns="http://www.springframework.org/schema/beans"
   xmlns:context="http://www.springframework.org/schema/context"
   xmlns:xsi="http://www.w3.org/2001/XMLSchema-instance"
   xsi:schemaLocation="
   http://www.springframework.org/schema/beans
   http://www.springframework.org/schema/beans/spring-beans.xsd
   http://www.springframework.org/schema/context
   http://www.springframework.org/schema/context/spring-context.xsd">

   <!--  component scan -->
   <context:component-scan base-package="org.mvc.controller"></context:component-scan>


  <bean class="org.springframework.web.servlet.view.InternalResourceViewResolver">
  <property name="prefix" value="/WEB-INF/views/" />
      <property name="suffix" value=".jsp" />
  </bean>
   </beans>
Create a Student bean Class- Student.java
package org.mvc.controller;

import java.util.List;

public class Student {

  private String name;
  private String gender;
  private String course;
  private List<String> skills;

  public String getName() {
    return name;
  }

  public void setName(String name) {
    this.name = name;
  }

  public String getGender() {
    return gender;
  }

  public void setGender(String gender) {
    this.gender = gender;
  }

  public String getCourse() {
    return course;
  }

  public void setCourse(String course) {
    this.course = course;
  }

  public List<String> getSkills() {
    return skills;
  }

  public void setSkills(List<String> skills) {
    this.skills = skills;
  }

  @Override
  public String toString() {
    return "Student [name=" + name + ", gender=" + gender + ", course=" + course + ", skills=" + skills + "]";
  }

}
Now, Create a Controller. The DispatcherServlet on receiving the request transfer the request to the controller.
- The @Controller here defines the class as Controller in SpringMVC.
- The @RequestMapping is used to map the URL. Here, it is ‘/’ means all the requests for this will be handled by this home() method. Inside home() method, created the object of Student Bean and passed to the view.
- Here, we have returned the “index” Page.
- Also created submitform() method with URL ‘/form’ means every request for ‘/form’ will go to this method.
package org.mvc.controller;

import org.springframework.stereotype.Controller;
import org.springframework.ui.Model;
import org.springframework.web.bind.annotation.ModelAttribute;
import org.springframework.web.bind.annotation.RequestMapping;
import org.springframework.web.bind.annotation.RequestParam;
import org.springframework.web.servlet.ModelAndView;

@Controller
public class HomeController {

  @RequestMapping("/")
  public String home(Model m) {
    Student student = new Student();
    m.addAttribute("student", student);
    return "index";
  }

  @RequestMapping("/form")
  public String form(@ModelAttribute("student") Student student, Model m) {
    System.out.println(student);
    return "result";

  }
}
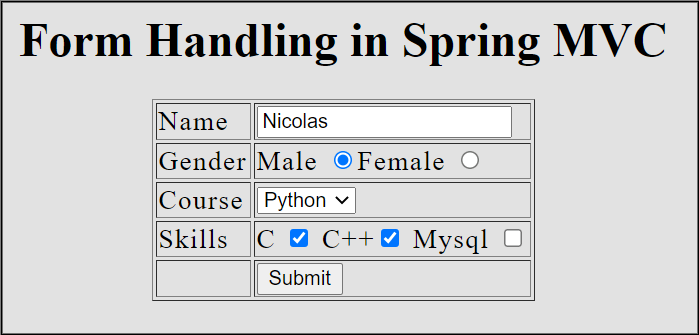
Create an index.jsp and result.jsp to display form and its information
<%@ taglib prefix="c" uri="http://java.sun.com/jstl/core" %>
<%@ taglib prefix="f" uri="http://www.springframework.org/tags/form"%>
<html>
<head>
<title>Spring MVC</title>
</head>
<body style="background-color: #e2e2e2">
  <h1 align="center">Form Handling in Spring MVC</h1>
  <f:form action="form" modelAttribute="student" method="post">
    <table   border="1" style="align-items: center;font-size: large; letter-spacing: 1px;  text-decoration: inherit; " align="center" >
      <tr >
        <td >Name</td>
        <td><f:input path="name" /></td>
      </tr>
      <tr>
        <td>Gender</td>
        <td>Male <f:radiobutton path="gender" value="male" />Female <f:radiobutton
            path="gender" value="female" /></td>
      </tr>
      <tr>
        <td>Course</td>
        <td><f:select path="course">
            <f:option value="Java" label="Java" />
            <f:option value="SQL" label="SQL" />
            <f:option value="Python" label="Python" />
          </f:select></td>
      </tr>
      <tr>
        <td>Skills</td>
        <td>C <f:checkbox path="skills" value="C" /> C++<f:checkbox
            path="skills" value="C++" /> Mysql <f:checkbox path="skills"
            value="Mysql" />
        </td>
      </tr>
      <tr>
        <td></td>
        <td><input type="submit" value="Submit"></td>
      </tr>
    </table>
  </f:form>
</body>
</html>
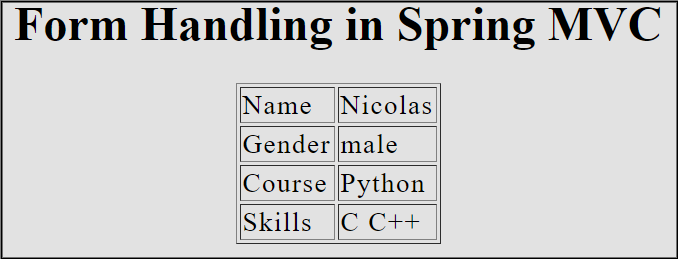
result.jsp
<%@ taglib prefix="c" uri="http://java.sun.com/jstl/core" %>
<%@ taglib prefix="f" uri="http://www.springframework.org/tags/form"%>
<html>
<head>
<title>Spring MVC</title>
</head>
<body  style="background-color: #e2e2e2">
  <h1 align="center">Form Handling in Spring MVC</h1>
    <table border="1"  style="align-items: center;font-size: large; letter-spacing: 1px;  text-decoration: inherit; " align="center" >
      <tr>
        <td>Name</td>
        <td><c:out value="${student.name }"/></td>
      </tr>
      <tr>
        <td>Gender</td>
        <td><c:out value="${student.gender }"/></td>
      </tr>
      <tr>
        <td>Course</td>
        <td><c:out value="${student.course }"/></td>
      </tr>
      <tr>
        <td>Skills</td>
        <td><c:forEach var="s" items="${student.skills }">
        <c:out value="${s}"/>
        </c:forEach>
        </td>
      </tr>

    </table>

</body>
</html>
Now, Deploy your application over the server and see the following output.
In this way, we handle forms in Spring MVC using the Form Tag Library. In the next article of this tutorial, we will create an MVC CRUD Example.