Forms are the entry gate of any application. So it’s really important to add some validation checks on the input fields. In this tutorial, We will see how to create forms in Django and how to validate forms in Django.
What is Form validation
Form validation is the main reason that any developer has to use Forms for. The basic security principle of any computer application is “do not trust the user input”.
That could be because the user passes in malicious data to compromise the application or the user has made a mistake in providing the needed data which in turn, unintentionally, breaks our application.
Whatever the case, every piece of user input has to be validated to keep our application secure and un-compromised.
Django validates a form when we run the is_valid() method and the validated data is placed in the cleaned_data attribute of the form. A coding example will clear all of our doubts caused by vague English statements.
At first, you
How to Create forms in Django
need to open your command prompt and type the following:
C:\Users\hp>django-admin startproject Registration
C:\Users\hp>cd Registation
Here, we have used the name of our project as Registration. You can choose whichever name you want.
Now, type:
C:\Users\hp\Registration>python manage.py runserver
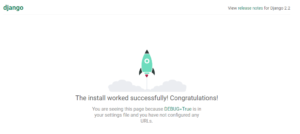
You should get the above screen which signifies that your project is working perfectly.
Now, you need to create your application. Here, we are using our application name as Regapp, you can opt for any name.
C:\Users\hp\Registration>django-admin startapp Regapp
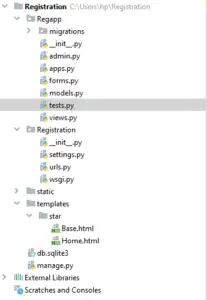
Now, open Pycharm(or any ide of your choice) and open “Registration”. Create a directory templates which will have a star director inside which we will have Base.html and Home.html. Similarly, create another static directory which will have style.css file.
Your tree should look like this:
Validate Forms in Django
Registration\Registration\settings.py
"""
Django settings for Registration project.

Generated by 'django-admin startproject' using Django 2.2.

For more information on this file, see
https://docs.djangoproject.com/en/2.2/topics/settings/

For the full list of settings and their values, see
https://docs.djangoproject.com/en/2.2/ref/settings/
"""

import os

# Build paths inside the project like this: os.path.join(BASE_DIR, ...)
BASE_DIR = os.path.dirname(os.path.dirname(os.path.abspath(__file__)))
TEMPLATE_DIR = os.path.join(BASE_DIR,'templates')
STATIC_DIR = os.path.join(BASE_DIR,'static')
# Quick-start development settings - unsuitable for production
# See https://docs.djangoproject.com/en/2.2/howto/deployment/checklist/

# SECURITY WARNING: keep the secret key used in production secret!
SECRET_KEY = ''
# SECURITY WARNING: don't run with debug turned on in production!
DEBUG = True

ALLOWED_HOSTS = []


# Application definition

INSTALLED_APPS = [
    'django.contrib.admin',
    'django.contrib.auth',
    'django.contrib.contenttypes',
    'django.contrib.sessions',
    'django.contrib.messages',
    'django.contrib.staticfiles',
    'Regapp',
]

MIDDLEWARE = [
    'django.middleware.security.SecurityMiddleware',
    'django.contrib.sessions.middleware.SessionMiddleware',
    'django.middleware.common.CommonMiddleware',
    'django.middleware.csrf.CsrfViewMiddleware',
    'django.contrib.auth.middleware.AuthenticationMiddleware',
    'django.contrib.messages.middleware.MessageMiddleware',
    'django.middleware.clickjacking.XFrameOptionsMiddleware',
]

ROOT_URLCONF = 'Registration.urls'

TEMPLATES = [
    {
        'BACKEND': 'django.template.backends.django.DjangoTemplates',
        'DIRS': [TEMPLATE_DIR,],
        'APP_DIRS': True,
        'OPTIONS': {
            'context_processors': [
                'django.template.context_processors.debug',
                'django.template.context_processors.request',
                'django.contrib.auth.context_processors.auth',
                'django.contrib.messages.context_processors.messages',
            ],
        },
    },
]

WSGI_APPLICATION = 'Registration.wsgi.application'


# Database
# https://docs.djangoproject.com/en/2.2/ref/settings/#databases

DATABASES = {
    'default': {
        'ENGINE': 'django.db.backends.sqlite3',
        'NAME': os.path.join(BASE_DIR, 'db.sqlite3'),
    }
}


# Password validation
# https://docs.djangoproject.com/en/2.2/ref/settings/#auth-password-validators

AUTH_PASSWORD_VALIDATORS = [
    {
        'NAME': 'django.contrib.auth.password_validation.UserAttributeSimilarityValidator',
    },
    {
        'NAME': 'django.contrib.auth.password_validation.MinimumLengthValidator',
    },
    {
        'NAME': 'django.contrib.auth.password_validation.CommonPasswordValidator',
    },
    {
        'NAME': 'django.contrib.auth.password_validation.NumericPasswordValidator',
    },
]


# Internationalization
# https://docs.djangoproject.com/en/2.2/topics/i18n/

LANGUAGE_CODE = 'en-us'

TIME_ZONE = 'UTC'

USE_I18N = True

USE_L10N = True

USE_TZ = True


# Static files (CSS, JavaScript, Images)
# https://docs.djangoproject.com/en/2.2/howto/static-files/

STATIC_URL = '/static/'
STATICFILES_DIR = [
    STATIC_DIR,
]
Registration\Registration\urls.py
"""Registration URL Configuration

The `urlpatterns` list routes URLs to views. For more information please see:
    https://docs.djangoproject.com/en/2.2/topics/http/urls/
Examples:
Function views
    1. Add an import:  from my_app import views
    2. Add a URL to urlpatterns:  path('', views.home, name='home')
Class-based views
    1. Add an import:  from other_app.views import Home
    2. Add a URL to urlpatterns:  path('', Home.as_view(), name='home')
Including another URLconf
    1. Import the include() function: from django.urls import include, path
    2. Add a URL to urlpatterns:  path('blog/', include('blog.urls'))
"""
from django.contrib import admin
from django.urls import path
from Regapp import views
urlpatterns = [
    path('admin/', admin.site.urls),
    path('',views.form_view),
]
No changes required in Registration\Registration\__init__.py and Registration\Registration\wsgi.py. Leave it as it is.
In Registration\Regapp\models.py write the following code:
from django.db import models

class Student(models.Model):
    No = models.IntegerField()
    Name = models.CharField(max_length=25)
    Age = models.IntegerField()
    Mob = models.IntegerField()
    Add = models.CharField(max_length=64)
After the changes in models.py, we need to make changes in migrations and also add superuser.
To make changes in migrations, run the following code:
C:\Users\hp\Registration>python manage.py makemigrations
You will get the output like:
Migrations for 'Regapp':
  Regapp\migrations\0001_initial.py
    - Create model Student
now type:
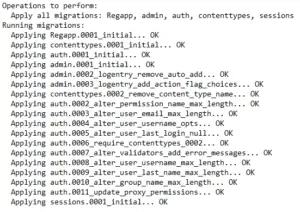
C:\Users\hp\Registration>python manage.py migrate
You should get like this:
Run the server and check whether Student table is created or not. On running the server you should get like this:
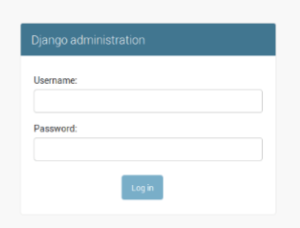
Hence, now we need to create a superuser so that we can login in our application. To create a superuser:
C:\Users\hp\Registration>python manage.py createsuperuser
It will ask for the following details:
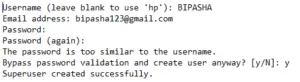
On running your server and entering your details, you should get like this:
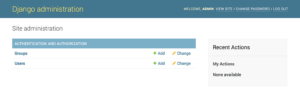
Now we need to make change in Registration\Regapp\admin.py accordingly:
from django.contrib import admin
from Regapp.models import Student

class StudentAdmin(admin.ModelAdmin):
    list_display = ['No','Name','Age','Mob','Add']
admin.site.register(Student,StudentAdmin)
Now, create a forms.py file in Regapp folder and write the following code:
from django import forms
from .models import Student
class StudentForm(forms.ModelForm):
    class Meta:
        model = Student
        fields = '__all__'
Adding validators to views.py
We now need to add validators in Registration\Regapp\views.py
from django.shortcuts import render

# Create your views here.
from django.shortcuts import render,redirect
from .models import Student
from .forms import StudentForm


def form_view(request):
    form = StudentForm()
    if request.method == 'POST':
        form = StudentForm(request.POST)
        if form.is_valid():
            form.save()
        return redirect('/')
    return render(request,'star/Home.html',{'form':form})
Forms in templates
A form is an element of an HTML page, and Django provides tools to render its fields correctly. It also gives default methods to format fields as a table, an unordered list or paragraphs.
So, let us make changes in Registration\templates\star\Base.html
<!DOCTYPE html>
{%load staticfiles%}
<html lang="en">
<head>
    <meta charset="UTF-8">
    <title>Homepage</title>
    <link rel="stylesheet" href="https://maxcdn.bootstrapcdn.com/bootstrap/3.3.7/css/bootstrap.min.css" integrity="sha384-BVYiiSIFeK1dGmJRAkycuHAHRg32OmUcww7on3RYdg4Va+PmSTsz/K68vbdEjh4u" crossorigin="anonymous">
    <link rel="stylesheet" href="{%static 'css/style.css'%}">
</head>
<body>
    <div class = "container" align="center">
        {%block child_block%}
        {%endblock%}
    </div>
</body>
</html>
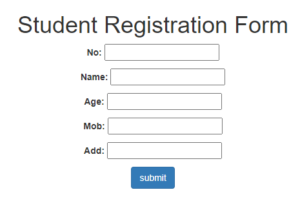
And also make changes in Registration\templates\star\Home.html
<!DOCTYPE html>
{% extends 'star/Base.html'%}
{% load staticfiles %}
{%block child_block%}
<h1>Student Registration Form</h1>
<form method="post">
    {{form.as_p}}
    {% csrf_token %}
    <input type = 'submit' class="btn btn-primary" value="submit">
</form>

{%endblock%}
Now, let us also add css file in Registration\static\css\style.css
body{
background:url(https://www.google.com/url?sa=i&url=https%3A%2F%2Fwww.123rf.com%2Fphoto_104215326_education-background-frame-school-student-office-supplies-stationery-glasses-alarm-clock-notebook-on.html&psig=AOvVaw0ULFXy1KCJOYDroQBfPNzB&ust=1597580708371000&source=images&cd=vfe&ved=0CAIQjRxqFwoTCLj4pcabnesCFQAAAAAdAAAAABAD);
}
You can add any background of your choice.
Now, let’s run the server and check for the output
Let’s add details to the Student Registration Form:
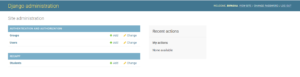
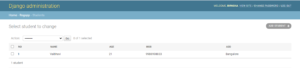
After entering the details when we login to the admin page and check the student tables, we should find the entered details:
Errors and rendering
The code which checks for the code validation is:
def form_view(request):
    form = StudentForm()
    if request.method == 'POST':
        form = StudentForm(request.POST)
        if form.is_valid():
            form.save()
        return redirect('/')
    return render(request,'star/Home.html',{'form':form})
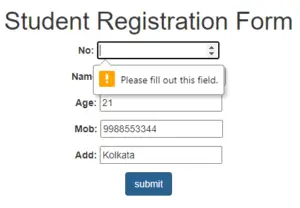
To check for Form Validation, if we keep a field blank and then submit it, we get a pop-up message like this:
Summary
Now, you can generate all the forms with ease and take different types of input from the user. Forms are pretty powerful elements on a webpage. They also raise many ethical questions as they contain user-data. Therefore, always design forms in a secure manner which are following international rules.
Forms can do much more than this. There are different built-in forms for each task. Now, you can actually prepare a web-application on your own. Work on that, it will be fun.