In this article, we will understand the Spring Data JPA in Spring Boot with a simple and easy example. Also, we will see how it makes things easy for us at Data Access Layer i.e the DAO Layer.
While creating an application, we need to interact with a database to store values. For this, we have a Data Access Layer where we write JDBC code to interact with the database.
But, in Spring Boot we don’t need to write the implementation for the DAO Layer. Spring Boot Auto generates the implementation. We have one module called Spring Data which is a high-level SpringSource project whose purpose is to unify and ease access to different kinds of persistence stores, both relational database systems, and NoSQL data stores.
Let us understand first JPA then move toward how to use Spring Boot.
What is JPA?
JPA is Java Persistence API which is a standard specification provided to access databases from Java applications. The advantage of using JPA over JDBC is that we don’t need to access tables and columns, Here we work with the classes and objects.
It is built to improve database programming where we can use our POJO i.e Plain Old Java Objects to represent persistent data. It should be noted that JPA is a specification, we will need an implementation to use these APIs. The popular implementation is Hibernate, EclipseLink and etc. This implementation follows ORM Model i.e Object Relational Mapping(to map objects to the relational database)
What is Spring Data?
Spring Data is a high-level SpringSource Project developed by the Spring community which is developed to simplify the data access layer of your application.
There would be no need to write low-level data access codes like JDBC code. It will generate everything dynamically by creating the proxy instances of your abstract repositories and perform the required operations. There are multiple projects running under this umbrella project such as Spring Data JPA, Spring Data MongoDB and etc.
What is Spring Data JPA?
Spring Data JPA is one of the implementations of JPA to remove lots of boiler code. we just need to add the spring-boot-starter-data-jpa POM. It has the following dependencies
- Hibernate: It is the default implementation.
- Spring Data JPA: It is used to implement JPA based repository.
- Spring ORMs: core support from the Spring Frameworks.
Let us discuss the repository available in Spring Data JPA.
Spring data repository
In an application, we just need to provide an abstract method in the interface. Spring data provides an abstract repository that will take care of performing all the CRUD operations. It reduces lots of boilerplate code. The following are the base interface
- Repository: It is a marker interface. It is a central interface in the spring data repository.
- CrudRepository: It has all the methods of CRUD operations. It extends the Repository interface.
- JPARepository: It is a specialized version of CRUDRepository and has a method specific to JPA.
- PagingAndSortingRepository: It is a specialized version for the paging and sorting operation.
Now, let us start with an example to understand the use of Spring Data JPA in the Spring Boot Application.
Example of Spring Data JPA in Spring Boot Application
In this example, we will show you how to persist data into the database using SpringData JPA.
Creating a Project Structure
Step 1: Open IDE STS- Spring Tool Suite
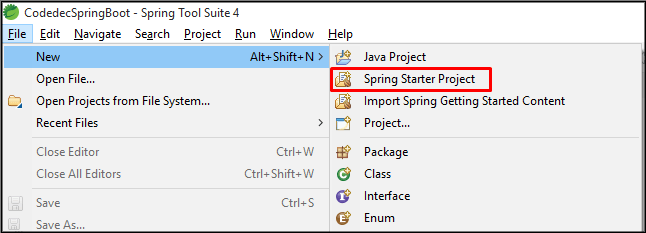
Step 2: Go to File > Spring Starter Project.
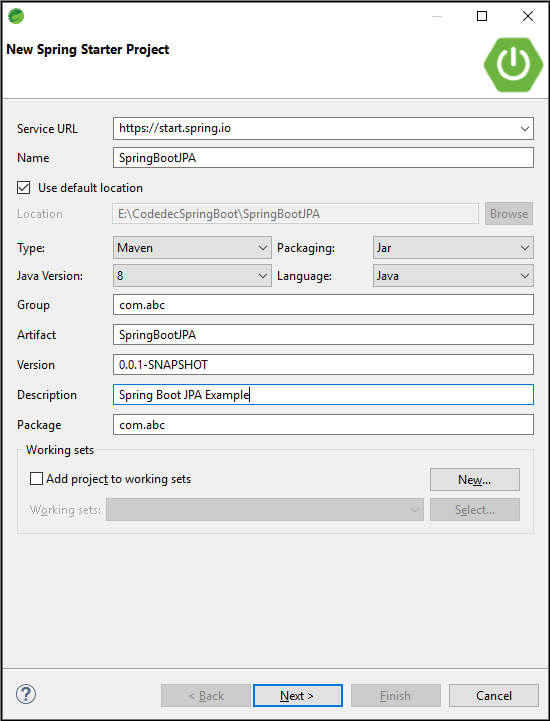
Step 3: Now, Fill all the fields as shown below and click Next.
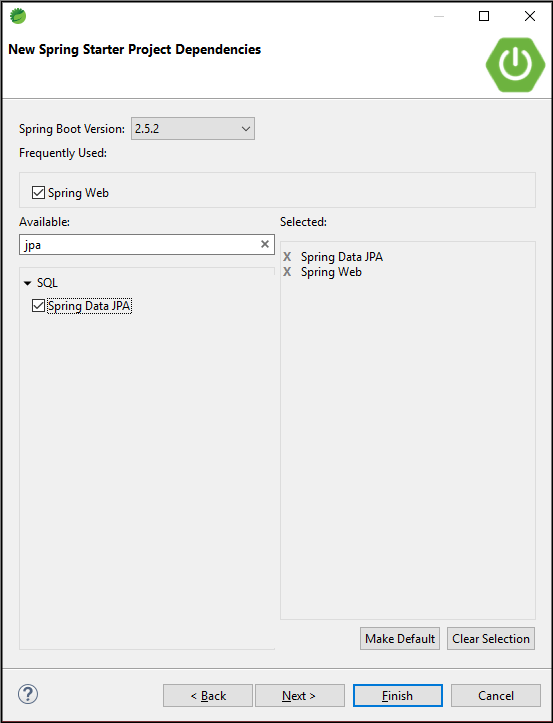
Step 4: Now, Add the dependencies as per your requirement, I have added Spring Web Dependency and Spring Data JPA click Next > Finish.
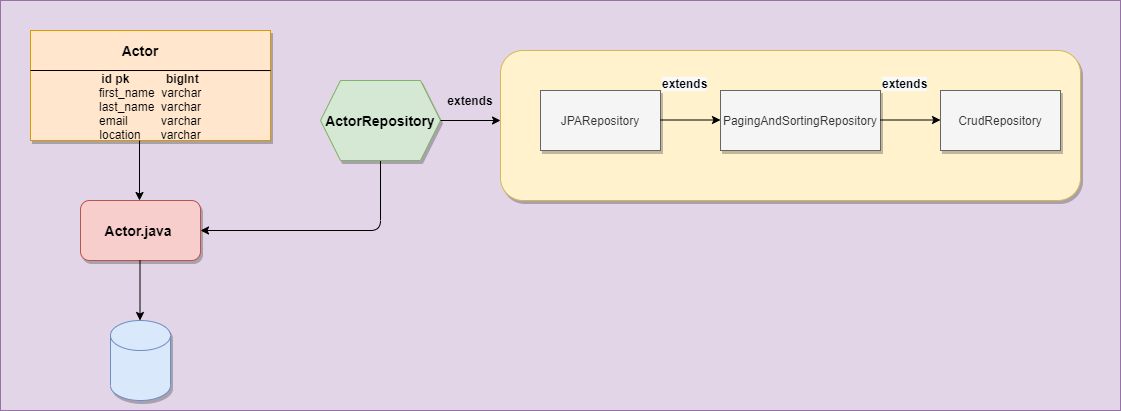
Following is the diagrammatic representation of what we are going to build
Once the project is created, see the maven file required for this project
<?xml version="1.0" encoding="UTF-8"?>
<project xmlns="http://maven.apache.org/POM/4.0.0"
  xmlns:xsi="http://www.w3.org/2001/XMLSchema-instance"
  xsi:schemaLocation="http://maven.apache.org/POM/4.0.0 https://maven.apache.org/xsd/maven-4.0.0.xsd">
  <modelVersion>4.0.0</modelVersion>
  <parent>
    <groupId>org.springframework.boot</groupId>
    <artifactId>spring-boot-starter-parent</artifactId>
    <version>2.5.2</version>
    <relativePath /> <!-- lookup parent from repository -->
  </parent>
  <groupId>com.abc</groupId>
  <artifactId>SpringBootJPA</artifactId>
  <version>0.0.1-SNAPSHOT</version>
  <name>SpringBootJPA</name>
  <description>Spring Boot JPA Example</description>
  <properties>
    <java.version>1.8</java.version>
  </properties>
  <dependencies>
    <dependency>
      <groupId>org.springframework.boot</groupId>
      <artifactId>spring-boot-starter-data-jpa</artifactId>
    </dependency>
    <dependency>
      <groupId>org.springframework.boot</groupId>
      <artifactId>spring-boot-starter-web</artifactId>
    </dependency>

    <dependency>
      <groupId>org.springframework.boot</groupId>
      <artifactId>spring-boot-starter-test</artifactId>
      <scope>test</scope>
    </dependency>
    <!-- https://mvnrepository.com/artifact/mysql/mysql-connector-java -->
    <dependency>
      <groupId>mysql</groupId>
      <artifactId>mysql-connector-java</artifactId>
    </dependency>
     <!-- JSTL for JSP -->
        <dependency>
            <groupId>javax.servlet</groupId>
            <artifactId>jstl</artifactId>
        </dependency>
        <!-- Need this to compile JSP -->
        <dependency>
            <groupId>org.apache.tomcat.embed</groupId>
            <artifactId>tomcat-embed-jasper</artifactId>
            <scope>provided</scope>
        </dependency>

  </dependencies>

  <build>
    <plugins>
      <plugin>
        <groupId>org.springframework.boot</groupId>
        <artifactId>spring-boot-maven-plugin</artifactId>
      </plugin>
    </plugins>
  </build>

</project>
- spring-boot-starter-data-jpa: It will download the files required for spring data JPA.
- spring-boot-starter-web: It is used to create web-based applications.
- mysql-connector-java: It is used to connect with MySQL database.
Configure application. properties file
This is the file provided by spring boot to configure JDBC URL, username, password, and driver class name. Also, configure JPA-related information.
spring.jpa.hibernate.ddl-auto=update
spring.datasource.url=jdbc:mysql://localhost:3306/db_demo
spring.datasource.username=root
spring.datasource.password=khan
spring.datasource.driver-class-name =com.mysql.jdbc.Driver
spring.jpa.show-sql= true


## Hibernate Properties
# The SQL dialect makes Hibernate generate better SQL for the chosen database
spring.jpa.properties.hibernate.dialect = org.hibernate.dialect.MySQL5InnoDBDialect
#To format SQL queries generated by Hibernate
spring.jpa.properties.hibernate.format_sql=true

#change the port
server.port=8888
- spring.jpa.hibernate.ddl-auto is set to update so that whatever changes we will do will be reflected in the schema.
- spring.datasource.url is used to set the URL of the MYSQL DB.
- spring.datasource.username is used to set the username and spring. datasource. password is used to set the password.
- spring.datasource.driver-class-name is used to set the driver class name.
- spring.jpa.show-sql is set to true to show SQL generated by the Hibernate.
- spring.jpa.properties.hibernate.dialect is used to generate better SQL for the chosen database.
- spring.jpa.properties.hibernate.format_sql is set to true to format SQL queries.
- server.port is set to 8888.
Create an Entity Class
Here, we will create an Entity that would be mapped to the database tables. It is nothing but the Java POJO class.
Actor.java
package com.abc;

import javax.persistence.Column;
import javax.persistence.Entity;
import javax.persistence.GeneratedValue;
import javax.persistence.GenerationType;
import javax.persistence.Id;

@Entity (name = "Actor") // This tells Hibernate to make a table out of this class
public class Actor {

  @Id
  @GeneratedValue(strategy = GenerationType.AUTO) //Auto increment id
  @Column(name = "id", updatable = false)
  private long id;
  @Column(name = "first_name",nullable = false) // It should not be null
  private String firstName;
  @Column(name = "last_name",nullable = false) // It should not be null
  private String lastName;
  @Column(name = "email",nullable = false, unique = true)  //Email should be unique
  private String email;
  @Column(name = "loc",nullable = false)  // It should not be null
  private String location;


  public Actor() {

  }
  public Actor( String firstName, String lastName, String email, String location) {
    super();
    this.firstName = firstName;
    this.lastName = lastName;
    this.email = email;
    this.location = location;
  }
  public long getId() {
    return id;
  }
  public void setId(long id) {
    this.id = id;
  }
  public String getFirstName() {
    return firstName;
  }
  public void setFirstName(String firstName) {
    this.firstName = firstName;
  }
  public String getLastName() {
    return lastName;
  }
  public void setLastName(String lastName) {
    this.lastName = lastName;
  }
  public String getEmail() {
    return email;
  }
  public void setEmail(String email) {
    this.email = email;
  }
  public String getLocation() {
    return location;
  }
  public void setLocation(String location) {
    this.location = location;
  }
  @Override
  public String toString() {
    return "Actor [id=" + id + ", firstName=" + firstName + ", lastName=" + lastName + ", email=" + email
        + ", location=" + location + "]";
  }


}
- @Entity annotation mark this class as a JPA entity. It tells hibernate to make a table out of it.
- @Id annotation specifies the primary key of an entity.
- @GeneratedValue is applied to the primary key and Generation type is set to Auto(Auto increment id).
- @Column annotation the property of the class with the table column.
Create Repository Interface
The repository here is the DAO layer, which performs all the database operations. ActorRepository interface is created which will extends JPARepository<ClassName, ID>
package com.abc;
import org.springframework.data.jpa.repository.JpaRepository;
import org.springframework.stereotype.Repository;
@Repository
public interface ActorRepository extends JpaRepository<Actor, Long>{
}
There are no methods declaration inside this interface because JPARepository indirectly implements CRUDRepository which has all the basic CRUD operations.
Now, go to SpringBootJpaApplication class inside main method test whether all operation is being performed
package com.abc;

import java.util.Optional;

import org.springframework.boot.CommandLineRunner;
import org.springframework.boot.SpringApplication;
import org.springframework.boot.autoconfigure.SpringBootApplication;
import org.springframework.context.ApplicationContext;
import org.springframework.context.annotation.Bean;

@SpringBootApplication
public class SpringBootJpaApplication {

  public static void main(String[] args) {
    ApplicationContext context = SpringApplication.run(SpringBootJpaApplication.class, args);

    ActorRepository actorRepository = context.getBean(ActorRepository.class);

    /*
     * Save Actor in the db*\
     */

    Actor actor = new Actor("Shahrukh", "khan", "srk@gmail.com", "Mumbai");
    actorRepository.save(actor);
    Actor actor2 = new Actor("Salman", "khan", "sal@gmail.com", "Mumbai");
    actorRepository.save(actor2);
    Actor actor3 = new Actor("Rajkumar", "Rao", "raj@gmail.com", "Mumbai");
    actorRepository.save(actor3);

    // Read All
    System.out.println(actorRepository.findAll());
    // Read by ID
    System.out.println(actorRepository.findById(2l));

    // Update actor with id -->2

    Optional<Actor> optional = actorRepository.findById(2l);
    Actor actor4 = optional.get();
    actor4.setLocation("ABC");
    Actor a = actorRepository.save(actor4);
    System.out.println(a);

    // delete by Id
    actorRepository.deleteById(2L);

  }

}
- In this we have used all the methods such as save(entity), findAll, findById(long),delete() of JPARepository.
- These methods are already implemented by SimpleJPARepository.
Run the Application
Run the SpringBootJpaApplication class. Now, just check the console all the hibernate queries will be generated automatically. All the operations will be performed. Just go to the database and check.
mysql> select * from actor;
+----+---------------+------------+-----------+--------+
| id | email         | first_name | last_name | loc    |
+----+---------------+------------+-----------+--------+
|  1 | srk@gmail.com | Shahrukh   | khan      | Mumbai |
|  3 | raj@gmail.com | Rajkumar   | Rao       | Mumbai |
+----+---------------+------------+-----------+--------+
2 rows in set (0.00 sec)
In this way, we persist, accessed data from the database using the Spring Data JPA. You can further use Spring Data JPA in the web application or with REST APIs.(we will see in the coming tutorial)