Update View refers to a view (logic) to update a particular instance of a table from the database with some extra details. It is used to update entries in the database. So Update view must display the old data in the form and let user update the data from there only. For Update View, we need a project with some models and multiple instances which will be displayed. Basically Update view is a combination of Detail view and Create view.
Django Model Example Overview
We will be doing the following in this Django ModelForm Example
- Create a Page for entry of Details(Name, Email-id, Password) and save it into the database(which will be done automatically by model forms).
- Create the details page where we would view the student entries in an ordered list, save and update the data.
Coding the App
As usual, we need to deal with some data(Name, Email-d, Password). So, we need to create the model of the data and implement that model into the admin panel of django.
To do so, look for the file models.py in your app folder and add the code below:-
from django.db import models

# Create your models here.
class User(models.Model):
    name = models.CharField(max_length=70)
    email = models.CharField(max_length=100)
    password = models.CharField(max_length=100)
- Add your app in the installed_apps of settings.py
Making Migrations
- Make sure that the shell is navigated into the correct folder and run the following command.
python manage.py makemigrations
- Next, run the command below to actually implement it into the database.
python manage.py migrate
- By now, the database is created.
Configuring the View
- Yes, the class based views reduce our efforts to quite an extent.
- So, look for the file views.py in your app folder and add the following code:
from django.shortcuts import render

# Create your views here.
from .forms import StudentRegistration
from .models import User
def showformdata(request):
    if request.method == 'POST':
        fm = StudentRegistration(request.POST)
        if fm.is_valid():
            nm = fm.cleaned_data['name']
            em = fm.cleaned_data['email']
            pw = fm.cleaned_data['password']
            reg = User(name=nm, email=em, password=pw)
            reg.save()

    else:
        fm = StudentRegistration()
    return render(request,'enroll/userregistration.html',{'form':fm})
Creating UI for Django Model
- Firstly create a directory named templates into your app folder.
- Now, in the templates folder, create another directory named enroll and it should be like /Your_app_name/templates/enroll/.
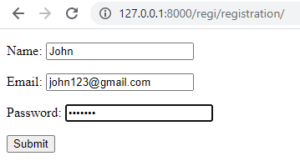
- In the Your_app_name folder present in templates directory, create a new HTML file called userregistration.html and add the following code:-
<!DOCTYPE html>
<html lang="en">
<head>
    <meta charset="UTF-8">
    <meta name="viewport" content="width=device-width,initial-scale=1.0">
    <title>User Registration</title>
</head>
<body>
 <form action="" method="POST" novalidate>
     {% csrf_token %}
      {{form.as_p}}
      <input type="submit" value="Submit">
 </form>
</body>
</html>
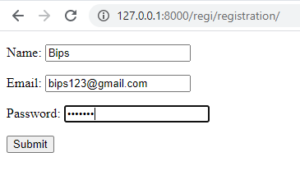
Running the app
- To add, edit and delete the posts we’ve just modeled, we will use django admin panel and add details in the database using the submit of the form.
- Now, let’s try to open the server.
- You can also create a superuser to add data to the database. Then make add the following code in the admin.py file
from django.contrib import admin
from .models import User
# Register your models here.
@admin.register(User)
class UserAdmin(admin.ModelAdmin):
    list_display = ('id','name','email','password')
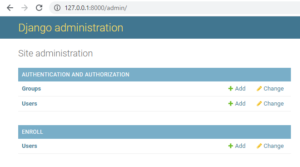
- Hence, now on running the server/admin you can see that your app is present on the admin panel:
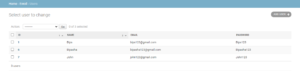
- Now you also add data using the admin panel by opting for “Add User+” option and can also check the details of the student enrolled:
Update existing Data
- Let’s try to update id 1 data. So we need to make changes in views.py
from django.shortcuts import render

# Create your views here.
from .forms import StudentRegistration
from .models import User
def showformdata(request):
    if request.method == 'POST':
        fm = StudentRegistration(request.POST)
        if fm.is_valid():
            nm = fm.cleaned_data['name']
            em = fm.cleaned_data['email']
            pw = fm.cleaned_data['password']
            reg = User(id=1,name=nm, email=em, password=pw)
            reg.save()

    else:
        fm = StudentRegistration()
    return render(request,'enroll/userregistration.html',{'form':fm})
On entering the details to update
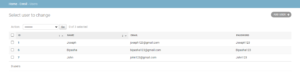
We can see the update in id 1, in the database: