In the previous article, we have seen all the implicit objects used in JSP such as to request, response, out, etc. In this article, we will cover what is Directives in JSP and examples for it.
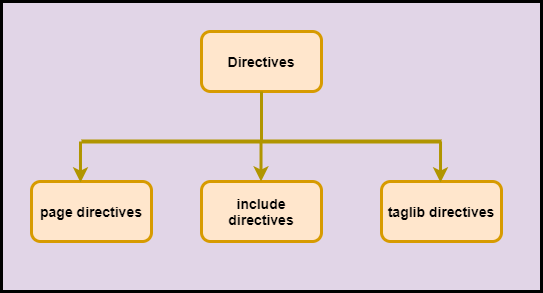
What are JSP Directives?
JSP Directives are special instructions that are given to the container for translation of the JSP page to Servlet code.
- It is the message to JSP Container to tell how to translate the JSP page to Servlet.
- Directives are present in key-value pairs.
- In JSP, the Directive is represented in <%@ %>.
- There are three types of Directives.
Let’s see every directive in detail
JSP page Directive
page Directive is used to provide special instruction to the container. It defines attributes that apply to an entire JSP page.
Syntax
<%@ page %>
List of Attribute associated with the page Directive
- language
- import
- contentType
- extends
- info
- buffer
- isELIgnored
- isThreadSafe
- autoFlush
- session
- pageEncoding
- errorPage
- isErrorPage
Let’s see every page directive in detail
language
It defines the language used in the JSP page. The syntax for language is
<%@ page language="any value" %>

<%@ page language="java" contentType="text/html; charset=ISO-8859-1" pageEncoding="ISO-8859-1"%>
import
This import page directive is used to import classes, interface, enums, etc. It is similar to the import keyword we use in JAVA programming.
Syntax
<%@ page import="any value"%>
extends
This attribute is just like the keyword extend that we used to extend a class in Java. The Syntax for extends is
<%@ page extends="any value" %>
contentType
This attribute is used to set the type of content for the response. The Syntax for contentType is
<%@ page contentType="any value" %>

<%@ page language="java" contentType="text/html; charset=ISO-8859-1" pageEncoding="ISO-8859-1"%>
info
This attribute sets the information on the JSP page that is retrieved by getServletInfo().
Syntax
<%@ page info="any value" %>@ page language="java" contentType="text/html; charset=ISO-8859-1"
    info="New JSP" pageEncoding="ISO-8859-1"%>
session
This attribute is used to set the session on the JSP page. In the JSP page session is set to true by default but if we want to set it to false we can use this attribute of page directive. The Syntax for the session is
<%@ page session="true/false" %>
buffer
This attribute is used to buffer the output of response. It sets the buffer size in KB to handle output generated by the JSP page. The default size is 8KB. The Syntax for the buffer is
<%@ page buffer="28kb" %>
isErrorPage
This attribute checks whether the error page is available to check errors on the JSP page. Exceptions are available on the error page. The Syntax for isErrorPage is
<%@ page isErrorPage="true/false"%>
pageEncoding
The pageEncoding attribute defines the character encoding for the JSP page. The syntax for pageEncoding is
<%@ page pageEncoding="any value"%>

<%@ page language="java" contentType="text/html; charset=ISO-8859-1"
    pageEncoding="ISO-8859-1"%>
errorPage
This attribute is used to set the Error Page on the JSP page. It handles all the errors and exceptions thrown by Page. The Syntax for errorPage is
<%@ page errorPage="any value" %>

<%@ page language="java" contentType="text/html;" pageEncoding="ISO-8859-1"
    errorPage="handleException.jsp"%>
isELIgnored
In order to ignore the Expression tag(we will see in the coming tutorial) in JSP, we will use the isELIgnored attribute. Its default value is false. The Syntax for isELIgnored is
<%@ page isELIgnored="true" %>
isThreadSafe
As we know, Servlet and JSP are multithreaded. If we want to make the page thread-safe we can use the isThreadSafe attribute. Its default value is true. The Syntax for isThreadSafe is
<%@ page isThreadSafe="true/false" %>
autoFlush
This attribute is used to buffer output.
- It should be flushed automatically or not and the default value of that attribute is true.
- If the value is set to false the buffer will not be flushed automatically and if it’s full, we will get an exception.
- When the buffer is none then there is no buffering, so it will be flushed automatically.
Syntax
<% @ page autoFlush="true/false" %>
JSP include Directive
This page Directive is used to include any resources such as JSP file, servlet file.
- It includes one file into another file
- It is generally used as templates like for creating header and footer and that we can include on every page.
- It includes files during the translation phase of JSP.
Syntax
<%@ include resources%>
Example
In this example, we will include one file into another using include directive
header.jsp
<%@ page language="java" contentType="text/html; charset=ISO-8859-1"
pageEncoding="ISO-8859-1"%>
<!DOCTYPE html PUBLIC "-//W3C//DTD HTML 4.01 Transitional//EN" "http://www.w3.org/TR/html4/loose.dtd">
<html>
<head>
<meta http-equiv="Content-Type" content="text/html; charset=ISO-8859-1">
<title>Insert title here</title>
</head>
<body>
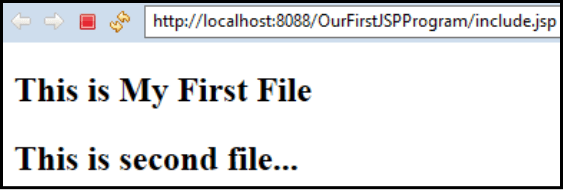
<h2>This is My First File</h2>
</body>
</html>
include.jsp
<%@ page language="java" contentType="text/html; charset=ISO-8859-1"
    pageEncoding="ISO-8859-1"%>
<!DOCTYPE html PUBLIC "-//W3C//DTD HTML 4.01 Transitional//EN" "http://www.w3.org/TR/html4/loose.dtd">
<html>
<head>
<meta http-equiv="Content-Type" content="text/html; charset=ISO-8859-1">
<title>Insert title here</title>
</head>
<body>
<%@ include file="header.jsp" %>
<h2>This is second file...</h2>
</body>
</html>
Output
JSP TagLib Directive
Tag Libraries is a library that contains many tags.
- It is used in JSP pages using the standard tag libraries.
- Here the attribute uri indicates a location that the container will understand and the prefix informs the container about actions.
Notes: (This topic will be more understandable once we learn about customs tags in JSP in the coming tutorial).
Syntax
<%@ taglib uri="uri" prefix="value"%>
Example
In this example, we have defined taglib with URI newtag and prefix tag1. newtag is a custom tag that can be used anywhere.
<html>
<body>
<%@ taglib uri="newtag" prefix="tag1" %>
<tag1:Welcome/>
</body>
</html>
Thus these are the JSP Directives we used in Our JSP page to make things simpler and easy.
In the next article of this tutorial, we will cover the Action Tags used in JSP such as useBean, include, forward with a simple example.