In the previous article, we have seen the login and logout example in JSP Login and Logout Example in JSP. Today there are like every application where we require to upload an image or file or any document. so, we can create a File Uploading application in JSP. In this article, we will look at the simple example of How to upload a File or image in using JSP.
Example of How to Upload File in JSP?
In this application, we will be creating two files:
- index.jsp for view
- fileupload.jsp for processing of the request.
We will create a project structure as shown below using Eclipse IDE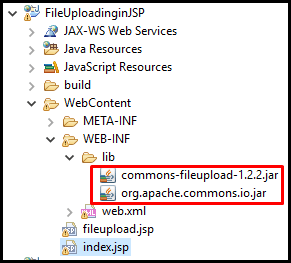
Download the following jar files extract it and paste the jar files to the lib folder of the project.
- Apache Common File Upload:http://commons.apache.org/proper/commons-fileupload/download_fileupload.cgi
- Apache Common IO:http://commons.apache.org/proper/commons-io/download_io.cgi
create an index.html page that shows an upload form certain points to consider here are:
- The form method attribute should be POST here.
- The form enctype should be multipart/form-data.
<%@ page language="java" contentType="text/html; charset=ISO-8859-1"
  pageEncoding="ISO-8859-1"%>
<!DOCTYPE html PUBLIC "-//W3C//DTD HTML 4.01 Transitional//EN" "http://www.w3.org/TR/html4/loose.dtd">
<html>
<head>
<meta http-equiv="Content-Type" content="text/html; charset=ISO-8859-1">
<title>Insert title here</title>
</head>
<body>
  <form action="fileupload.jsp" method="post"
    enctype="multipart/form-data">
    <table>
      <tr>
        <td>Select a File</td>
        <td><input type="file" name="file"></td>
      </tr>
      <tr>
        <td><input type="submit" value="Upload"></td>
      </tr>
      </form>

    </table>
</body>
</html>
Create a fileupload.jsp file for Handling the request.
- DiskFileItemFactory is the default Factory class. The DiskFileItemFactory keeps the file content either in memory or disk depending upon the threshold value. (In this we have to use memMaxSize =”60000*10248″).
- DiskFileItemFactory parses the request and return list of FileItems.
- FileItems provide useful information like file name, file size content type.
- create a location to save the uploaded file.
<%@ page language="java" contentType="text/html; charset=ISO-8859-1"
  pageEncoding="ISO-8859-1"%>
<%@ page import="java.io.*,java.util.*, javax.servlet.*"%>
<%@ page import="javax.servlet.http.*"%>
<%@ page import="org.apache.commons.fileupload.*"%>
<%@ page import="org.apache.commons.fileupload.disk.*"%>
<%@ page import="org.apache.commons.fileupload.servlet.*"%>
<%@ page import="org.apache.commons.io.output.*"%>

<!DOCTYPE html PUBLIC "-//W3C//DTD HTML 4.01 Transitional//EN" "http://www.w3.org/TR/html4/loose.dtd">
<html>
<head>
<meta http-equiv="Content-Type" content="text/html; charset=ISO-8859-1">
<title>Insert title here</title>
</head>
<body>
  <%

File file ;
int sizeMax = 60000 * 10248;
int MemMaxSize = 60000 * 10248;
ServletContext context = pageContext.getServletContext();
String filePath = context.getInitParameter("fileLocation");
// Verify the content type
String contentType = request.getContentType();

if ((contentType.indexOf("multipart/form-data") >= 0)) {
   DiskFileItemFactory factory = new DiskFileItemFactory();
   // maximum size that will be stored in memory
   factory.setSizeThreshold(MemMaxSize);

   // Location to save data that is larger than maxMemSize.
   factory.setRepository(new File("E:\\java"));
   // Create a new file upload handler
   ServletFileUpload upload = new ServletFileUpload(factory);

   // maximum file size to be uploaded.
   upload.setSizeMax( sizeMax );
   try {
       // Parse the request to get file items.
       List fileItems = upload.parseRequest(request);

       // Process the uploaded file items
       Iterator i = fileItems.iterator();
       while ( i.hasNext () ) {
          FileItem fi = (FileItem)i.next();
          if ( !fi.isFormField () ) {
             // Get the uploaded file parameters
             String fieldName = fi.getFieldName();
             String fileName = fi.getName();
             boolean isInMemory = fi.isInMemory();
             long sizeInBytes = fi.getSize();

             // Write the file
             if( fileName.lastIndexOf("\\") >= 0 ) {
                file = new File( filePath +
                fileName.substring( fileName.lastIndexOf("\\"))) ;
             } else {
                file = new File( filePath +
                fileName.substring(fileName.lastIndexOf("\\")+1)) ;
             }
             fi.write( file ) ;
             out.println("Uploaded Filename: " + filePath +
             fileName + "<br>");
          }
       }
       out.println("</body>");
       out.println("</html>");
    } catch(Exception ex) {
       System.out.println(ex);
    }
 } else {
    out.println("<html>");
    out.println("<head>");
    out.println("<title>File upload</title>");
    out.println("</head>");
    out.println("<body>");
    out.println("<p>No file uploaded</p>");
    out.println("</body>");
    out.println("</html>");
 }

%>
</body>
</html>
create web.xml file
Add context-param in web.xml file to add the path where our files will be uploaded.
<?xml version="1.0" encoding="UTF-8"?>
<web-app xmlns:xsi="http://www.w3.org/2001/XMLSchema-instance"
  xmlns="http://java.sun.com/xml/ns/javaee"
  xsi:schemaLocation="http://java.sun.com/xml/ns/javaee http://java.sun.com/xml/ns/javaee/web-app_3_0.xsd"
  id="WebApp_ID" version="3.0">
  <display-name>File Uploading</display-name>
  <welcome-file-list>
    <welcome-file>index.jsp</welcome-file>
  </welcome-file-list>
   <context-param>
    <param-name>fileLocation</param-name>
    <param-value>E:\java\</param-value>
</context-param>
</web-app>
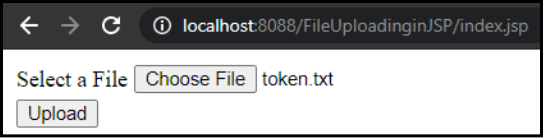
Run this application on the server and we will get the following output

Now just go to folder E:\java\ your file will be uploaded here.
Thus we have seen How to upload File in JSP.
In the next article of this tutorial, we will cover How to Download a file or image in JSP with a simple example.