In this article, we will understand what is the @Component & @Value annotation with a simple example.
Both these annotations are stereotype annotations. As we know, Spring IOC Container uses the config file to create an object using the <bean> element. But when we are going with annotation-based configuration, @Component annotation indicates that the class is a “component”. Thus, Spring will auto-detect the class and will create an object.
What is @Component & @Value annotation in Spring
@Component belongs to a class. It tells that the class is a “component”. In the XML file now we don’t need to write the extra code.
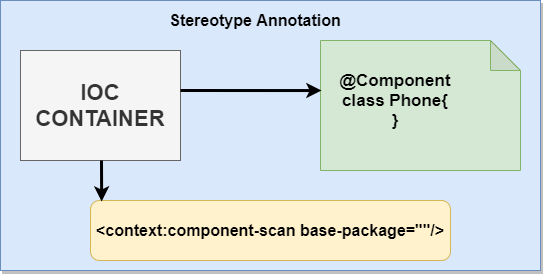
- Spring will auto-detect the class using @Component.
- It will create the object of the class using the name of the class with a camelcase reference.
- If there is any dependency it will inject.
But How it will it inject the dependency? The answer is using the @Value annotation.
@value annotation is applied on the properties and values are passed and the Spring will inject the dependency automatically.
Example of @Component & @Value Annotation
In this example, we will make a class SocialMedia with property name & HeadQuarter.
Create a Spring Project Go to File> New > Other > Search maven > Select Maven Project > Next > Search Filter org.apache.maven.archetypes/webapp > Next > Enter Group Id & Archetype id > Finish.
SocialMedia.java
- In this class, @Componet is used to make a class into a bean and will be auto-detected.
- @Value is used to add value to the properties.
- It has a setter and getter method plus one show() method to display values.
package com.codedec.stereotype;

import org.springframework.beans.factory.annotation.Value;
import org.springframework.stereotype.Component;

@Component
public class SocialMedia {

  @Value("Facebook")
  private String name;
  @Value("California")
  private String headQuarter;
  public String getName() {
    return name;
  }
  public void setName(String name) {
    this.name = name;
  }
  public String getHeadQuarter() {
    return headQuarter;
  }
  public void setHeadQuarter(String headQuarter) {
    this.headQuarter = headQuarter;
  }
  public void show() {
    System.out.println("Name is :"+name+"\n HQ at : "+headQuarter);
  }

}
beans.xml
- On-Line no:9, add the <context:component-scan base-package=””> and add the package to scan for components.
<?xml version="1.0" encoding="UTF-8"?>
<beans xmlns="http://www.springframework.org/schema/beans"
  xmlns:xsi="http://www.w3.org/2001/XMLSchema-instance"
  xmlns:context="http://www.springframework.org/schema/context"
  xsi:schemaLocation="
        http://www.springframework.org/schema/beans http://www.springframework.org/schema/beans/spring-beans.xsd
        http://www.springframework.org/schema/context http://www.springframework.org/schema/context/spring-context.xsd">

          <context:component-scan base-package="com.codedec.stereotype"></context:component-scan>
</beans>
App.java
- In this class, we get the bean definition from the context and will call the method show() method.
package com.codedec.stereotype;

import org.springframework.context.ApplicationContext;
import org.springframework.context.support.ClassPathXmlApplicationContext;

public class App {

  public static void main(String[] args) {
    // TODO Auto-generated method stub
   ApplicationContext context = new ClassPathXmlApplicationContext("beans.xml");
   SocialMedia media=context.getBean("socialMedia",SocialMedia.class);
   media.show();
  }

}
Output:
Name is :Facebook
 HQ at : California
Thus, this is How we use @Component & @Value annotation in spring Framework. Now, In this we are supplying a single value, But what if we want more than one value i.e. If there is a collection How we will pass? For that let us understand by using the same example.
Example of Collection with @Value annotations
Here, we will be using the same example, Just first we need to modify the beans.xml.
beans.xml
- First, add the xmlns:util=”http://www.springframework.org/schema/util & http://www.springframework.org/schema/util http://www.springframework.org/schema/util/spring-util.xsd in bean definition inorder to use the Collection.
- Create a standalone list using <util:list list-class=”java.util.ArrayList” id=”temp”> like this and add the value as show on Line no:14 with id=”temp”.
<?xml version="1.0" encoding="UTF-8"?>
<beans xmlns="http://www.springframework.org/schema/beans"
  xmlns:xsi="http://www.w3.org/2001/XMLSchema-instance"
  xmlns:context="http://www.springframework.org/schema/context"
  xmlns:util="http://www.springframework.org/schema/util"
  xsi:schemaLocation="
        http://www.springframework.org/schema/beans http://www.springframework.org/schema/beans/spring-beans.xsd
        http://www.springframework.org/schema/context http://www.springframework.org/schema/context/spring-context.xsd

            http://www.springframework.org/schema/util http://www.springframework.org/schema/util/spring-util.xsd">
       <context:component-scan base-package="com.codedec.stereotype"/>
       <!-- Make a standalone Collection -->
       <util:list list-class="java.util.ArrayList" id="temp">
       <value>Nicolas</value>
       <value>John</value>
       <value>Ron</value>
       <value>Harry</value>

       </util:list>
</beans>
SocialMedia.java
- Now, add a property list of users in this class.
- Use the @Value annotation and pass the id “temp” like this: @Value(“#{temp}”)
package com.codedec.stereotype;

import java.util.List;

import org.springframework.beans.factory.annotation.Value;
import org.springframework.stereotype.Component;

@Component
public class SocialMedia {

  @Value("Facebook")
  private String name;
  @Value("California")
  private String headQuarter;
  @Value("#{temp}")
  private List<String> users;
  public String getName() {
    return name;
  }
  public void setName(String name) {
    this.name = name;
  }
  public String getHeadQuarter() {
    return headQuarter;
  }
  public void setHeadQuarter(String headQuarter) {
    this.headQuarter = headQuarter;
  }

  public List<String> getUsers() {
    return users;
  }
  public void setUsers(List<String> users) {
    this.users = users;
  }
  public void show() {
    System.out.println("Name is :"+name+"\n HQ at : "+headQuarter+"\nUser List : "+users);
  }

}
Now, Just keep the App.java file as it is and run the project and you will get the following output.
Output:
Name is :Facebook
 HQ at : California
User List : [Nicolas, John, Ron, Harry]
Thus, this is How we can use any Collection value using annotation-based. If you want to learn How to use collection with XML based-configuration check this article How to Inject Collection using Dependency Injection in Spring.
In the next article of this tutorial, we will start with Java Based-Configuration in Spring Framework.