In the previous article, we started with the Spring MVC concept with a simple example you can check here. In this article, we will create a simple example with JSTL. Also, we will see what is Model.
What is a Model?
If we want to add some data to the view, we have to use the object of the Model interface.
- It is present in org.springframework.ui.Model.
- It is used to render a view with some data/values.
Example
@RequestMapping("/list")
  public String hello(Model m) {
    m.addAttribute("msg", "Hey Passing the Model data");
    return "view";
}
Note: Addition to the Model, we also have ModelMap, ModelAndView interface.
ModelMap is used to pass the collection of values and treat values as Map. ModelAndView is used to pass all the information in one return.
Let us look at a simple example to understand how to use the JSTL in Spring MVC
Example to use JSTL and Model Interface in Spring MVC
Create a Spring Project Go to File> New > Other > Search maven > Select Maven Project > Next > Search Filter org.apche.maven.archetypes/webapp > Next > Enter Group Id & Archetype id > Finish.
First, Create a pom.xml file to add all the dependencies needed for Spring MVC Configuration
<project xmlns="http://maven.apache.org/POM/4.0.0"
  xmlns:xsi="http://www.w3.org/2001/XMLSchema-instance"
  xsi:schemaLocation="http://maven.apache.org/POM/4.0.0 http://maven.apache.org/maven-v4_0_0.xsd">
  <modelVersion>4.0.0</modelVersion>
  <groupId>co</groupId>
  <artifactId>SpringMVCExample</artifactId>
  <packaging>war</packaging>
  <version>0.0.1-SNAPSHOT</version>
  <name>SpringMVCExample Maven Webapp</name>
  <url>http://maven.apache.org</url>
  <dependencies>
    <dependency>
      <groupId>junit</groupId>
      <artifactId>junit</artifactId>
      <version>3.8.1</version>
      <scope>test</scope>
    </dependency>
    <!-- https://mvnrepository.com/artifact/org.springframework/spring-context -->
    <dependency>
      <groupId>org.springframework</groupId>
      <artifactId>spring-context</artifactId>
      <version>5.3.5</version>
    </dependency>
    <!-- https://mvnrepository.com/artifact/org.springframework/spring-web -->
    <dependency>
      <groupId>org.springframework</groupId>
      <artifactId>spring-web</artifactId>
      <version>5.3.5</version>
    </dependency>
    <!-- https://mvnrepository.com/artifact/org.springframework/spring-core -->
    <dependency>
      <groupId>org.springframework</groupId>
      <artifactId>spring-core</artifactId>
      <version>5.3.5</version>
    </dependency>
    <!-- https://mvnrepository.com/artifact/org.springframework/spring-beans -->
    <dependency>
      <groupId>org.springframework</groupId>
      <artifactId>spring-beans</artifactId>
      <version>5.3.5</version>
    </dependency>
    <!-- https://mvnrepository.com/artifact/javax.servlet/jstl -->
    <dependency>
      <groupId>javax.servlet</groupId>
      <artifactId>jstl</artifactId>
      <version>1.2</version>
    </dependency>

    <!-- https://mvnrepository.com/artifact/javax.servlet.jsp/javax.servlet.jsp-api -->
    <dependency>
      <groupId>javax.servlet.jsp</groupId>
      <artifactId>javax.servlet.jsp-api</artifactId>
      <version>2.3.3</version>
      <scope>provided</scope>
    </dependency>
    <!-- https://mvnrepository.com/artifact/javax.servlet/javax.servlet-api -->
    <dependency>
      <groupId>javax.servlet</groupId>
      <artifactId>javax.servlet-api</artifactId>
      <version>4.0.1</version>
      <scope>provided</scope>
    </dependency>
    <!-- https://mvnrepository.com/artifact/org.springframework/spring-webmvc -->
    <dependency>
      <groupId>org.springframework</groupId>
      <artifactId>spring-webmvc</artifactId>
      <version>5.3.5</version>
    </dependency>
  </dependencies>
  <build>
    <finalName>SpringMVCExample</finalName>
  </build>
</project>
Create the web.xml to configure DisptacherServlet. Web.xml is a deployment descriptor that is used by the server to map the incoming request.
- Here, the server transfer request to Dispatcher Servlet which in turn retrieves the appropriate controller
- The view (JSP file) is resolved by DispatcherServlet using the ViewResolver.
<!DOCTYPE web-app PUBLIC
 "-//Sun Microsystems, Inc.//DTD Web Application 2.3//EN"
 "http://java.sun.com/dtd/web-app_2_3.dtd" >

<web-app>
  <display-name>Archetype Created Web Application</display-name>
  <servlet>
    <servlet-name>spring</servlet-name>
    <servlet-class>org.springframework.web.servlet.DispatcherServlet</servlet-class>
    <init-param>
      <param-name>contextConfigLocation</param-name>
      <param-value>/WEB-INF/Spring-servlet.xml</param-value>
    </init-param>
    <load-on-startup>1</load-on-startup>
</servlet>
<servlet-mapping>
    <servlet-name>spring</servlet-name>
    <url-pattern>/</url-pattern>
</servlet-mapping>
</web-app>
Create a Spring-servlet.xml file. As we are building a Spring MVC application so we will need to store spring-related information in a file. So, it provides a file called [anyName]-servlet.xml. It contains information on configuration.
- Here, we have used <context:component-scan> detects the annotation by package scanning.
- It tells Spring to scan which package to search for Controller, Beans, or any component.
- @Component, @Controller, @Repository, @Service, @Service, and etc. are ones that <context:component-scan> can detect.
- To resolves views such as JSP, we have used InternalResourceViewResolver.
<?xml version="1.0" encoding="UTF-8"?>
<beans xmlns="http://www.springframework.org/schema/beans"
   xmlns:context="http://www.springframework.org/schema/context"
   xmlns:xsi="http://www.w3.org/2001/XMLSchema-instance"
   xsi:schemaLocation="
   http://www.springframework.org/schema/beans
   http://www.springframework.org/schema/beans/spring-beans.xsd
   http://www.springframework.org/schema/context
   http://www.springframework.org/schema/context/spring-context.xsd">

   <!--  component scan -->
   <context:component-scan base-package="org.mvc.controller"></context:component-scan>


  <bean class="org.springframework.web.servlet.view.InternalResourceViewResolver">
  <property name="prefix" value="/WEB-INF/views/" />
      <property name="suffix" value=".jsp" />
  </bean>
   </beans>
Now, Create a Controller. The DispatcherServlet on receiving the request transfer the request to the controller.
- The @Controller here defines the class as Controller in SpringMVC.
- The @RequestMapping is used to map the URL. Here, it is ‘/’ means all the requests for this will be handled by this home() method and the ‘/list’ URL map to list() method.
- Here, we have returned the “index” page and list page.
- We have created Multiple methods and transfer the request according to the URL.
- Use the Model to pass the data from the controller to the view which is returned.
package org.mvc.controller;

import org.springframework.stereotype.Controller;
import org.springframework.ui.Model;
import org.springframework.web.bind.annotation.RequestMapping;

@Controller
public class HomeController {

  @RequestMapping("/")
  public String home(Model m) {

    return "index";
  }

  @RequestMapping("/list")
  public String list(Model m) {
    m.addAttribute("msg", "Hey Passing the Model data");
    return "list";
  }
}
index.jsp
Create two JSP pages that will act as a View. Here is the list.jsp we have used JSTL to get the display data on the controller. To know more about JSTL check this article JSP Standard Tag Library(JSTL) in the JSP.
<%@ taglib prefix="c" uri="http://java.sun.com/jstl/core" %>
<%@ taglib prefix="x" uri="http://java.sun.com/jstl/xml" %>
<%@ taglib prefix="fmt" uri="http://java.sun.com/jstl/fmt" %>
<%@ taglib prefix="sql" uri="http://java.sun.com/jstl/sql" %>
<html>
<head>
<title>Spring MVC</title>
</head>
<body>
<h1>Welcome To Spring MVC Framework!!! </h1>
<a href="list">Hey</a>

</body>
</html>
list.jsp
<%@ page language="java" contentType="text/html; charset=ISO-8859-1"
    pageEncoding="ISO-8859-1"%>
    <%@ taglib prefix="c" uri="http://java.sun.com/jstl/core" %>
<%@ taglib prefix="x" uri="http://java.sun.com/jstl/xml" %>
<%@ taglib prefix="fmt" uri="http://java.sun.com/jstl/fmt" %>
<%@ taglib prefix="sql" uri="http://java.sun.com/jstl/sql" %>
<!DOCTYPE html>
<html>
<head>
<meta charset="ISO-8859-1">
<title>Insert title here</title>
</head>
<body>
<h2><c:out value="${msg }"></c:out></h2>
</body>
</html>
Now, Deploy the application on the Server and see the following output
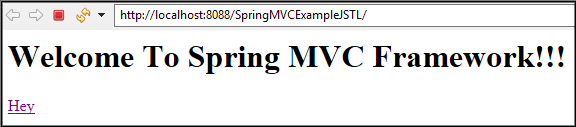

Thus, this is how we render any data using the Model interface, and to view data on the JSP page we have JSTL.