In this tutorial we are going to discuss about how to handle the web elements in Selenium C#. As we have discussed in earlier tutorials that the Web Elements are web components which are present on the webpage, using these components user can perform the different actions on the webpage.
Web Elements in Selenium C#
We will see how to handle web elements or Components in Selenium C#. To see the example of handling web elements some of the components are
- Hyperlink
- TextBox
- CheckBox
- Button
- RadioButton.
Automate Hyperlink in Selenium C#
In order to handle the Hyperlink first we need to locate the element on the webpage with the help of FindElement() method. After that we can use Click() method of “IWebElement” interface with the help of this we can click on the Hyperlink.
In Visual Studio first we will add a directory in the TestScript and name it HyperLink, inside this we will add a class called TestHyperLink we will make this class public and use the attribute [TestClass] with it. Inside this class we will make a public method with name ClickLink() and use the attribute [TestMethod] with it.
[TestClass]
public class TestHyperLink
{
[TestMethod]
public void ClickLink()
 {
NavigationHelper.NavigateToUrl(ObjectRepository.Config.GetWebsite());
IWebElement element= ObjectRepository.Driver.FindElement(By.LinkText("File a Bug"));
element.Click();
IWebElement pelement= ObjectRepository.Driver.FindElement(By.PartialLinkText("File"));
pelement.Click();
 }
}
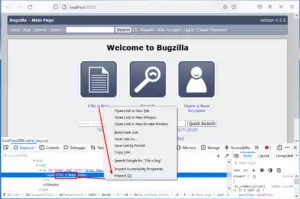
First we need to locate the Hyperlink on the webpage so we are using FindElement(), then go to Bugzilla webpage and click on Home page then right click on Hyperlink and select the option inspect element, the text of the Hyperlink is “File a Bug”.
ObjectRepository.Driver.FindElement(By.LinkText("File a Bug")); if we look at the return type of this method so it shows it is going to return us element of type IWebElement which is an interface.
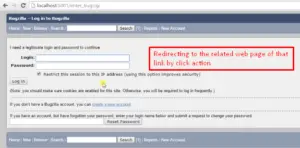
If we go to the interface here we can see a method called Click() so we are going to use the same method for clicking on the webpage. We will call the Click() by element.Click(); and use the NavigationHelper which is going to redirect us to the current page so NavigationHelper.NavigateToUrl(ObjectRepository.Config.GetWebsite()); write this statement put the debug point here and build the solution and run the script in debug mode.
Output: First if we do stepover it has find the element “File a Bug”
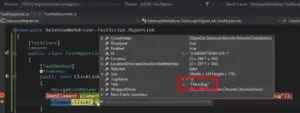
& again if we do a step over it has been clicking on the link.
Similar thing can be done with the other location strategies that is PartialLinkText just write PartialLinkText in the place of LinkText and specify only a part of the LinkText in brackets again run this script this will also give the same output.
Adding the class in ComponentHelper
Inside our ComponentHelper we will add a class GenericHelper this class will contain the common methods which are using by other script. Make sure this class should be public and inside this class we will make a public static method because we want to call it with the help of the Class name.
public class GenericHelper
{
public static bool IsElementPresent(By Locator)
{
 try
  {
   return ObjectRepository.Driver.FindElements(Locator).Count==1;
  }
 catch(Exception)
  {
   return false;
  }
 }
public static IWebElement GetElement(By Locator)
 {
 if(IsElementPresent(Locator))
  return ObjectRepository.Driver.FindElement(Locator);
 else
  throw new NoSuchElementException("Element Not Found:"+Locator.ToString());
 }
}
Output: If the web element is present on that webpage it will return us count 1 means the entire statement will return true. If it is not present then it will return us 0 in that case it is a false condition.
This method is capable of handling only the unique elements, means if we supply the locator for multiple elements so in that case this method will not work. So we need to keep in mind while using this method the locator should be unique every time.
After that inside the ComponentHelper we will add one more class called LinkHelper inside this we will put the method related to the clicking on Hyperlink.
public class LinkHelper
{
private static void IWebElement element;
 public static void ClickLink(By Locator)
 {
  element=GenericHelper.GetElement(Locator);
  element.Click();
 }
}
In TestHyperLink.cs write this code.
[TestClass]
public class TestHyperLink
{
[TestMethod]
public void ClickLink()
{ NavigationHelper.NavigateToUrl(ObjectRepository.Config.GetWebsite());
LinkHelper.ClickLink(By.LinkText("File a Bug"));
LinkHelper.ClickLink(By.PartialLinkText("File"));
}
}
Again build the solution and run the script in debug mode when we do a step over it will go inside the IsElementPresent method. This is going to return us true and also return the Web Element. Then it will perform the click action means it will click on the link. Similar actions will perform with the PartialLinkText condition.
Automate TextBox in Selenium C#
Now moving on we will discuss about how to handle the TextBox. Again the procedure is same first we need to locate them using FindElement(), then their are two methods SendKeys() & Clear() which comes from the IWebElement interface.
SendKeys():
It will supply the argument to the element TextBox.
Clear():
It will clear all the text that is currently present in the element TextBox.
In TestScript we will again add a directory called TextBox inside this we will add a class and name it TestTextBox.
[TestClass]
public class TestTextBox
{
[TestMethod]
public void TextBox()
{ NavigationHelper.NavigateToUrl(ObjectRepository.Config.GetWebsite());
LinkHelper.ClickLink(By.LinkText("File a Bug"));
IWebElement ele= ObjectRepository.Driver.FindElement(By.Id("Bugzilla_login"));
ele.SendKeys(ObjectRepository.Config.GetUsername());
ele= ObjectRepository.Driver.FindElement(By.Id("Bugzilla_password"));
ele.SendKeys(ObjectRepository.Config.GetPassword());
ele= ObjectRepository.Driver.FindElement(By.Id("Bugzilla_login"));
ele.Clear();
}
}
Now build the solution and run the script in debug mode.
Output: So as we can see here it’s able to locate the element and it’s TagName is “input”
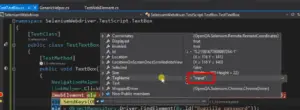
if we do a step over so it has supplied the Username, similarly the Password has also supplied.
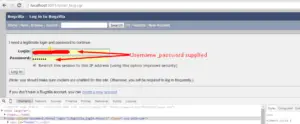
Now again we will locate the old element and call the Clear() method, as we can see it has clear all the present information from the login TextBox.
![]()
Again in our ComponentHelper we will create one more class called TextBoxHelper.
public class TextBoxHelper
{
private static IWebElement element;
public static void TypeInTextBox(By locator,string text)
{
element= GenericHelper.GetElement(locator);
element.SendKeys(text);
}
public static void ClearTextBox(By locator)
{
element= GenericHelper.GetElement(locator);
element.Clear();
}
}
And in our TestTextBox class we have a method TextBox() inside it we will specify some statements that are.
[TestClass]
public class TestTextBox
{
[TestMethod]
public void TextBox()
{ NavigationHelper.NavigateToUrl(ObjectRepository.Config.GetWebsite());
TextBoxHelper.TypeInTextBox(By.Id("Bugzilla_login"), ObjectRepository.Config.GetUsername()); TextBoxHelper.TypeInTextBox(By.Id("Bugzilla_password"), ObjectRepository.Config.GetPassword());
TextBoxHelper.ClearTextBox(By.Id("Bugzilla_login"));
}
}
Output: Now run this script in debug mode so if we do a step over it will supply the username into the login TextBox then supply the password into the password Textbox and then it will clear all the supplied text from the login TextBox just like the previous example of this one.
Here we have learned only two elements one is Hyperlink and the second one is TextBox. In next tutorial we will discuss about other leftover elements.