In the previous tutorial we have learnt about How to Find element by CSS Selector Selenium C#, now in this tutorial we will discuss about selenium web driver and how to setting up selenium web driver and how to write our first automation in selenium C#.
What is Selenium Web Driver in C#
Selenium web driver is a popular tool for automating the web page application it can be used for automating the UI components or it can be used for automating the functional part of the product.
How Selenium Web Driver Works
In Selenium Web Driver we have a concept of driver which is an executable file, the driver will communicate to the browser so in Selenium Web Driver there is a driver file for the individual browser.
Suppose if we have Internet Explorer browser in my testcase then in that case I need help of IE driver. Similarly if i need to use Chrome browser then i need Chrome driver for that, Firefox driver for Firefox browser and Safari driver for Safari browser.
So whatever the script you return in the binding language during the runtime that is going to communicate to the driver, driver will communicate to the browser, resulting in the automation of the browser according to the script.
Setting Up of Selenium Web Driver in C# Visual Studio
Let’s see how can we setup a Selenium Web Driver into our local system. For this we will use “Nuget”, Nuget is a package manager for Microsoft Development Platform.
Using the Nuget client, one can compose and release the packages. packages are nothing these are the collection of the dll files.
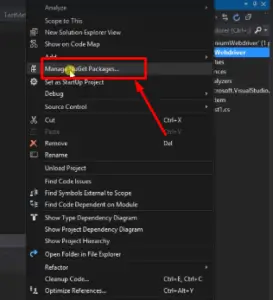
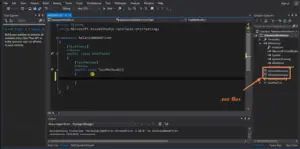
So if you want to open the package manager inside your project just do a right click on your project and select “Manage Nuget Packages”.
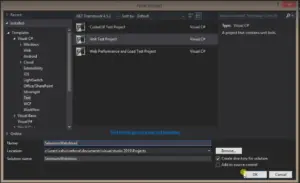
So in my visual studio i am making a new project then name it as Selenium WebDriver.
Now in order to use this selenium in our project we need to consume the package of Selenium. In solution explorer just right click on the project name select the option Manage Nuget Packages this will be going to launch the nuget gallary which contains all the packages.
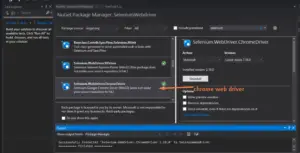
Nuget gallery is an online repository for storing the package. In search Text box search for the selenium, and install the Selenium WebDriver and Selenium Support.

So when we install these packages they are going to add the reference to some certain dll in our project.
And after this in order to use the Firefox we don’t need to install the driver explicitly, in case of using Chrome or Internet Explorer we have to add the driver explicitly.
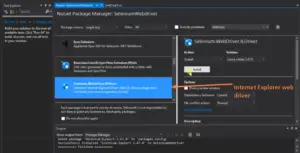
If we scroll down then we will find the Internet Explorer and Chrome driver with the 32 bit version from here we can install them if you want 64 bit you can search for it. After that we can see in solution explorer the executable files of them have added they will be communicate with their respective browser while using them.
Write Automation test in C# Selenium
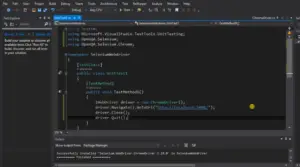
Open your visual studio and go to the project that you have created and gave the name as Selenium WebDriver in the coding section start writing the code inside the public test method under the public class.
Writing Automation Test using Selenium C#
IWebDriver driver = new ChromeDriver();
driver.Navigate().GoToUrl("http://localhost:5001/"); //this will open the webpage
driver.Close(); // this will close the browser session
driver.Quit(); // this will stop the WebDriver
When we run the Application in Debug mode then if any error is caught that will show otherwise it will open the Chrome browser window and there will be the URL that we have given that webpage will requested and display.
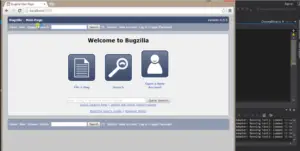
We have created a IWebDriver object as a new ChromeDriver() object whatever browser you want to select we have to give their name here while making its instance in the above image you can see that we have taken ChromeDriver so the Chrome browser has opened, and the given URL was the URL of Bugzilla homepage so it has open that webpage.
Suppose if we want to open internet explorer then we have to write IWebDriver driver = new InternetExplorerDriver ()
Same goes with the Firefox browser we have to write IWebDriver driver = new FirefoxDriver for that.
driver.Navigate().GoToUrl(" ") in this method we have to give the name of the URL which we want to open in browser, driver.Close() is to close the browser session, and the driver.Quit() method work is to stop the WebDriver.
So in this way we have successfully created our first Automation in Selenium C#. I hope you all have understood it properly.