In previous tutorial we have seen how to handle the Hyperlink and TextBox in Selenium C#. Now in this tutorial we will discuss about handling some more web elements that are CheckBox, Button and RadioButton in Selenium C#.
Automate CheckBox in Selenium C#
Now moving on the next type of Component we are going to handle is CheckBox. In this element the procedure is also the same as we have seen in the last tutorial of Automate Hyperlinks and TextBox If you want you can go through with this link.
First we need to locate the element with FindElement(), then use the Click() method to Check it or uncheck it. Their is also a attribute called “Checked” by which we can identify whether the CheckBox is already Checked or not.
Go to Visual studio in TestScript first we will add a directory called CheckBox, inside this we will add a class name it as TestCheckBox.
[TestClass]
public class TestCheckBox
{
[TestMethod]
public void TestBox()
{
NavigationHelper.NavigateToUrl(ObjectRepository.Config.GetWebsite());
LinkHelper.ClickLink(By.LinkText("File a Bug"));
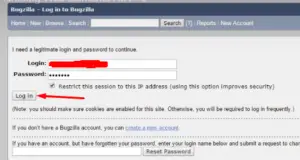
TextBoxHelper.TypeInTextBox(By.Id("Bugzilla_login"), ObjectRepository.Config.GetUsername());
TextBoxHelper.TypeInTextBox(By.Id("Bugzilla_password"), ObjectRepository.Config.GetPassword());
TextBoxHelper.ClearTextBox(By.Id("Bugzilla_login"));
IWebElement ele= ObjectRepository.Driver.FindElement(By.Id("Bugzilla_restrictlogin"));
ele.Click();
}
}
Build the solution and run the script in debug mode.
Output: It will identify the CheckBox and click it means it checked the CheckBox.
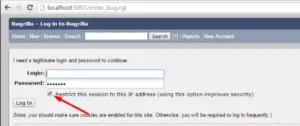
If we do a step over it will uncheck the CheckBox.
Again in our ComponentHelper we will add a class CheckBoxHelper. Inside this we will create a public method called CheckedCheckBox().
public class CheckBoxHelper
{
public void CheckedCheckBox(By locator)
{
element= GenericHelper.GetElement(locator);
element.Click();
}
public static bool IsCheckBoxChecked(By locator)
{
element= GenericHelper.GetElement(locator);
string Flag= element.GetAttribute("Checked");
 if(Flag==null)
     return false;
 else
     return Flag.Equals("true")||Flag.Equals("Checked");
}
}
Inside our TestCheckBox class add some more statements, and comment out two statements like below.
[TestClass]
public class TestCheckBox
{
[TestMethod]
public void TestBox()
{
NavigationHelper.NavigateToUrl(ObjectRepository.Config.GetWebsite());
LinkHelper.ClickLink(By.LinkText("File a Bug"));
TextBoxHelper.TypeInTextBox(By.Id("Bugzilla_login"), ObjectRepository.Config.GetUsername());
TextBoxHelper.TypeInTextBox(By.Id("Bugzilla_password"), ObjectRepository.Config.GetPassword());
TextBoxHelper.ClearTextBox(By.Id("Bugzilla_login"));
//IWebElement ele= ObjectRepository.Driver.FindElement(By.Id("Bugzilla_restrictlogin"));
//ele.Click();
Console.WriteLine(CheckedBoxHelper.IsCheckBoxChecked(By.Id("Bugzilla_restrictlogin")));
CheckBoxHelper.CheckedCheckBox(By.Id("Bugzilla_restrictlogin"));
Console.WriteLine(CheckedBoxHelper.IsCheckBoxChecked(By.Id("Bugzilla_restrictlogin")));
}
}
Now run this script in debug mode.
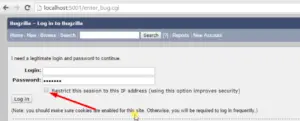
Output: As we can see here currently the CheckBox is checked if we do a step over so it will return us true.
Suppose if we uncheck this CheckBox and do a step over so it will return us false.
We have created the HelperClass so that the actions related to the component will be grouped into with their corresponding classes.
Automate Button in Selenium C#
Now in order to handle the Button all the process is same . First we need to locate them using FindElement() method then perform the click action with the help of Click() method which comes from the IWebElement interface.
In TestScript we will add one more directory called Button, inside this directory we will add a class and name it HandleButton make it public and use Attribute [TestClass] with it inside this we will make a method.
[TestClass]
public class HandleButton
{
[TestMethod]
public void TestButton()
{
NavigationHelper.NavigateToUrl(ObjectRepository.Config.GetWebsite());
LinkHelper.ClickLink(By.LinkText("File a Bug"));
TextBoxHelper.TypeInTextBox(By.Id("Bugzilla_login"), ObjectRepository.Config.GetUsername());
TextBoxHelper.TypeInTextBox(By.Id("Bugzilla_password"), ObjectRepository.Config.GetPassword());
IWebElement element=ObjectRepository.Driver.FindElement(By.Id("log_in"));
element.Click();
}
}
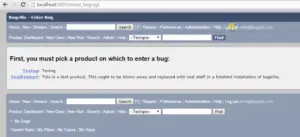
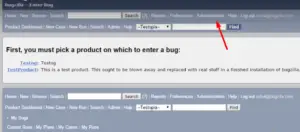
Inside the Bugzilla Home page when we click on the link “File a Bug” then it will take us to the login screen where we have a “Log in” Button .
We are using element=ObjectRepository.Driver.FindElement(By.Id("log_in")); this line of code and provided the id in parameter by inspecting the login button. This particular method will return us the type of IWebElement interface and inside this interface we have a Click() method which we are using to perform the click action.
Now we will build the solution and run our script in debug mode.
Output: First it will click on the a “File a Bug” link then move on the next page 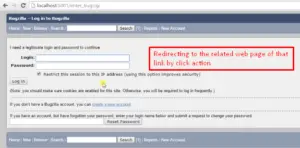
and supply the username, password to their corresponding Text Boxes,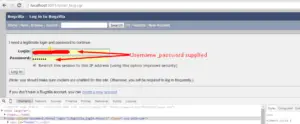
if we do a step over it will identify the button on the webpage
and again if we do a step over then it will perform the click action so it will take us to the related page of that button.
Now we will click on continue in our debugging window.
Inside the ComponentHelper directory we will add a class called ButtonHelper inside this class first we will add a private IWebElement element, and a public method called ClickButton() this method will take the By as an argument.
public class ButtonHelper
{
private static IWebElement element;
public static void ClickButton(By locator)
{
element=GenericHelper.GetElement(locator);
element.Click();
}
}
In HandleButton.cs here we will use.
[TestClass]
public class HandleButton
{
[TestMethod]
public void TestButton()
{
NavigationHelper.NavigateToUrl(ObjectRepository.Config.GetWebsite());
LinkHelper.ClickLink(By.LinkText("File a Bug"));
TextBoxHelper.TypeInTextBox(By.Id("Bugzilla_login"), ObjectRepository.Config.GetUsername());
TextBoxHelper.TypeInTextBox(By.Id("Bugzilla_password"), ObjectRepository.Config.GetPassword());
//IWebElement element=ObjectRepository.Driver.FindElement(By.Id("log_in"));
//element.Click();
ButtonHelper.ClickButton(By.Id("log_in));
}
}
Again we will run this script in debug mode.
Output: First it will click on the “File a Bug” link then supply the username, password and if we do a stepover it will click on the “Log in” Button as we can see here in below image it has redirected us on the related webpage of that button.
Enabled Property:
So moving on their is one more property which is present inside of IWebElement interface that is “Enabled”. Using this property we can identify whether the web component is enable or disable. So here inside the ButtonHelper we will add two more method.
public class ButtonHelper
{
private static IWebElement element;
public static void ClickButton(By locator)
{
element=GenericHelper.GetElement(locator);
element.Click();
}
public void bool IsButtonEnabled(By locator)
{
element=GenericHelper.GetElement(locator);
return element.Enabled;
}
public static string GetButtonText(By locator)
{
element= GenericHelper.GetElement(locator);
if(element.GetAttribute("value")==null)
 return string.Empty;
return element.GetAttribute("value");
}
}
We are using the value attribute for retrieving the text of the Button in a static method.
In HandleButton.cs we will add some more statements. That are Console.WriteLine statements.
[TestClass]
public class HandleButton
{
[TestMethod]
public void TestButton()
{ NavigationHelper.NavigateToUrl(ObjectRepository.Config.GetWebsite());
LinkHelper.ClickLink(By.LinkText("File a Bug")); TextBoxHelper.TypeInTextBox(By.Id("Bugzilla_login"), ObjectRepository.Config.GetUsername()); TextBoxHelper.TypeInTextBox(By.Id("Bugzilla_password"), ObjectRepository.Config.GetPassword());
Console.WriteLine(Enabled:{0}",ButtonHelper.IsButtonEnabled(By.Id("log_in")));
Console.WriteLine("ButtonText:{0}",ButtonHelper.GetButtonText(By.Id("log_in")));
ButtonHelper.ClickButton(By.Id("log_in));
}
}
Put the debug point on TextBoxHelper.TypeInTextBox(By.Id("Bugzilla_login"), ObjectRepository.Config.GetUsername()); line and build the solution and run the script in debug mode.
Output: First it will provide the username password
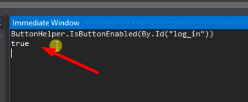
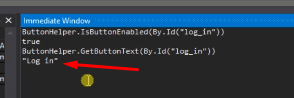
then we will copy the line ButtonHelper.IsButtonEnabled(By.Id("log_in") and paste it on the immediate window so it will show us true means the Button is enable.
similarly in order to get the text of the Button copy this line ButtonHelper.GetButtonText(By.Id("log_in") and paste on the immediate window so it will show the text as “Log in”.
If we do a step over again, it will click on the “Log in” button.
Automate Radio Buttons in Selenium C#
The main difference between the CheckBox and Radio button is that in the CheckBox we can select the multiple CheckBox but in case of Radio button we can select either one of the two Radio buttons or more than that.
Now in order to handle the Radio button the procedure is same as the Button. First we will use FindElement() method to locate them then use the Click() method of IWebElement interface.
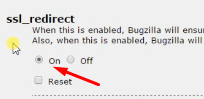
So in Bugzilla Homepage if we go to the Administration page > Parameters so we will see the Radio buttons are present their. In our TestScript we will add one more directory called RadioButton inside this we will add a class and name it as HandleRadioButton.
[TestClass]
public class HandleRadioButton
{
[TestMethod]
public void TestRadio()
{ NavigationHelper.NavigateToUrl(ObjectRepository.Config.GetWebsite());
LinkHelper.ClickLink(By.LinkText("File a Bug")); TextBoxHelper.TypeInTextBox(By.Id("Bugzilla_login"), ObjectRepository.Config.GetUsername()); TextBoxHelper.TypeInTextBox(By.Id("Bugzilla_password"), ObjectRepository.Config.GetPassword());  ButtonHelper.ClickButton(By.Id("log_in));
LinkHelper.ClickLink(By.XPath("//div[@id='header']/ul[1]/li[9]/a"));
LinkHelper.ClickLink(By.XPath("//dt[@id='parameters']/a"));
IWebElement element=ObjectRepository.Driver.FindElement(By.Id("ssl_redirect-on"));
element.Click();
}
}
Now put the break point on TextBoxHelper.TypeInTextBox(By.Id("Bugzilla_login"), ObjectRepository.Config.GetUsername()); line and build the solution and run the script in debug mode.
Output: First it will hit the break point then if we do a step over so it will supply the username and password,
then it will click on “Log in” button then click on the Administration
after that it will click on parameters,
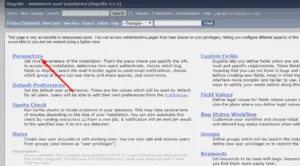
then locate the Radio button. Currently the Radio button is not selected
if we do a step over so it will select the Radio button.
Inside the ComponentHelper directory we will add one more class called RadioButtonHelper.
public class RadioButtonHelper
{
private static IWebElement element;
public static void ClickRadioButton(By locator)
{
element=GenericHelper.GetElement(locator);
element.Click();
}
public static bool IsRadioButtonSelected(By locator)
{
element=GenericHelper.GetElement(locator);
string flag= element.GetAttribute("Checked");
  if(flag==null)
       return false;
  else
       return flag.Equals("true")||flag.Equals("Checked");
}
}
Now comment out the following statement from the HandleRadioButton.cs and write code like below.
[TestClass]
public class HandleRadioButton
{
[TestMethod]
public void TestRadio()
{ NavigationHelper.NavigateToUrl(ObjectRepository.Config.GetWebsite());
LinkHelper.ClickLink(By.LinkText("File a Bug")); TextBoxHelper.TypeInTextBox(By.Id("Bugzilla_login"), ObjectRepository.Config.GetUsername()); TextBoxHelper.TypeInTextBox(By.Id("Bugzilla_password"), ObjectRepository.Config.GetPassword()); ButtonHelper.ClickButton(By.Id("log_in));
LinkHelper.ClickLink(By.XPath("//div[@id='header']/ul[1]/li[9]/a"));
LinkHelper.ClickLink(By.XPath("//dt[@id='parameters']/a"));
//IWebElement element=ObjectRepository.Driver.FindElement(By.Id("ssl_redirect-on"));
//element.Click();
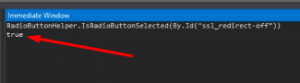
Console.WriteLine("Selected:{0}", RadioButtonHelper.IsRadioButtonSelected(By.Id("ssl_redirect-off")));
RadioButtonHelper.ClickRadioButton(By.Id("ssl_redirect-on"));
}
}
Put the break point on LinkHelper.ClickLink(By.LinkText("File a Bug")); line.Now build the solution and run the script in debug mode.
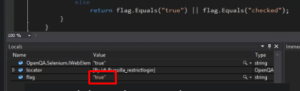
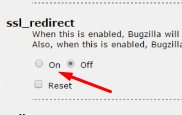
Output: First it will hit the Debug point if we do a step over it will supply the username and password then click on “Log in” button then it will click on Administration after that it will click on parameters. If we copy RadioButtonHelper.IsRadioButtonSelected(By.Id("ssl_redirect-off")) this line of code and paste it in immediate window so as we can see it will return us true which is correct because that particular “Off” Radio button is selected
and if we do a step over again so it will select the other radio button that is “On” Radio button.
Text Property:
Their is one more property that is “Text” property, this property will help us to get the text from the web component.
For example- if we look on the Bugzilla Homepage suppose we want to get the text of the “File a Bug” link so the code we have to write is.
IWebElement webelement= ObjectRepository.Driver.FindElement(By.XPath("//a[@id='enter_bug']/span"));
Console.WriteLine("Text:{0}",webelement.Text);
So in this manner we can automate or handle the CheckBox, Buttons and Radio Buttons in Selenium C#.