What is Defect Reporting?
The key to making a good report is providing the development team as much information as necessary to reproduce the bug. These can be broken into the following:
- Give a brief description of the bug or defect
- List the steps that are needed to reproduce the issue
- Provide all the details on the test data used to get the issue
- Provide all the required screenshots of the defect to the development team
- Provide the opinion from a tester’s perspective
Generally the more information is shared by the test team, the easier it will be for the development team to determine the problem and fix the issue.
But a bug report is a case against a product so the report should be concise such that someone who has never seen the system can follow the steps and reproduce the issue.
What is Defect Management?
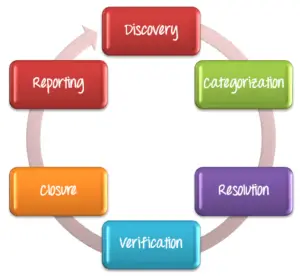
Defect Management is a systematic process to identify and fix bugs. A defect management cycle contains the following stages 1) Discovery of Defect, 2) Defect Categorization 3) Fixing of Defect by developers 4) Verification by Testers, 5) Defect Closure 6) Defect Reports at the end of the project.
What is the process of Defect Management?
The process of defect management usually includes four steps.
- The first step is the stage of defect detection. We have already mentioned that it can be conducted either by the team of developers or by the users. Regardless of the type of testing, its main goal is to detect all bugs in the final product or its part.
- The second step of the bug management process is dedicated to the formulation of bug reports. These are the documents that include all the necessary information about certain bugs. Usually, they contain data on the type of bug and the possible ways of its correction.
- The third step is the stage of bug fixing. After the bugs are fixed, they should be tested once more to make sure that the software works properly.
- During the final step, the bug list is created. This is the document that contains information about all bugs that occurred during the project’s performance. The team often uses the bug list because similar bugs’ occurrence is not rare.
Defect management process
- Identification: This will be the first step to identify the defect in the process this can be done by the testing team and sometimes the customer can also tell you about the defect.
- Categorization: After the defect is registered, then it passes to the desired person then checks it and categorize it that what type of defect it is and then move to the next step.
- Prioritization: According to the type of defect or severity of the defect. These defects are a set of priorities for fixing it accordingly. It can handle through a formal channel or an individual team member who is working on defects can set its own priorities for fixing defects.
- Assignment: As soon as the priorities are decided by a formal channel defect is assigned to a developer to fix it.
- Resolution: Developer fixes the defect and places it in the same place from where it was identified.
- Verification: As soon as the defect is fixed, the developing team verifies that the defect is actually fixing and working in the smoothest way or not.
- Closure: once it is fixed and resolved it is marked as a closed case.
- Management Reporting: This provided at regular intervals which helps management to know which work is done and which work is going on and when it will be done.
Defect Management Life Cycle
When a system gives a different output other than the actual business requirement i.e. when there is a deviation from the actual or original business requirement then we can say that there is a defect in the system/software.
When the testing team executes the test cases, they come across a situation where the actual test result is different from the expected result. This variation is termed as a Defect.
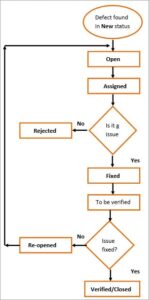
- Whenever the testing team finds a defect in the application, they raise the defect with the status as “NEW”.
- When a new defect is reviewed by a QA lead and if the defect is valid, then the status of the defect would be “Open” and it is ready to be assigned to the development team.
- When a QA lead assigns the defect to the corresponding developer, the status of the defect would be marked as “Assigned”. A developer should start analyzing and fixing the defect at this stage.
- When the developer feels that the defect is not genuine or valid, then the developer rejects the defect. The status of the defect is marked as “Rejected” and assigned back to the testing team.
- If the defect logged is repeated twice or both the defects reported have similar results and steps to reproduce, then one defect status is changed to “Duplicate”.
- If there are some issues or hurdles in the current release for fixing a particular defect, then the defect would be taken in the upcoming releases instead of the current release, and then it is marked as “Deferred” or “Postponed”.
- When a developer is not able to reproduce the defect by the steps mentioned in “Steps to Reproduce” by the testing team then the developer can mark the defect as “Not Reproducible”. In this stage, the testing team should provide detailed reproducing steps to a developer.
- If the developer is not clear about the steps to reproduce provided by a QA to reproduce the defect, then he/she can mark it as “Need more information”. In this case, the testing team needs to provide the required details to the development team.
- If a defect is already known and currently present in the production environment then the defect is marked as “Known defect”.
- When a developer makes the necessary changes, then the defect is marked as “Fixed”.
- The developer now passes the defect to the testing team to verify, so the developer changes the status as “Ready for Retest”.
- If the defect has no further issues and it is properly verified, then the tester marks the defect as “Closed”.
- While retesting the defect if the tester found that, the defect is still reproducible or partially fixed then the defect would be marked as “Reopened”. Now the developer has to look again into this defect.
A well planned and controlled Defect Life Cycle gives the total number of defects found in a release or in all releases. This standardized process gives a clear picture of how the code was written, how properly the testing has been carried out, how the defect or software has been released, etc.
This will reduce the number of defects in production by finding the defects in the testing phase itself.
Defect Prevention
It is a process of improving quality and productivity by preventing the injection of defects into a software product. It is virtually impossible to eliminate the defects altogether.
Objective of Defect Prevention Process
- Identify and analyze the causes of defects, so that we reduce the occurrence of defects.
- Reduction in the number of defect categories.
- Reduce most frequent types of defects such as “not following coding guidelines” or Ambiguity within requirement and specification.
- Reduction in the extent of defect escapes between the test phase and the release.
- Establish practice within projects to identify defects early in the process.
- Set goals for improving critical processes with team-level accountability.
- It is practically impossible to prevent defects in the software. So testers and developers should collaborate for quick detection of defects and minimize the risk. They should assess the critical risk associated with the system and identified the defects.
Advantages of Defect Management
- There is no shortage of automation tools when it comes to defect tracking. You can find the software tools to track the non-technical problems, user-facing tools for production-related defects, & internal automated tools the development team can use to track the defects. In fact, even if you are just using the email, spreadsheets, sticky notes, and a log on a wiki to track the customer’s issues, you will need the defect tracking of few slots. It is just a matter of figuring out the correct tools & activities for the team.
- The defect tracking assists you to ensure that the bugs found in the system really get fixed. Sure, it is great for developers and testers to have a conversation & to recreate the issue together.
- In defect management, the defect tracking, automated tools not only provide a channel to ensure follow-through but also provide the valuable-metrics. Depending on application tools being used, the teams can tie the defects for changed the code, tests, and other data that’ll allow for traceability and analysis of the defect trends. If a certain module strains with the defects, it might be time for review & rewrite that module.
- Having the tool in the spot also sends notifications for the right individual when the bug needs to be tested, fixed, and marked as resolved. In defect management tools, the defect tracking app tools, it allows for a repository of the documentation that’ll provide the value for troubleshooters and for support the workers later on if there is a workaround to a problem.
Disadvantages of Defect Management
- If DMP is not handled properly, then there will a huge increased cost in a creeping i.e. increase in the price of the product.
- If errors or defects are not managed properly at an early stage, then afterward, defect might cause greater damage, and costs to fix or resolve the defect will also get increased.
- There will be other disadvantages also like loss of revenue, loss of customers, damaged brand reputations if DMP is not done properly.