A Development Environment in software and web application is a workplace where changes from the developer are deployed, test before reaching a live web site. In this tutorial, we will see the Development Environment Set up for creating a Servlet application.
How to set up the Environment?
For a beginner, I am going to tell you about How to set up the environment and start creating web applications from scratch. Following are the things you will need:
- JDK(Java Development Kit)
- Java Application Server
- IDE for Java
JDK(Java Development Kit)
JDK is a development environment for building applications using Java Programming language. It includes tools useful for developing and testing programs.
Download JDK https://www.oracle.com/java/technologies/javase/javase-jdk8-downloads.html
After Downloading JDK, it will ask you to install JRE(Java Runtime Environment) to install it.
Now You have to set up some Environment variables in your OS.
- Go to My Computer, Right Click on it. Click Properties.
- Click on Advanced System Setting
- Click on Environment Variable.
- In The System Variable, Click on Path and edit it.
- Add the java installation path to the path variable like “C:\Program Files\jdk1.8.0_20\bin” (it should be a double quote)
- Click OK and Ok.
- Just restart your PC
- Now Open cmd prompt and type “Java version” (for checking whether it is installed)
- It will return the Java Version else you need to follow these steps again.
Why do we set Environment variables?
Environment variables are the global variables accessed by processes under OS. The PATH is set so that our OS is able to access exe files from the command line.
When we compile a java code we need javac.exe inside the bin directory where JDK is installed (for ex. C:\Program Files\Java\jdk1.8.0_91\bin). If we don’t set the PATH in Environment variable every time you compile or run you have to provide a complete path of javac.
Once you set the PATH Environment variable we can compile and run the program without giving complete javac path every time.
Java Application Server
In order for web applications to run, we will need a Web Server. There are different web servers available. For now, we will use the popular Apache Tomcat Server.
- Get the Apache Server from https://tomcat.apache.org/download-90.cgi and Download it.
- Unzip the file into some Location.
- Now click on the Setup, Click next on the setup.
- Then, Click I agree with the license agreement.
- Check the Component button and click Next.
- Enter username and password(make it easy so that you can remember it) and click Next.
- Now see whether the path for the JRE is right and then click Next.
- Click Install and wait till the installation completes.
- At last, Click the Finish button. (You can uncheck both the options here which are Read me files and Run apache)
Let us verify its installation.
- Open the browser
- Type in http://localhost:8080
- If you are able to see the apache tomcat page then the installation is successful.
IDE Installation
IDE is an Integrated Development Environment in which java programs are going to be executed. There are many IDE’s available like IntelliJ IDEA, NetBeans, Eclipse, etc. which are open source. Here we are going to use Eclipse. You can get Eclipse from http://www.eclipse.org.
- Download as per your OS(32 bit or 64 bit).
- Unzip the file into some location after downloading it.
- Go to that folder and double click on eclipse.exe.
- Now Eclipse will prompt and ask you the workspace folder(Where all your files will be saved ).
- It will take time and Eclipse will start.
How to Connect Eclipse IDE with Apache Server?
- Open Eclipse, there is a server tab at the bottom.
- Click on the link to create a server.
- Select the right server from the options given(for now Apache Tomcat).
- Click Next and give the installation path for tomcat (navigate the location till tomcat ) where it is installed.
- Click Finish.
- Now you are able to see the server name Just right click on it. You can now start it, stop it, delete it as per your choice.
What is the Error Faced by Users?
When you start a server, it is most probable you will face the following error:” starting Tomcat v(any) Server at localhost has encountered a problem”.
- Just double click on the link below the server tab at the bottom.
- Now one tab will open, just check the Ports tab and change the port number of HTTP/1.1 to any(I have used 8088).
- Now, click save or do Ctrl+S.
- Now, Once again right-click on the link of the server and start it. It will get started.
Let us see the First Example of Servlet in Eclipse:
- Open Eclipse
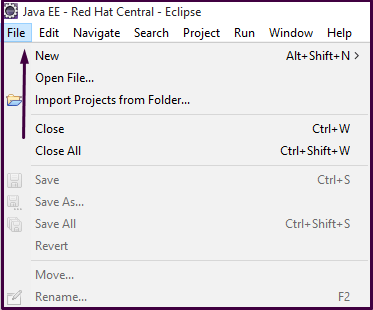
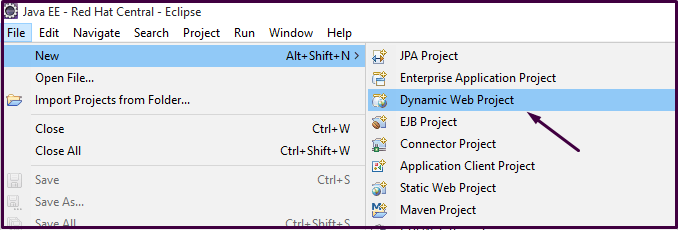
- Click on File then click New
- Click on Dynamic web project
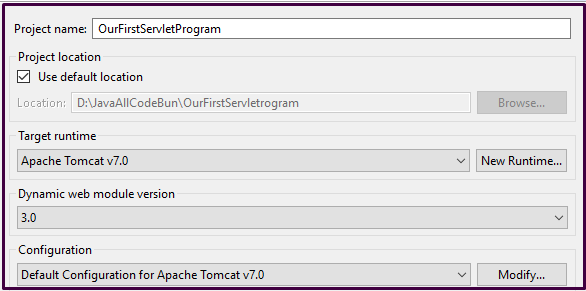
- Enter the project name (for now OurFirstServletProgram)
- Click Next, Next Finish.
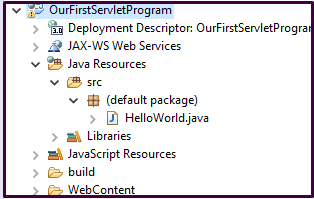
- This is our Project structure
Example for First Servlet Program
- Go to our project name
- Expand it
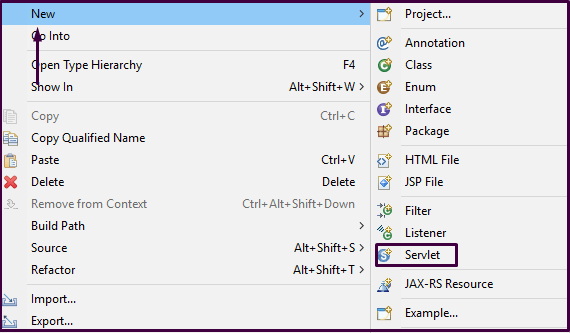
- Expand java resources. Right-click on it
- Click new, Servlet write our servlet name (for now Hello World)
- Uncheck all the checkboxes except doGet().
- Click Next and click Finish.
- Click Next.
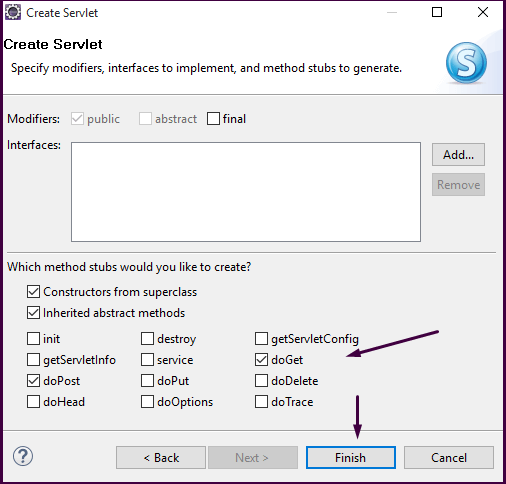
- Click Finish.
Now we have to add the Jar file to the project. How to add it?
- Right-click on your project
- Build path
- Configure build path
- Click on the libraries tab.
- Select servlet-ap.jar file under tomcat/lib
- Click ok


import java.io.IOException;
import java.io.PrintWriter;

import javax.servlet.ServletException;
import javax.servlet.annotation.WebServlet;
import javax.servlet.http.HttpServlet;
import javax.servlet.http.HttpServletRequest;
import javax.servlet.http.HttpServletResponse;

/**
 * Servlet implementation class HelloWorld
 */
@WebServlet("/HelloWorld")
public class HelloWorld extends HttpServlet {
  private static final long serialVersionUID = 1L;

  /**
   * @see HttpServlet#HttpServlet()
   */
  public HelloWorld() {
    super();
    // TODO Auto-generated constructor stub
  }

  /**
   * @see HttpServlet#doGet(HttpServletRequest request, HttpServletResponse
   *      response)
   */
  protected void doGet(HttpServletRequest request, HttpServletResponse response)
      throws ServletException, IOException {
    // TODO Auto-generated method stub
    response.getWriter().append("Served at: ").append(request.getContextPath());
    PrintWriter out = response.getWriter();
    out.println("<html><body>");
    out.println("<h1>Hello World!!!!<h1>");
    out.println("<body><html>");
    System.out.println("hello");
  }

}
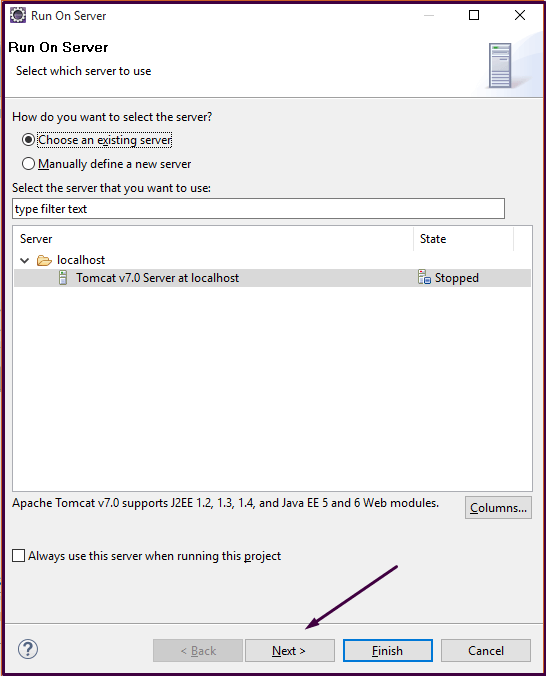
Now Run the project.
- Go to the menu.
- Go to the run option and then run HelloWorld.java
- Choose tomcat server
- Next
- addAll Finish.
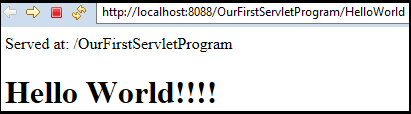
- Now, you will see the page.it will be like this. It is showing the error because the server is not able to find the required resource/servlet.

- The URL is wrong. Now add /HelloWorld to the URL. We will get the following page. Now we will have the output for Our FirstServletProgram.
We will discuss the concept of the life cycle in Servlet in detail in the next article of the tutorial i.e Life Cycle of Servlet.