As of now, We have seen the Login & Logout Example in servlet. Today there are like every application where we require to upload an image or file or any document so, we can create a File Uploading application in Servlet. In this article, we will look at the sample example of how to implement the File uploading option in Servlet.
Example of File Uploading using Servlet
In this application we will be creating two files:
- Servlet for ImageUpload
- index.html for view.
We will create a project structure as shown below using Eclipse IDE
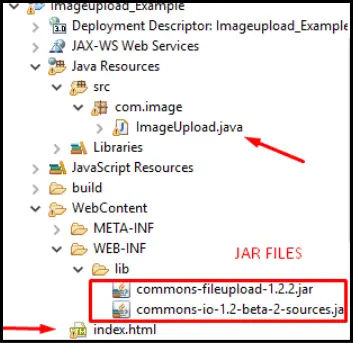
Download the following jar files extract it and paste the jar files to the lib folder of the project.
- Apache Common File Upload:http://commons.apache.org/proper/commons-fileupload/download_fileupload.cgi
- Apache Common IO:http://commons.apache.org/proper/commons-io/download_io.cgi
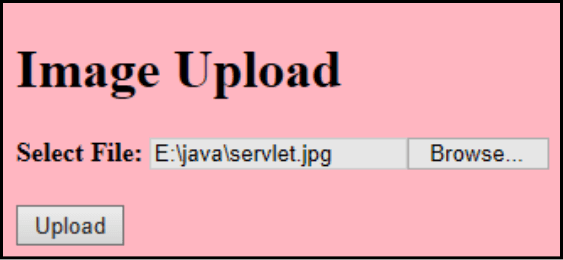
create an index.html page that shows an upload form certain points to consider here are:
- The form method attribute should be POST here.
- The form enctype should be multipart/form-data.
<!DOCTYPE html>
<html>
<head>
<meta charset="ISO-8859-1">
<title>Insert title here</title>
</head>
<body bgcolor=#FFB6C1">
  <form action="ImageUpload" method="post" enctype="multipart/form-data">
  <h1>Image Upload</h1>
    <h4>
      Select File: <input type="file" name="file">
    </h4>
    <input type="submit" value="Upload" id="button-1" />
  </form>
</body>
</html>
Create an ImageUpload.java Servlet for Handling the request.
In this, we have created the following variables:
- SAVE_DIR: where uploaded files will be stored.
- fileSizeThreshold: File size greater than the threshold will be directly written to disk, instead of memory.
- maxFileSize: the maximum size for a single upload file.
- maxRequestSize: maximum size for request.
package com.image;

import java.io.File;
import java.io.IOException;
import java.io.InputStream;
import java.io.PrintWriter;
import java.util.List;

import javax.servlet.ServletException;
import javax.servlet.annotation.MultipartConfig;
import javax.servlet.annotation.WebServlet;
import javax.servlet.http.HttpServlet;
import javax.servlet.http.HttpServletRequest;
import javax.servlet.http.HttpServletResponse;
import javax.servlet.http.Part;

import org.apache.tomcat.util.http.fileupload.FileItem;
import org.apache.tomcat.util.http.fileupload.FileUploadException;
import org.apache.tomcat.util.http.fileupload.RequestContext;
import org.apache.tomcat.util.http.fileupload.disk.DiskFileItemFactory;
import org.apache.tomcat.util.http.fileupload.servlet.ServletFileUpload;
import org.apache.tomcat.util.http.fileupload.servlet.ServletRequestContext;

@WebServlet("/ImageUpload")
public class ImageUpload extends HttpServlet {
  private static final long serialVersionUID = 1L;

  // location for uploading File
  private static final String SAVE_DIR = "uploadFiles";
  // Configuration for uploading files
  private static final int fileSizeThreshold = 62914;
  private static final long maxFileSize = 104857L;
  private static final long maxRequestSize = 20971520L;

  public ImageUpload() {
    super();
    // TODO Auto-generated constructor stub
  }

  protected void doPost(HttpServletRequest request, HttpServletResponse response)
      throws ServletException, IOException {
    // gets absolute path of the web application
    PrintWriter printWriter = response.getWriter();
    if (!ServletFileUpload.isMultipartContent(request))// if request
                              // contains upload
                              // files.
    {
      printWriter.println("Error!!!");// if not
    }
    DiskFileItemFactory itemFactory = new DiskFileItemFactory();// configure
                                  // setting
    itemFactory.setSizeThreshold(fileSizeThreshold);// set memory threshold
    itemFactory.setRepository(new File(System.getProperty("java.io.tmpdir")));
    ServletFileUpload servletFileUpload = new ServletFileUpload(itemFactory);
    servletFileUpload.setFileSizeMax(maxFileSize);// uploadfile max size
    servletFileUpload.setSizeMax(maxRequestSize);// max size of request

    String apppath = getServletContext().getRealPath("") + File.separator + SAVE_DIR;
    // create a directory if it doesn't exist
    File Dirnew = new File(apppath);
    if (!Dirnew.exists()) {
      Dirnew.mkdir();
    }
    @SuppressWarnings("unchecked")
    List<FileItem> fileItems;
    try {
      // parses the request content to extract file data
      fileItems = servletFileUpload.parseRequest(new ServletRequestContext(request));
      if (fileItems != null && fileItems.size() > 0) {
        for (FileItem item : fileItems) {
          if (!item.isFormField()) {
            String fileName = new File(item.getName()).getName();
            String filepath = apppath + File.separator + fileName;
            File storge = new File(filepath);
            item.write(storge);
            printWriter.println("FIle Uploaded...");
          }
        }
      }
    } catch (FileUploadException e) {
      // TODO Auto-generated catch block
      e.printStackTrace();
    } catch (Exception e) {
      // TODO Auto-generated catch block
      e.printStackTrace();
    }

  }
}
Run this application on the Server and we will get the following output.

Now Just go to project workspace>.metadata>.plugins>org.eclipse.wst.server.core>temp0>wtpwebapss>(YourProject name in my case ImageUpload_Examples)>UploadFiles>Your image which you uploaded.
Note: Point to be noted here is we are not using the web.xml file as we have learned in the previous articles that in Servlet 3.0 instead of web.xml we can use “@” annotations. So here I have used annotation @WebServlet.