In this tutorial, I am going to cover Database connectivity between Java and MYSQL with the servlet. Whatever the data we enter in input boxes it needs to be store at some location(Server or local computer) that is called a database.
There are many database tools available in the market but the most demanding tools are MYSQL, Oracle, MongoDB, SQLite ETC. In this Servlet tutorial, I Will cover the All the Java database connectivity examples with MYSQL.
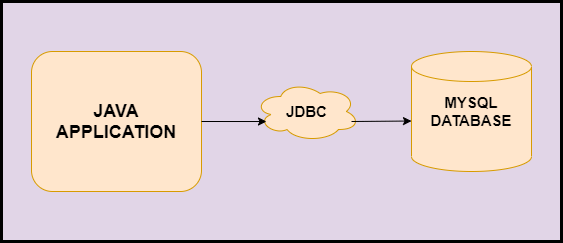
What is JDBC(Java Database Connectivity)?
JDBC is a Java API that is used to create connectivity to the Java code and Database. java.sql package contains all the classes, interfaces, and methods that provide support to manage a database with a Java application.
DriverManager Class
DriverManager class acts as an interface between users and drivers. It established a connection between the database and the appropriate driver. It calls the following methods:
- registerDriver(Driver driver): It is used to register the given driver with DriverManager.
- deregisterDriver(Driver driver): It is used to deregister the driver.
- getConnection(String url): It is used to established connection with the URL.
- getConnection(String url, String name, String pass): It is used to established connection with the URL, specified database name, database password. It returns the object of Connection.
Connection Interface
A connection is an interface to keep the session between java application & database. It provides some methods:
- createSatement(): This is used to create a statement object that is used to execute SQL queries.
- createStatement(int resultSetType,int resultSetConcurrency):This create the statement object and generate Resultset type with concurrency.
- setAutoCommit(): This method sets the commit status.
- commit(): This method saves the changes made.
- rollback(): This method drops all the changes made since the previous commit.
- close(): This method closes the connection.
Statement Interface
It is an interface that provides methods to execute queries with the database. It is a factory of ResultSet.
- executeQuery(String sql): This method is used to execute a SELECT query that returns the Resultset object.
- executeUpdate(String sql): This method is used to execute a DML query.
- execute(String sql): This method returns multiple results.
- executeBatch(): This method is used to execute the Batch of commands.
Statement st=con.createStatement();
int query=st.executeQuery("INSERT INTO TABLE_DEMO VALUES("ABC",21)");
PreparedStatement Interface
This interface is used to execute parameterized queries. Let’s look at the methods of it.
- setInt(int index,int values): This method sets the Integer values to given index.
- setString(int index, string value): This method sets the string value to the given index.
- setFloat(int index, float value): This method sets the float value to the given index.
- setDouble(int index, double value): This method sets the double value to the given index.
- executeUpdate(): This method is used for executing queries.
- executeQuery(): This method executes the SELECT query.
PreparedStatement pstmt=con.prepareStatement("insert into TABLE_DEMO values(?,?)");
pstmt.setString(1,"Nicolas");
pstmt.setInt(2,21);
Difference between Statement and PreparedStatement
Statement |
PreparedStatement |
| It is used for executing a static SQL statement in JDBC. | It is used for executing pre-compiled SQL statement in JDBC. |
| It cannot accept parameters at runtime. | It can accept different parameters. |
| It is slower as compared to PreparedStatement. | It is faster as compared to the statement because it executes precompiled SQL statements. |
| It is suitable for executing DDL commands. | It is suitable for executing DML commands |
| It makes code less readable and understandable. | It makes code more readable and understandable. |
| It is present in java.sql.Statement | It is present in java.sql.PreparedStatement |
ResultSet Interface
This interface object is pointed to the row of a table. The ResultSet interface provides methods for retrieving column values from the current row. Let’s see the methods in ResultSet Interface.
- next(): This method is used to move the cursor one location at a time.
- previous(): This method is used to move to the previous location from the current position.
- first(): This is used to move the cursor to the first row.
- last(): This method is used to move to the last row.
- absolute(int row): This method is used to move the cursor to a specified row number.
- relative(int row): This method is used to move the cursor to a relative row number.
- getInt(int column_index): This method is used to return integer data from the specified column index number.
- getInt(String column_name): This method is used to return integer data from the specified column name.
- getString(int column_index): This method is used to return string data from the specified column index.
- getString(String column_name): This method is used to return string data from the specified column name.
ResultSet rs=st.executeQuery("SELECT * FROM TABLE_DEMO");
while(rs.next())
{
rs.getString("name");   //get the column values.
rs.getInt("RollNo");
}
ResultSetMetaData Interface
ResultSetMetadata is used to get the metadata of the data(extra information about data) like the total number of rows, rows name rows data type, etc. Let’s see the methods:
- int getColumnCount():This method returns total number of columns.
- String getColumnName(): This method returns Column Name.
- String getTableName(): This method returns the table name.
ResultSetMetaData rs=rs.getMetaData();
System.out.pritnln("Column Name of index 2 :"+rs.getColumnName(2));
DatabaseMetaData Interface
DatabaseMetaData interface is used to get the metadata of the database like database name, driver name, etc. Let’s see some of the methods in this interface.
- String getDriverName(): This method returns the database driver’s name.
- String getDriverVersion(): This method returns the version of Driver.
- String getUserName(): This method returns the username of the database.
- String getDatabaseProductName(): This method returns the product name of the database.
DatabaseMetadata st=con.getMetaData();
System.out.pritnln("Driver Name :"+st.getDriverName());
JDBC Connectivity with MYSQL
Mysql is a free, open-source RDBMS(Relational Database Management System). MYSQL is one of the best RDBMS being used for developing various web-based software applications. We will look at the steps to install MYSQL in Windows OS.
Download the MySQL database from https://dev.mysql.com/downloads/mysql/ After Downloading the MYSQL community version, double click the installer file. Now the Installer window will be launched. Now, Follow the below steps.
- Select the Full radio button to install MYSQL. Click on Next.
- Click on Execute. It will take time to install the package (have patience here)
- Click on Next. again Click on Next.
- Now, you will see Type and Networking Page. Click Next.
- Here it will ask you to write username and password which is important so make sure you keep it simple as it will be good to remember (I will suggest you keep both username and password as root). Click on Next.
- Now, on the Windows Service page check the above two options of Configure MySQL server and start the MYSQL and then select the Standart system Account radio button and click Next.
- Now, When the configuration will be finished Click Finish to continue.
Step 1: Create a Database and Table in MYSQL.
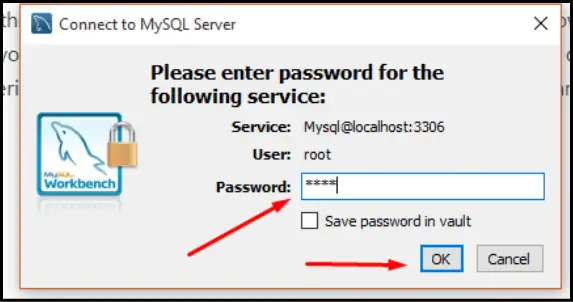
We can create a database using MySQL Workbench. Go to the Windows start menu and search MySQL workbench and click to open it. Now Select the First MySQL Instance.

After that, we can access the MYSQL query browser run it perform an operation, etc.
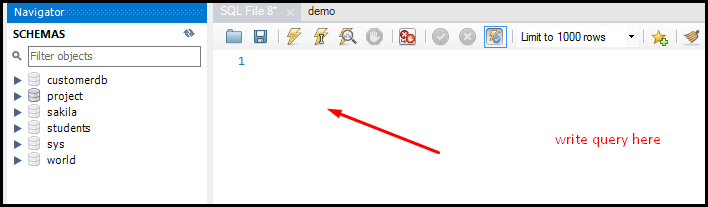
Write the query in the MYSQL Query tab then refresh the schemas you will get the database that you have created.
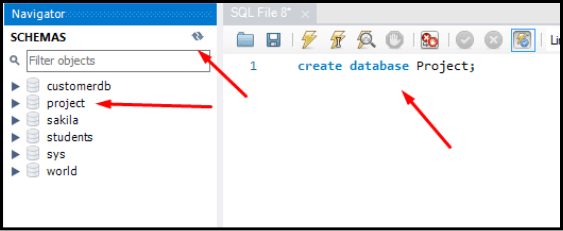
Now, create a table, write the following query in the Query tab, and execute it.
use Project
create table project.demo(id int(20), string varchar(20));
Now Table will be created in the database having two column Id and String.
Step 2: Create a project in eclipse (as we normally create it) add the jar file for mysql-connector.jar(open directory of MySql where you have installed >open Connector >copy mysql-connector-java8.0.21 into lib folder)
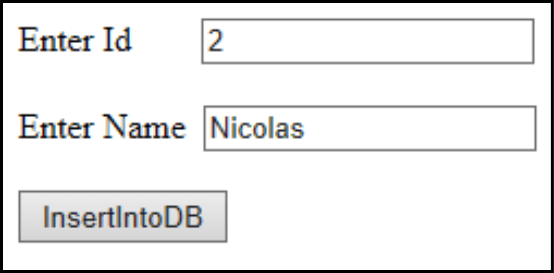
Step 3: Create an HTML file to take the required input & insert it into the database.
index.html
<form action="JDBCExample" method="post">
Enter Id<input type="text" name="id"><br>
Enter Name<input type="text" name="name">
<br>
<input type="submit" value="InsertIntoDB" id="button-1"/>
</form>
Step 4: Create a class for initializing the database
public class DatabaseCon {
  protected static Connection getConn() throws SQLException, ClassNotFoundException {
    String dbDriver = "com.mysql.jdbc.Driver";
    String dbURL = "jdbc:mysql://localhost:3306/Project";
    String dbUsername = "root";
    String dbPassword = "root";
    Class.forName(dbDriver);
    Connection con = DriverManager.getConnection(dbURL, dbUsername, dbPassword);
    return con;

  }
}
Step 5: Create a Servlet and insert the data into the database
  protected void doPost(HttpServletRequest request, HttpServletResponse response)
      throws ServletException, IOException {
    // TODO Auto-generated method stub
    int id = Integer.parseInt(request.getParameter("id"));
    String name = request.getParameter("name");
    try {
      Connection connection = DatabaseCon.getConn();
      PreparedStatement ps = connection.prepareStatement("insert into demo values(?,?)");
      ps.setInt(1, id);
      ps.setString(2, name);
      ps.executeUpdate();
      ps.close();

      PrintWriter out = response.getWriter();
      out.println("<html><body><b>Successfully Inserted!!!!" + "</b></body></html>");
    } catch (ClassNotFoundException e) {
      // TODO Auto-generated catch block
      e.printStackTrace();
    } catch (SQLException e) {
      // TODO Auto-generated catch block
      e.printStackTrace();
    }

  }

}
Output

Now view the database by executing the query select * from demo to check whether the data is inserted or not.
Id |
String |
| 2 | Nicolas |
Now data will be stored in the database. Thus this is how we connect MYSQL Database in Servlet.
In the next article we will see How to connect ORACLE database in Servlet.