As of now, we have seen everything about the Servlet its classes, interfaces, cookies, session, Database connectivity, etc. In this article, we will make a Registration application using the Servlet and MySQL database.
Registration Example using Servlet
We will be using an MYSQL database, so first create a database registration_form and then create a table user_register in the database.
create database registration_form
use registration_form
create table user_register(Id int Auto_Increment,primary key(id),Name varchar(20) NOT NULL,
    -> Email varchar(30) NOT NULL,userName varchar(30) NOT NULL,password varchar(20) NOT NULL, Unique key(userName));
I have created a folder structure as shown below to follow the basic coding practice in the Eclipse IDE.
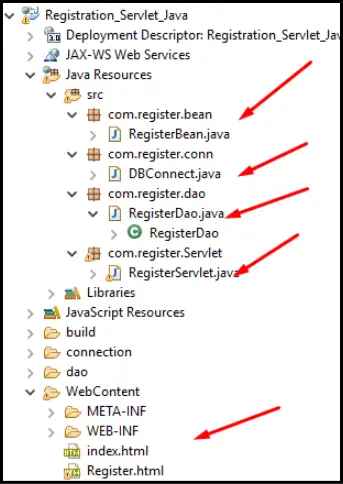
Now, We will create index.html and Register.html for the View.
index.html
<!DOCTYPE html>
<html>
<head>
<meta charset="ISO-8859-1">
<title>Servlet</title>
</head>
<body>
<h1 align="center"><a href="Register.html">Register</a></h1>
</body>
</html>
Register.html
<!DOCTYPE html>
<html>
<head>
<meta charset="ISO-8859-1">
<title>Insert title here</title>
<style>
body {
  background-image:
    url('https://image.shutterstock.com/image-photo/lime-retro-pastel-paper-background-260nw-598436903.jpg');
  background-repeat: no-repeat;
  background-size: cover;
}
</style>
</head>
<body>
  <form action="RegisterServlet" method="post">
    <h1 align="center" style="margin-top: 5%">Registration Form</h1>
    <table align="center" style="margin-top: 10%">
      <tr>
        <td>Name</td>
        <td><input type="text" name="name"></td>
      </tr>
      <tr>
        <td>Email Id</td>
        <td><input type="email" name="email"></td>
      </tr>
      <tr>
        <td>UserName</td>
        <td><input type="text" name="uname"></td>
      </tr>
      <tr>
        <td>Password</td>
        <td><input type="password" name="pass"></td>
      </tr>
      <tr>
        <td>Confirm Password</td>
        <td><input type="password" name="cpass"></td>
      </tr>

      <tr>
        <td></td>
        <td><input type="submit" value="Submit" id="button-1" /></td>
      </tr>

    </table>
  </form>
</body>
</html>
Now we will create a Database connection class for initializing the database
DBConnect.java
package com.register.conn;

import java.sql.Connection;
import java.sql.DriverManager;
import java.sql.SQLException;

public class DBConnect {

  public static Connection getConn() {
    Connection con = null;
    String loadDriver = "com.mysql.jdbc.Driver";
    String dbURL = "jdbc:mysql://localhost:3306/Registration_form";
    String dbUSERNAME = "root";
    String dbPASSWORD = "root";
    try {
      Class.forName(loadDriver);
      con = DriverManager.getConnection(dbURL, dbUSERNAME, dbPASSWORD);
    } catch (ClassNotFoundException e) {
      // TODO Auto-generated catch block
      e.printStackTrace();
    } catch (SQLException e) {
      // TODO Auto-generated catch block
      e.printStackTrace();
    }
    return con;
  }
}
Now, we will create a Bean class. As we know JavaBeans are classes that encapsulate many objects into the single bean(Single object).
RegisterBean.java
package com.register.bean;

public class RegisterBean {
  String Name;
  String EMail;
  String userName;
  String pasword;

  public RegisterBean(String name, String eMail, String userName, String pasword) {
    super();
    Name = name;
    EMail = eMail;
    this.userName = userName;
    this.pasword = pasword;
  }

  public RegisterBean() {
    super();
    // TODO Auto-generated constructor stub
  }

  public String getName() {
    return Name;
  }

  public void setName(String name) {
    Name = name;
  }

  public String getEMail() {
    return EMail;
  }

  public void setEMail(String eMail) {
    EMail = eMail;
  }

  public String getUserName() {
    return userName;
  }

  public void setUserName(String userName) {
    this.userName = userName;
  }

  public String getPasword() {
    return pasword;
  }

  public void setPasword(String pasword) {
    this.pasword = pasword;
  }

}
Now we will create a Dao class (Data Access Object). It involves the business logic for database operation like insert, update, delete (basically the CRUD operation of the database).
RegisterDao.java
package com.register.dao;

import java.sql.Connection;
import java.sql.PreparedStatement;
import java.sql.SQLException;

import com.register.bean.RegisterBean;
import com.register.conn.DBConnect;

public class RegisterDao {
  public String Regiterindb(RegisterBean bean) {
    Connection con = DBConnect.getConn();
    String sql = "insert into user_register(Id,Name,Email,userName,password) values (NULL,?,?,?,?) ";
    int i = 0;
    try {
      PreparedStatement preparedStatement = con.prepareStatement(sql);
      preparedStatement.setString(1, bean.getName());
      preparedStatement.setString(2, bean.getEMail());
      preparedStatement.setString(3, bean.getUserName());
      preparedStatement.setString(4, bean.getPasword());

      i = preparedStatement.executeUpdate();
    } catch (SQLException e) {
      // TODO Auto-generated catch block
      e.printStackTrace();
    }
    if (i != 0) {
      return "User is registered";
    } else {
      return "Error!!!!";
    }
  }
}
Then, we will create a Servlet class
RegisterServlet.java
package com.register.Servlet;

import java.io.IOException;
import java.io.PrintWriter;

import javax.servlet.RequestDispatcher;
import javax.servlet.ServletException;
import javax.servlet.annotation.WebServlet;
import javax.servlet.http.HttpServlet;
import javax.servlet.http.HttpServletRequest;
import javax.servlet.http.HttpServletResponse;

import com.register.bean.RegisterBean;
import com.register.dao.RegisterDao;

public class RegisterServlet extends HttpServlet {
  private static final long serialVersionUID = 1L;

  public RegisterServlet() {
    super();
    // TODO Auto-generated constructor stub
  }

  protected void doPost(HttpServletRequest request, HttpServletResponse response)
      throws ServletException, IOException {
    // TODO Auto-generated method stub
    System.out.println("inside post");
    response.setContentType("text/html");
    String name = request.getParameter("name");
    String email = request.getParameter("email");
    String username = request.getParameter("uname");
    String password = request.getParameter("pass");
    RegisterBean bean = new RegisterBean(name, email, username, password);
    RegisterDao dao = new RegisterDao();
    String result = dao.Regiterindb(bean);
    if (result.equals("User is registered")) {
      RequestDispatcher dispatcher = request.getRequestDispatcher("index.html");
      dispatcher.include(request, response);
    } else {
      RequestDispatcher dispatcher = request.getRequestDispatcher("Register.html");
      dispatcher.include(request, response);
    }
  }

}
create web.xml for the mapping of the URL.
<?xml version="1.0" encoding="UTF-8"?>
<web-app xmlns:xsi="http://www.w3.org/2001/XMLSchema-instance"
  xmlns="http://java.sun.com/xml/ns/javaee"
  xsi:schemaLocation="http://java.sun.com/xml/ns/javaee http://java.sun.com/xml/ns/javaee/web-app_3_0.xsd"
  id="WebApp_ID" version="3.0">
  <display-name>Register Servlet Demo</display-name>
  <welcome-file-list>
    <welcome-file>index.html</welcome-file>
  </welcome-file-list>
  <servlet>
    <servlet-name>RegisterServlet</servlet-name>
    <servlet-class>com.register.Servlet.RegisterServlet</servlet-class>
  </servlet>
  <servlet-mapping>
    <servlet-name>RegisterServlet</servlet-name>
    <url-pattern>/RegisterServlet</url-pattern>
  </servlet-mapping>
</web-app>
When we will run this application from the index.html page we will get the following output:


Now Click on Submit and check whether the data is inserted into the database. To check, let’s see in the database.
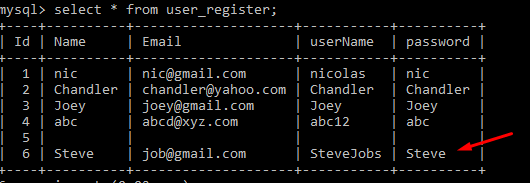
Thus we can create a Registration in Servlet by using the above steps.
Login Example in Servlet
We will be using the same database as we used for the Registration i.e user_register and we will fetch the username and password from it for Login Example.
I have created a folder structure as shown below to follow the basic coding practice in the Eclipse IDE.
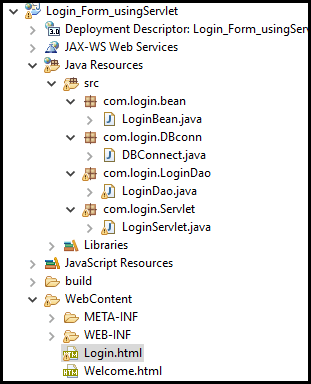
Now, We will create Login.html and Welcome.html for the View.
Login.html
<!DOCTYPE html>
<html>
<head>
<meta charset="ISO-8859-1">
<title>Insert title here</title>
<style>
body {
  background-image:
    url('https://image.shutterstock.com/image-photo/lime-retro-pastel-paper-background-260nw-598436903.jpg');
  background-repeat: no-repeat;
  background-size: cover;
}
</style>
</head>
<body>
  <form action="LoginServlet" method="post">
    <h1 align="center" style="margin-top: 5%">Login Form</h1>
    <table align="center" style="margin-top: 10%">
      <tr>
        <td>UserName</td>
        <td><input type="text" name="uname"></td>
      </tr>
      <tr>
        <td>Password</td>
        <td><input type="password" name="pass"></td>
      </tr>
      <tr>
        <td>Confirm Password</td>
        <td><input type="password" name="cpass"></td>
      </tr>
      <tr>
        <td></td>
        <td><input type="submit" value="Submit" id="button-1" /></td>
      </tr>
    </table>
  </form>
</body>
</html>
Welcome.html
<!DOCTYPE html>
<html>
<head>
<meta charset="ISO-8859-1">
<title>Insert title here</title>
</head>
<body>
<h1>Login Successfully!!!!</h1>
</body>
</html>
Now we will create a Database connection class for initializing the database
DBConnect.java
package com.login.DBconn;

import java.sql.Connection;
import java.sql.DriverManager;
import java.sql.SQLException;

public class DBConnect {
  public static Connection getConn() {
    Connection con = null;
    String loadDriver = "com.mysql.jdbc.Driver";
    String dbURL = "jdbc:mysql://localhost:3306/Registration_form";
    String dbUSERNAME = "root";
    String dbPASSWORD = "root";
    try {
      Class.forName(loadDriver);
      con = DriverManager.getConnection(dbURL, dbUSERNAME, dbPASSWORD);
    } catch (ClassNotFoundException e) {
      // TODO Auto-generated catch block
      e.printStackTrace();
    } catch (SQLException e) {
      // TODO Auto-generated catch block
      e.printStackTrace();
    }
    return con;
  }
}
Now, we will create a Bean class. As we know JavaBeans are classes that encapsulate many objects into a single bean(Single object).
LoginBean.java
package com.login.bean;

public class LoginBean {
  private String userName;
  private String password;

  public LoginBean(String userName, String password) {
    super();
    this.userName = userName;
    this.password = password;
  }

  public LoginBean() {
    super();
    // TODO Auto-generated constructor stub
  }

  public String getUserName() {
    return userName;
  }

  public void setUserName(String userName) {
    this.userName = userName;
  }

  public String getPassword() {
    return password;
  }

  public void setPassword(String password) {
    this.password = password;
  }

}
Now we will create a Dao class (Data Access Object). It involves the business logic for database operation like insert, update, delete (basically the CRUD operation of the database).
LoginDao.java
package com.login.LoginDao;

import java.sql.Connection;
import java.sql.PreparedStatement;
import java.sql.ResultSet;
import java.sql.SQLException;
import java.sql.Statement;

import com.login.DBconn.DBConnect;
import com.login.bean.LoginBean;

public class LoginDao {

  public boolean vaildate(LoginBean bean)
  {
    boolean result = false;
    Connection connection=DBConnect.getConn();
    String sql="select * from user_register where userName=? and password=?";
    try {
      PreparedStatement ps=connection.prepareStatement(sql);
      ps.setString(1, bean.getUserName());
      ps.setString(2, bean.getPassword());
      ResultSet rs=ps.executeQuery();
      result=rs.next();
    } catch (SQLException e) {
      // TODO Auto-generated catch block
      e.printStackTrace();
    }
    return result;
  }
}
Then, we will create a Servlet class
LoginServlet.java
package com.login.Servlet;

import java.io.IOException;
import javax.servlet.ServletException;
import javax.servlet.annotation.WebServlet;
import javax.servlet.http.HttpServlet;
import javax.servlet.http.HttpServletRequest;
import javax.servlet.http.HttpServletResponse;

import com.login.LoginDao.LoginDao;
import com.login.bean.LoginBean;
public class LoginServlet extends HttpServlet {
  private static final long serialVersionUID = 1L;

    /**
     * @see HttpServlet#HttpServlet()
     */
    public LoginServlet() {
        super();
        // TODO Auto-generated constructor stub
    }
  protected void doPost(HttpServletRequest request, HttpServletResponse response) throws ServletException, IOException {
    // TODO Auto-generated method stub
      response.setContentType("text/html");
      String uname=request.getParameter("uname");
      String pass=request.getParameter("pass");
      LoginBean bean=new LoginBean();
      LoginDao dao=new LoginDao();
      bean.setUserName(uname);
      bean.setPassword(pass);
      if(dao.vaildate(bean))
      {
        response.sendRedirect("Welcome.html");
      }
      else
      {
        response.sendRedirect("Login.html");
      }
  }

}
create web.xml for the mapping of the URL.
<?xml version="1.0" encoding="UTF-8"?>
<web-app xmlns:xsi="http://www.w3.org/2001/XMLSchema-instance"
  xmlns="http://java.sun.com/xml/ns/javaee"
  xsi:schemaLocation="http://java.sun.com/xml/ns/javaee http://java.sun.com/xml/ns/javaee/web-app_3_0.xsd"
  id="WebApp_ID" version="3.0">
  <display-name>Login_Form_usingServlet</display-name>
  <welcome-file-list>
    <welcome-file>index.html</welcome-file>
  </welcome-file-list>
  <servlet>
    <servlet-name>LoginServlet</servlet-name>
    <servlet-class>com.login.Servlet.LoginServlet</servlet-class>
  </servlet>
  <servlet-mapping>
    <servlet-name>LoginServlet</servlet-name>
    <url-pattern>/LoginServlet</url-pattern>
  </servlet-mapping>
</web-app>
When we will run this application from the Login.html page we will get the following output:
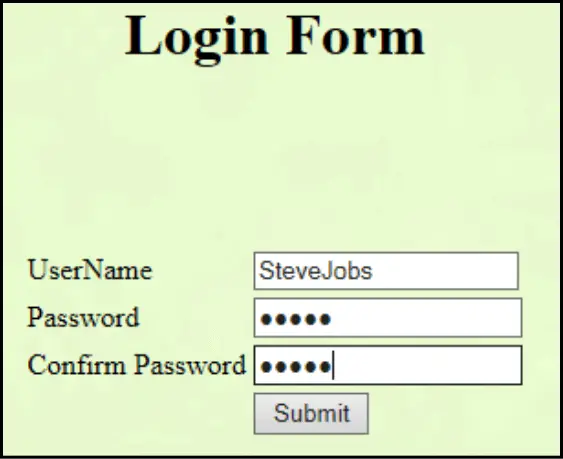
Thus we have created a Login Form using Servlet by using the above steps.