In this article, we will look at how to create a spring boot project in IntelliJ. If you want to know how to create using STS IDE then check here How to create Spring Boot Project in STS.
IntelliJ IDEA is an integrated development environment written in Java for developing computer applications. It is developed by JetBrains and is available as an Apache 2 Licensed community edition, and in a proprietary commercial edition.
How to Download and Install IntelliJ?
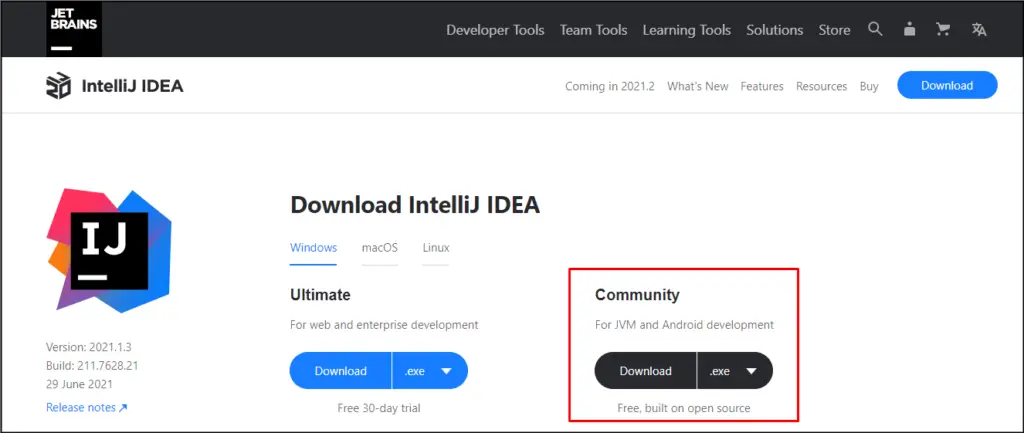
Step 1: First go to https://www.jetbrains.com/idea/download/#section=windows. It has two editions one is the ultimate edition and another one is the Community edition. The Ultimate edition is available only for a free 30-day trial whereas the community edition is the free one, open-source. So, download the community edition.
Step 2: Go to the folder where it is downloaded. Double click on it wait till it is set up.
Step 3: Click Next > Select the Destination folder > Next > Next > Install > Finish. Now your IDE will be installed.
Step 4: Go to start > type IntelliJ It will Open the IntelliJ IDEA.

Now, start creating the Spring Boot Project.
How to create a spring boot project in IntelliJ IDEA?
Here, we will create a project first using Spring Initializr, and then we will import it to IntelliJ.
Step 1: First, go to https://start.spring.io/.
Step 2: Fill in all the fields as shown below and click on generate button.

Step 3: As soon as you click on it, it will generate a project structure for you along with the dependencies and will be downloaded as a zip file. Now, go to the downloads folder and see the projects. Now, just extract the zip file to any location.
Step 4: Open IntelliJ IDE which you just installed now.
Step 5: Now, we need to import the project. Go on File > Open > select the project > ok.Now, it will take time to import the project so please wait.
Step 6: Now the project structure will look like this: (Note: the HomeController is created by us)
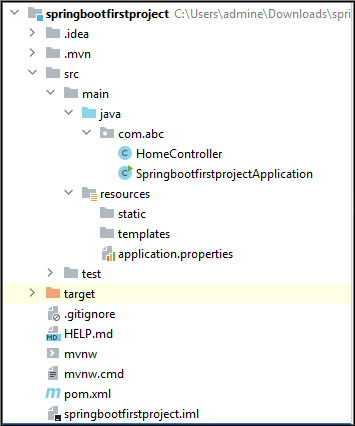
Step 7: Create a HomeController class inside src/main/java/com/abc package.(as you can see above). Create a method home() that will return a String.
package com.abc;

import org.springframework.stereotype.Controller;
import org.springframework.web.bind.annotation.RequestMapping;
import org.springframework.web.bind.annotation.ResponseBody;

@Controller
public class HomeController {
    @RequestMapping("/test")
    @ResponseBody
    public String home(){
        return "Welcome to Spring Boot using IntelliJ !";
    }
}
- @Controller annotation marks the HomeController class a Request Handler.
- @ResponseBody tells a controller that the object returned to the HTTP response body.
Step 8: Run the SpringbootfirstprojectApplication file.
package com.abc;


import org.springframework.boot.SpringApplication;
import org.springframework.boot.autoconfigure.SpringBootApplication;


@SpringBootApplication
public class SpringbootfirstprojectApplication {

  public static void main(String[] args) {
    SpringApplication.run(SpringbootfirstprojectApplication.class, args);
  }


}
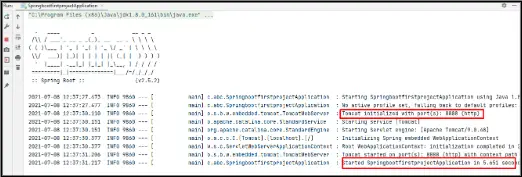
Step 9: Run your Spring application. The Console tab shows the output of Spring log messages.
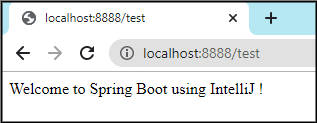
Step 10: Open your browser and go to http:localhost:8888/test. It will show the following response.
How to change the port number of the Tomcat server?
Spring Boot is a utility that provides us the default configuration, but sometimes we have to customize it based on our specific requirements.
While running this application you might face this error:

Don’t worry, Just go to the application.properties file which is present in the src/main/resources folder and includes the following line.
#Change the port number
server.port=8888
Now, Just stop the server and run the application once again.
Thus, this is one way we can change the default port number of the Tomcat server in Spring Boot.
Hence, this was all about how to create a spring boot project in IntelliJ IDEA.