In any web application User registration is a must process. It is used to create a track of user and Maintain it’s record and various other purposes. We are gonna use Passport js module to perform user registration.
What is Passport js?
Passport is authentication middleware for Node js. Extremely flexible and modular, Passport can be unobtrusively dropped into any Express-based web application. A comprehensive set of strategies support authentication using a username and password, Facebook, Twitter, and more.
Steps:-
1. Create Project Folder.
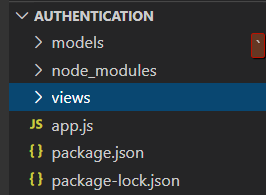
- Create a root directory named Authentication
- Create views folder for all the embedded javaScript Html pages
- Create a models folder for storing all the Schema.
- Create a file app.js
- Initialize the project using the command given below.
PS D:\work\Codebun\Authentication-validation> npm init

⇒Use command npm install module_name to install all the dependent packages.
- Express
- Ejs
- Body-parser
- Express-session
- Mongoose
- Passport
- Passport-local
- Passport-local-mongoose
2.Create the user schema in Models
- In the models, directory create a file named as user.js
- Require Mongoose and other Libraries in the file.
- Set up the Schema for User and use Passport-local-mongoose as a plugin.
- Export the Schema to be used in other files of node js.
const mongoose = require("mongoose");
const passportLocalMongoose = require("passport-local-mongoose");
const UserSchema = new mongoose.Schema({
    username:{
        type: String,
        required: true,
        maxlength: 32,
        trim: true
    },
    password:{
        type: String,
        required:true
    },
    phone:Number
}) ;

UserSchema.plugin(passportLocalMongoose);

module.exports = mongoose.model("User",UserSchema);
3.Create the template in Views
- In a view, directory create the different files for the home page, log in, registration and user profile.
- The files consist of templates of different pages and they are written using HTML and ejs
- Ejs engines allow us to embed JavaScript.
HomePage
- Set basic HTML page and give heading “Home Page“.
- Provide a link to log in, Register and Logout. (Note:- Log in and logout routes are dummy links logic for them will be in the upcoming tutorial. )
<h1>
    Home Page
</h1>
<p>
    <ul>
        <li><a href="#">Login</a></li>
        <li><a href="/register">Register</a></li>
        <li><a href="#">Logout</a></li>
    </ul>
</p>
Registration
- Use Html boiler code and set heading as the SignUp page.
- Use the form for collecting the information for the user to be registered.
- Use the “POST” Method and use the action to send information to “/register”.
- Provide the links to Home page and login.
<h1>
    SignUp Page
</h1>
<form action="/register" method="POST">
    <label for="username">UserName</label>
    <input type="text" id="username" name="username">
    <label for="password">Password</label>
    <input type="password" id="password" name="password">
    <label for="phone">Mobile No:-</label>
    <input type="text" name="phone" id="phone">
    <button>Submit</button>
</form>
<ul>
    <li><a href="/">Home</a></li>
    <li><a href="#">login</a></li>
</ul>
4. Syncing everything With app.js
- Import all the required libraries in app.js using require() function.
- Set up the express server using app.listen() function.
- Connect to a MongoDB database using mongoose.connect().
- Use the passport method of serialize and deserialize user and use the passport to initialize
- Set up the routes for homepage and register.
App.js: –
const express               =  require('express'),
      app                   =  express(),
      mongoose              =  require("mongoose"),
      passport              =  require("passport"),
      bodyParser            =  require("body-parser"),
      LocalStrategy         =  require("passport-local"),
      passportLocalMongoose =  require("passport-local-mongoose"),
      session               =  require("express-session"),
      User                  =  require("./models/user");


//Connecting database
mongoose.connect("mongodb://localhost/auth_demo",{
    useNewUrlParser: true,
    useUnifiedTopology:true,
    useCreateIndex:true
});

app.use(session({
    secret:"Any normal Word",       //decode or encode session
    resave: false,
    saveUninitialized:false,
    cookie:{
        maxAge: 2*60*1000
    }
}));


passport.serializeUser(User.serializeUser());       //session encoding
passport.deserializeUser(User.deserializeUser());   //session decoding
passport.use(new LocalStrategy(User.authenticate()));
app.set("view engine","ejs");
app.use(bodyParser.urlencoded(
      { extended:true }
))
app.use(passport.initialize());
app.use(passport.session());


//=======================
//      R O U T E S
//=======================

app.get("/", (req,res) =>{
    res.render("home");
})

//Auth Routes

app.get("/register",(req,res)=>{
    res.render("register");
});

app.post("/register",(req,res)=>{

    User.register(new User({username: req.body.username,phone:req.body.phone}),req.body.password,function(err,user){
        if(err){
            console.log(err);
            res.render("register");
        }
    passport.authenticate("local")(req,res,function(){
        console.log("Following User has been registerd");
        console.log(user)
        res.redirect("/");
    })
    })
})


app.listen(process.env.PORT ||3000,function (err) {
    if(err){
        console.log(err);
    }else {
        console.log("Server Started At Port 3000");
    }

});
Code Explanation:-
- First, we have required all the dependencies and modules that are used for this User registration.
- Acquire the UserSchema model from the models directory.
- Connected to a database named “auth_demo”. You can name anything to the database.
- Create express sessions and serialize them to create the user login session passing on expiry option under cookies.
- Set up the get request for the home page and a get request for the Sign-Up page which redirect to a form of user registration.
User Registration Logic
- Next is the post route or the logic for how the user is saved in the database. The data filled in the form is collected using the body-parser module and then passed on to the instance of the UserSchema model.
- A callback function is passed along with 2 parameters “err” and “user”. If an error occurred then the error will be displayed in console and registration page will be reloaded.
- If the User is registered successfully then the user is redirected to the home page. And a success message “Following User has been registered successfully. ” along with all the data provided by the user.