In this article, we will learn how to render every item that is available in an array dynamically. Because, in a website, it can’t be defined how much data can be there in an array hence we have to manage it in such a way so that if any new data is added, it doesn’t create any issue with the previous data and works just fine as it supposed to.
Below are the topics that we will be covering in this article,
- Rendering list of data
- Working with a stateful list
Rendering list of data in ReactJS
Note: Please read this article to know how to create a react project and work with it.
- Open the app.js file which is inside the src folder of a react project folder
import React from "react";
const App = () => {

  return (
    <div>

    </div>
  );
}

export default App
- Create an array of objects outside of the App function
const DUMMY_DATA = [
  { name: "item 1", category: "A" },
  { name: "item 2", category: "B" },
  { name: "item 3", category: "C" },
  { name: "item 4", category: "D" }
]
import React from "react";
 const DUMMY_DATA = [ { name: "item 1", category: "A" }, { name: "item 2", category: "B" }, { name: "item 3", category: "C" }, { name: "item 4", category: "D" } ]
const App = () => {

  return (
    <div>

    </div>
  );
}

export default App
- Create a component to render the lists
import React from 'react';

const ListItem = () => {
    return (
        <div>

        </div>
    );
};

export default ListItem;
Note: Please read this article to know more about creating a component and working with it.
- map through the ListItem array in the App component and pass the object values to the newly created component as props
import React from "react";
import ListItem from "./components/ListItem";
 const DUMMY_DATA = [ { name: "item 1", category: "A" }, { name: "item 2", category: "B" }, { name: "item 3", category: "C" }, { name: "item 4", category: "D" } ]
const App = () => {

  return (
    <div>
      {
        DUMMY_DATA.map(item => <ListItem key={Math.random().toString()} itemName={item.name} itemCat={item.category} />)
      }
    </div>
  );
}

export default App
Here, while mapping the array, we are rendering the ListItem component so that each time an object renders, the component will be rendered as well. Each time, we are passing some data to that component such as name, category, and key. We won’t use this key in the child component. Rather it is to help react to identify each item while looping to the array to identify each one.
- Receive these items as props in the child component
import React from 'react';

const ListItem = (props) => {
    const { itemName, itemCat } = props;
    return (
        <div>

        </div>
    );
};

export default ListItem;
In the child component, we are receiving those items as props and destructuring them for our further use.
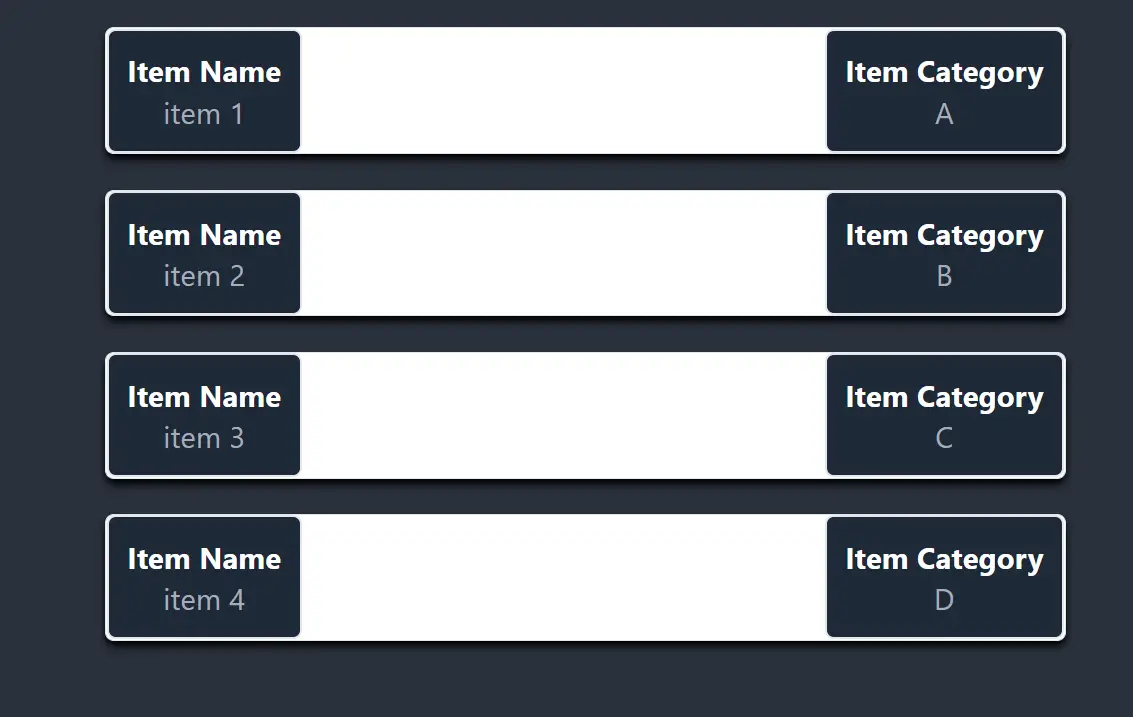
- Show the items here,
import React from 'react';

const ListItem = (props) => {
    const { itemName, itemCat } = props;
    return (
        <div className='border border-3  my-6 bg-white rounded-md shadow-md shadow-black'>
            <div className='flex justify-between'>
                <div className='border-2 text-center bg-gray-800 rounded-md p-3'>
                    <h1 className="text-xl text-white font-bold">
                        Item Name
                    </h1>
                    <h5 className="text-xl">
                        {itemName}
                    </h5>
                </div>
                <div className='border-2 text-center bg-gray-800 rounded-md p-3'>
                    <h1 className="text-xl text-white font-bold">
                        Item Category
                    </h1>
                    <h5 className="text-xl">
                        {itemCat}
                    </h5>
                </div>
            </div>

        </div>
    );
};

export default ListItem;
Here, we have created a div to contain the name and the category that we have destructured from the props and shown them dynamically using JSX expression.
Note: we have used Tailwind CSS to use the styled component. Please read this article to know more about it.
Working with a stateful list
We want to add a new item by submitting a form. And that newly added item will be visible in the browser as well with the previous items. To do that we have to declare a state and have to work with that state.
- Create a form
<div className='border border-3  my-6 bg-white rounded-md shadow-md shadow-black'>
          <form className='flex items-center'>
            <div className='border-2 text-center bg-gray-800 rounded-md p-3'>
              <h1 className=" text-white font-bold">
                Name
              </h1>
              <input type="text" name="name" placeholder="Type here" className="input input-bordered w-full max-w-xs my-2" />
            </div>
            <div className='border-2 text-center bg-gray-800 rounded-md p-3'>
              <h1 className=" text-white font-bold">
                Category
              </h1>
              <input type="text" name="category" placeholder="Type here" className="input input-bordered w-full max-w-xs my-2" />
            </div>
            <div className='text-center p-3'>
              <button type="submit" className="input bg-gray-200 border-2 border-b-slate-600 text-black input-bordered w-full max-w-xs my-2">Add Item</button>
            </div>
          </form>

        </div>
import React from "react";
import ListItem from "./components/ListItem";
 const DUMMY_DATA = [ { name: "item 1", category: "A" }, { name: "item 2", category: "B" }, { name: "item 3", category: "C" }, { name: "item 4", category: "D" } ]
const App = () => {

  return (
    <div className="flex justify-center">
      <div className="w-1/2">
        <div className='border border-3  my-6 bg-white rounded-md shadow-md shadow-black'>
          <form className='flex items-center'>
            <div className='border-2 text-center bg-gray-800 rounded-md p-3'>
              <h1 className=" text-white font-bold">
                Name
              </h1>
              <input type="text" name="name" placeholder="Type here" className="input input-bordered w-full max-w-xs my-2" />
            </div>
            <div className='border-2 text-center bg-gray-800 rounded-md p-3'>
              <h1 className=" text-white font-bold">
                Category
              </h1>
              <input type="text" name="category" placeholder="Type here" className="input input-bordered w-full max-w-xs my-2" />
            </div>
            <div className='text-center p-3'>
              <button type="submit" className="input bg-gray-200 border-2 border-b-slate-600 text-black input-bordered w-full max-w-xs my-2">Add Item</button>
            </div>
          </form>

        </div>
        {
          DUMMY_DATA.map(item => <ListItem key={Math.random().toString()} itemName={item.name} itemCat={item.category} />)
        }
      </div>
    </div >
  );
}

export default App
- Create a function to get all the input values and, for making some actions through the form submission as well
// function for the form
const handleAddItemForm = e => {
  e.preventDefault();
  const name = e.target.name.value;
  const category = e.target.category.value;
}
Here we will get the name and the category input values into these variables by submitting the form.
- Add an onSubmit(), event listener, to the form and pass this function as its value.
<form onSubmit={handleAddItemForm} className='flex items-center'>
            <div className='border-2 text-center bg-gray-800 rounded-md p-3'>
              <h1 className=" text-white font-bold">
                Name
              </h1>
              <input type="text" name="name" placeholder="Type here" className="input input-bordered w-full max-w-xs my-2" />
            </div>
            <div className='border-2 text-center bg-gray-800 rounded-md p-3'>
              <h1 className=" text-white font-bold">
                Category
              </h1>
              <input type="text" name="category" placeholder="Type here" className="input input-bordered w-full max-w-xs my-2" />
            </div>
            <div className='text-center p-3'>
              <button type="submit" className="input bg-gray-200 border-2 border-b-slate-600 text-black input-bordered w-full max-w-xs my-2">Add Item</button>
            </div>
          </form>
- Declare a state inside the App function whose default value will be the DUMMY_DATA array that has been already declared outside the App function.
  // state to keep the data
const [itemData, setItemData] = useState(DUMMY_DATA)
- Store the item values to this itemData state while keeping the previous data as well.
// state to keep the data
 const [itemData, setItemData] = useState(DUMMY_DATA)
 // function for the form
 const handleAddItemForm = e => {
   e.preventDefault();
   const name = e.target.name.value;
   const category = e.target.category.value;
   const formData = { name: name, category: category };
   setItemData(prevState => {
     return [...prevState, formData]
   })
 };
Here, inside the function, we are storing the input values in an object. And adding this object to the itemData array while keeping the previous data as well. If we look closely, we can see that inside the setItemData() we have declared a callback function and we are storing the previous data there as its parameter then we are returning it with a spread operator to keep those data and add the new data as well.
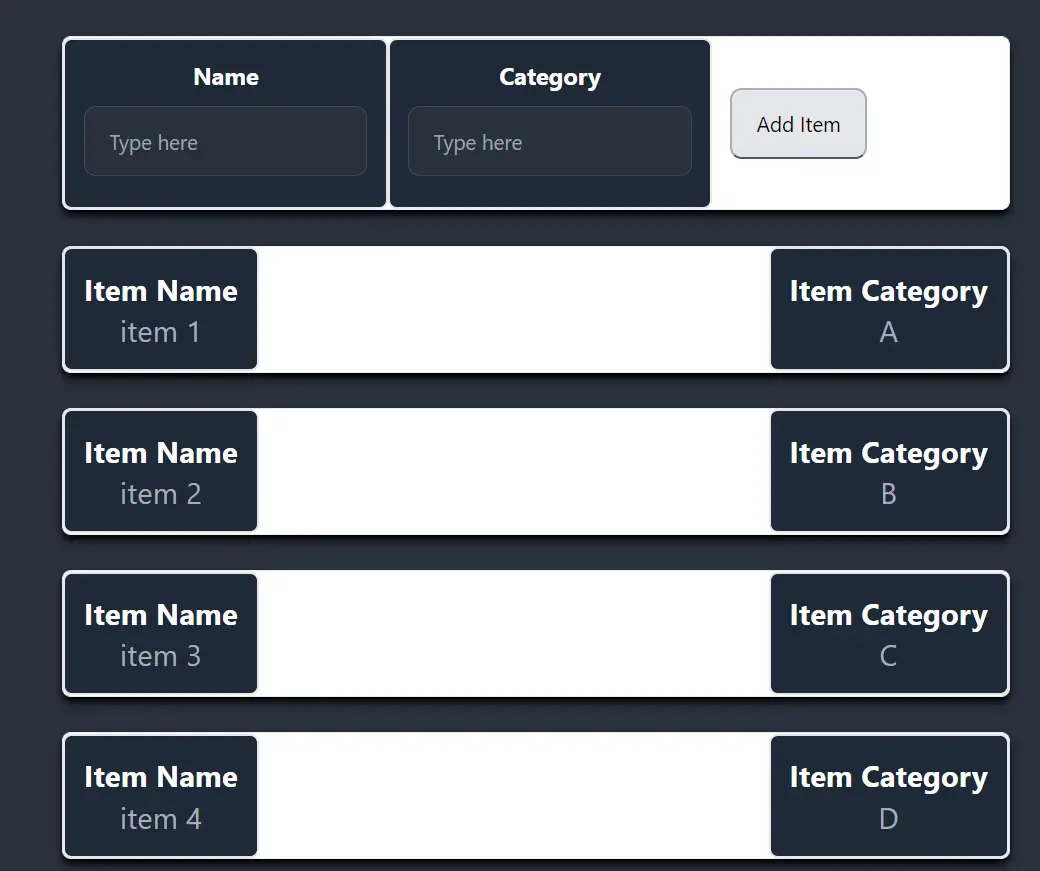
- Add some values and check whether the data is being added or not.
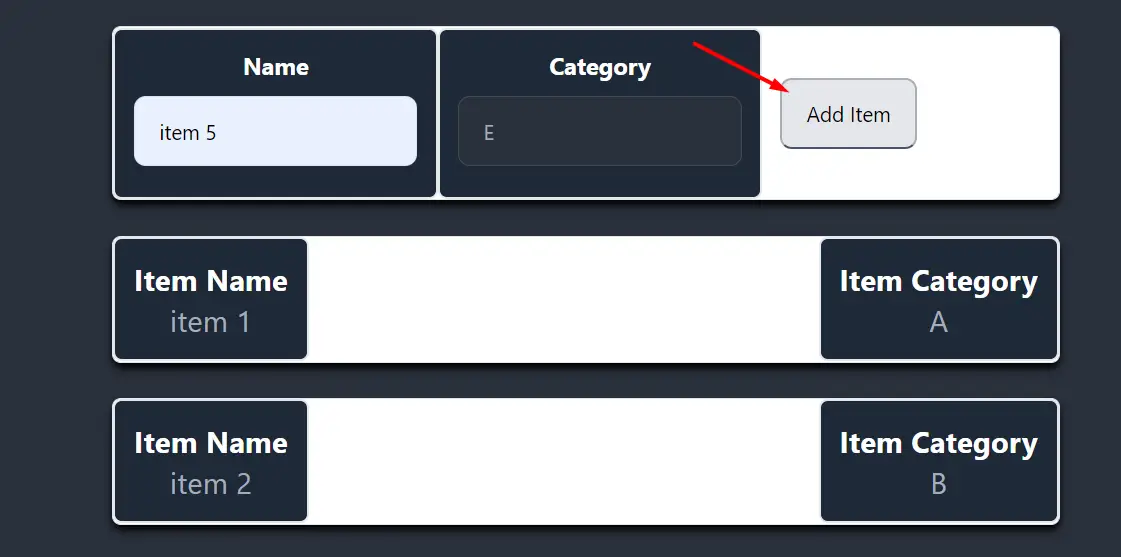
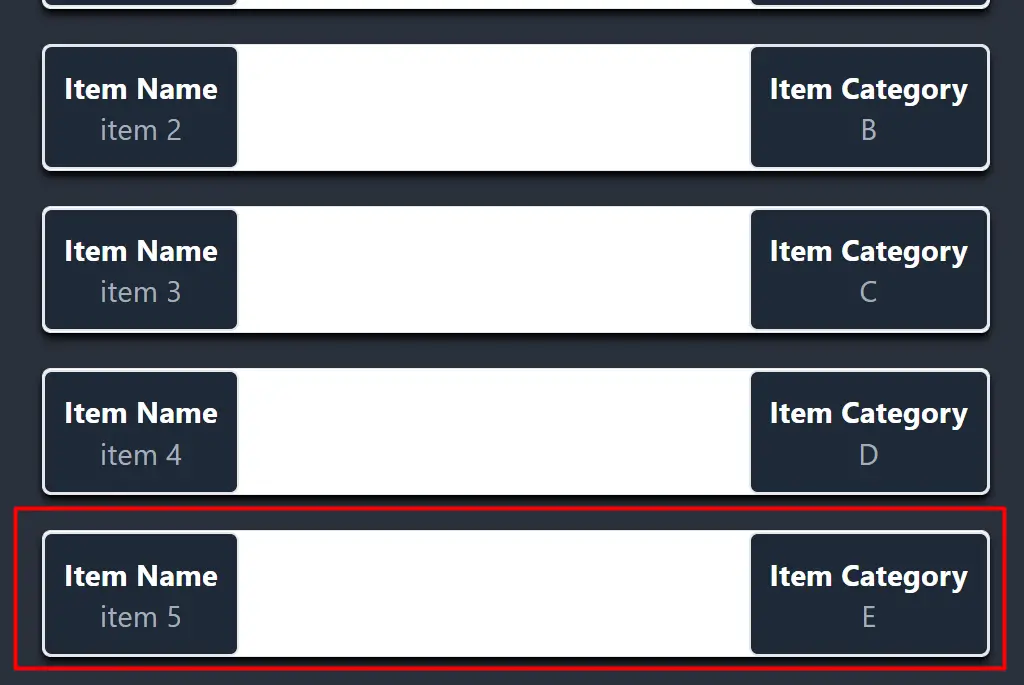
As we can see by using a stateful list, we are able to render the newly added data with previous data as well.