ReactJS is a JavaScript library to create User Interfaces. It works in a declarative way and to create a ReactJS application few steps need to be followed.
Steps to create a ReactJs project
- Install node.js (if it’s already installed on the computer then we don’t have to install it every time.
- Run the
create-react-apptool in the command prompt (have to run it each time to create a new project). - Open the newly created ReactJs app folder in code.
- Run react server with npm-start from file directory (by using command prompt or Visual Studio Code terminal).
- Preview the codes from src/App. Js to the browser while the server is running in the background.
The easiest way to do that is by using a tool named create-react-app . Using this tool will give a nice development environment to work with and a development server that will help to preview any changes on our created React App on our local machine; where the default browser will automatically update any changes that are made on the React App.
This tool downloads all necessary files and dependencies that need to be available to work with front-end projects and optimizes our React Code. But before using this tool, Node.js needs to be installed on our local machine.
Or can simply install this by visiting Node.js’s website and downloading the latest version of Node.js. After finished downloading, just need to walk through the installer and it will be installed. To know more details about where and how and where we use Node.js, Please refer to this article.
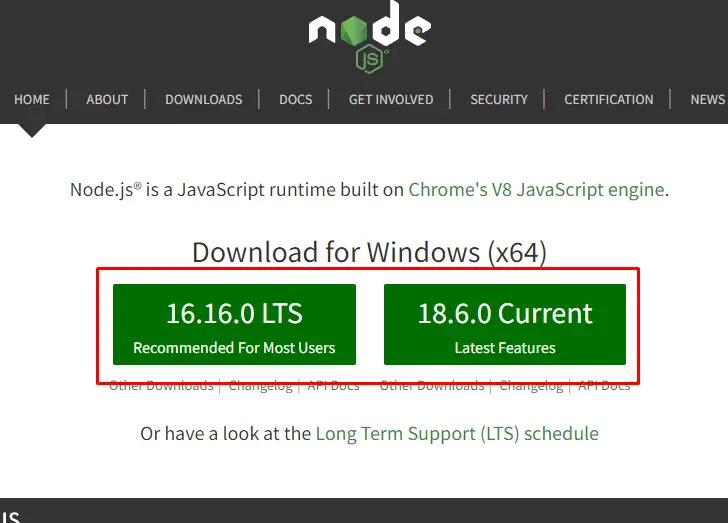
Install either version from here.
Though node.js is not directly connected with ReactJS, it is a runtime of JavaScript that allows us to run JavaScript codes outside of the browser. To run create-react-app in the system, first, Node.js needs to be installed on the machine.
Create a reactJS project from Scratch
As mentioned above, to create a ReactJS project, node.js needs to be installed on the computer, and the command prompt needs to be fully functional. After that, walk through the steps mentioned below.
Run “create-react-app” command in the command prompt
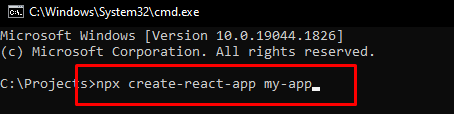
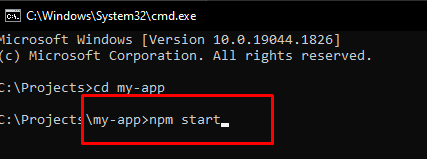
First, open the command prompt or the terminal on windows. Then get inside a folder with cd (which stands for change directory) where we want to create our React project. For example, to create React project into a folder named projects, which is inside of the C:\ drive, first open the command prompt in C:\ drive and type cd projects to get inside of that projects folder.
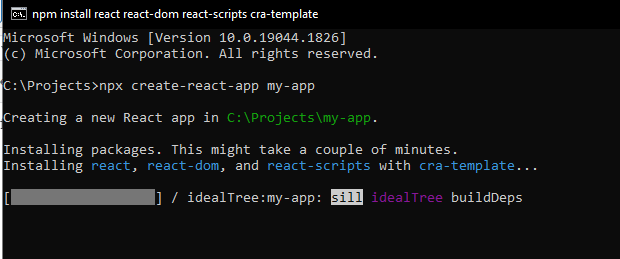
After getting inside the folder where type npx create-react-app my-app in the command prompt and hit enter. However, we can change the name of our project from my-app to anything else. But keep in mind, do not put space between the words of the project name while creating one.
After hitting enter, it will create all the necessary files in the destination where the command will be executed. It will create a folder with the same name we gave (in our case, my-app) inside the projects folder. And it might take a few moments to create the React project.
Run react server with npm-start from the file directory
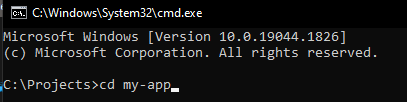
Right after creating the my-app folder, simply go to that folder by typing cd my-app and hitting enter. Once inside newly created my-app folder with the command prompt,
write npm start to run the server, where we can see the preview of our React project in our default web browser.
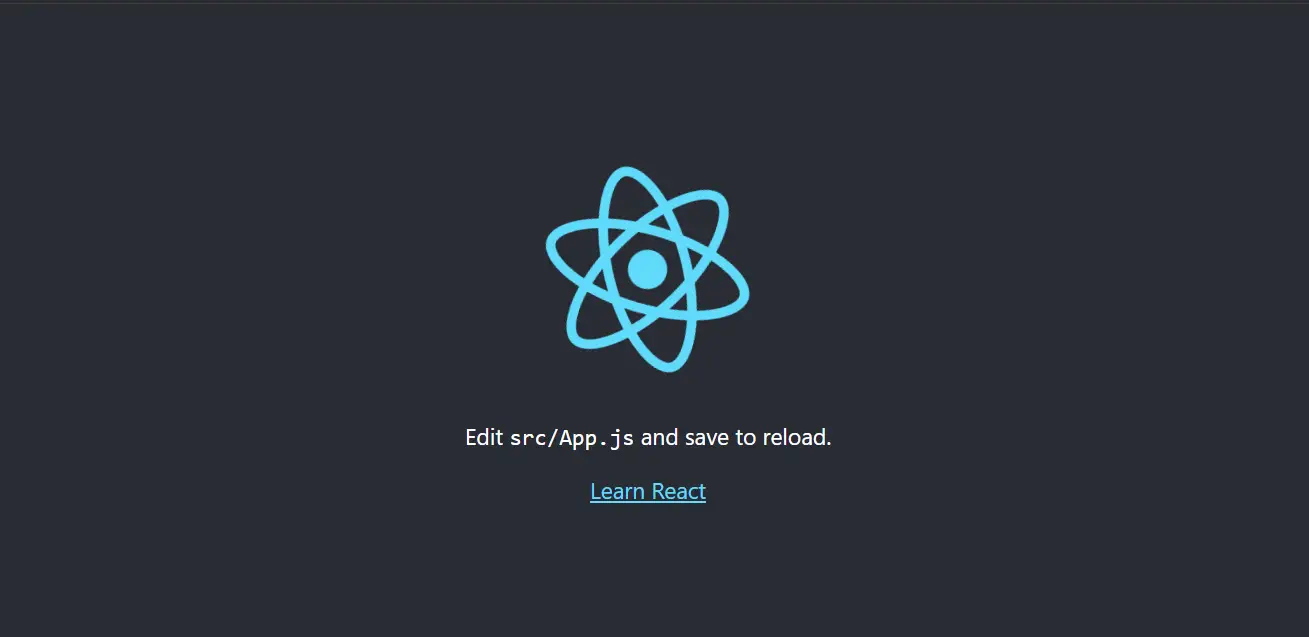
After several minutes, in the default browser, the preview of the ReactJS application will be open.
Now, open this my-app folder with Visual Studio Code. In the folder structure of my-app, we will see a folder named src and a file named package.json.
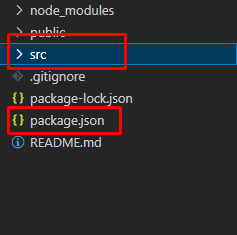
This package.json file holds all the dependencies that are currently available on the React project and the src folder holds the actual source code that we will be working on our React project.
And one more thing to remember while working with React project, we don’t have to stop the server we have started with npm start at the beginning. Because if the server doesn’t run, we won’t be able to see the changes we make in our React project on our browser.
The server can be stopped by running ctrl+c command on the command prompt. And can run the server again by writing npm start ion command prompt.
Analyzing a Standard React Project
Let’s focus on the src folder in the newly created React project (my-app) as we basically will work inside of this folder. Inside the src folder, there are two JavaScripts and one CSS file here.
Have to remember that we will be using JavaScript codes throughout any React project. And some features of React will help build the project further, but it is always JavaScript code all along.
Now, if go inside index.js file.
import React from 'react';
import ReactDOM from 'react-dom/client';
import './index.css';
import App from './App';
import reportWebVitals from './reportWebVitals';

const root = ReactDOM.createRoot(document.getElementById('root'));
root.render(
  <React.StrictMode>
    <App />
  </React.StrictMode>
);

// If you want to start measuring performance in your app, pass a function
// to log results (for example: reportWebVitals(console.log))
// or send to an analytics endpoint. Learn more: https://bit.ly/CRA-vitals
reportWebVitals();
This index.js file will be the first one to be executed whenever the page reloads. Basically, React gives the facilities to write the code in an easy-to-read or Developer friendly way with some syntactic sugar (JSX).
Importing a file is impossible inside the JavaScript setup. A syntax error will occur if we do so. But, here, it won’t give any errors. Here, any styles that are inside this index.css file will be applied to our whole project. And the file can be imported by this line of code, import './index.css .
Now if look at the code, it rendering something. It kinda looks like HTML code inside of a JavaScript file.
const root = ReactDOM.createRoot(document.getElementById('root'));
root.render(
  <React.StrictMode>
    <App />
  </React.StrictMode>
);
Normally it also wouldn’t work with vanilla JavaScript. We can’t add HTML code like this inside a JavaScript file. But here, it works. Because delivering this code to the browser, it transforms first. And keep in mind that, these transformations happen, and the idea of these transformations is basically to write code in a nice and easy way.
What exactly is this index.js doing here though? Well, we are importing ReactDOM from react-dom.
import ReactDOM from 'react-dom/client';
It is importing ReactDOM objects from the React DOM third-party library. Which are installed automatically while executing the create-react-app tool. And to talk about import and export,
If to use some features or the file itself to another file, export it. And to use this file’s features or this file, go to another file and then import this file.
Go to the public folder from the file structure, A file named index.html can be seen, which is an HTML file.
Basically, it is the only HTML file in the React Application. And it is the HTML file that loads on the web page and every other thing renders inside of it because of the Single-Page-Application feature of ReactJS.
<!DOCTYPE html>
<html lang="en">
  <head>
    <meta charset="utf-8" />
    <link rel="icon" href="%PUBLIC_URL%/favicon.ico" />
    <meta name="viewport" content="width=device-width, initial-scale=1" />
    <meta name="theme-color" content="#000000" />
    <meta
      name="description"
      content="Web site created using create-react-app"
    />
    <link rel="apple-touch-icon" href="%PUBLIC_URL%/logo192.png" />
    <!--
      manifest.json provides metadata used when your web app is installed on a
      user's mobile device or desktop. See https://developers.google.com/web/fundamentals/web-app-manifest/
    -->
    <link rel="manifest" href="%PUBLIC_URL%/manifest.json" />
    <!--
      Notice the use of %PUBLIC_URL% in the tags above.
      It will be replaced with the URL of the `public` folder during the build.
      Only files inside the `public` folder can be referenced from the HTML.

      Unlike "/favicon.ico" or "favicon.ico", "%PUBLIC_URL%/favicon.ico" will
      work correctly both with client-side routing and a non-root public URL.
      Learn how to configure a non-root public URL by running `npm run build`.
    -->
    <title>React App</title>
  </head>
  <body>
    <noscript>You need to enable JavaScript to run this app.</noscript>
    <div id="root"></div>
    <!--
      This HTML file is a template.
      If you open it directly in the browser, you will see an empty page.

      You can add webfonts, meta tags, or analytics to this file.
      The build step will place the bundled scripts into the <body> tag.

      To begin the development, run `npm start` or `yarn start`.
      To create a production bundle, use `npm run build` or `yarn build`.
    -->
  </body>
</html>
In index.html file, there a <div> that has an id of “root“. And this div actually doesn’t hold anything initially. But it is the <div> where we want to inject our React-driven User Interface.
In index.js file (located inside the src folder), there are some JavaScript codes,
const root = ReactDOM.createRoot(document.getElementById('root'));
root.render(
  <React.StrictMode>
    <App />
  </React.StrictMode>
);
We are applying a method of ReactJS, called createRoot on the <div> tag with the id of root from index.html file and storing this in a variable named root. And this root variable is applying the render method to tell ReactJS, what should be rendered. In this case, it is<App /> Component. Hence, we will be seeing whatever is inside of this <App /> The component in the <div id="root">...</div> tag.
Now, what is this <App /> here?
import App from './App';
Well as it can be seen, this file is being imported from somewhere else as well. And this is the App.js file from the src folder. This App.js file is a Component. To know more about Components, click here.
And inside the App.js file,
import logo from './logo.svg';
import './App.css';

function App() {
  return (
    <div className="App">
      <header className="App-header">
        <img src={logo} className="App-logo" alt="logo" />
        <p>
          Edit <code>src/App.js</code> and save to reload.
        </p>
        <a
          className="App-link"
          href="https://reactjs.org"
          target="_blank"
          rel="noopener noreferrer"
        >
          Learn React
        </a>
      </header>
    </div>
  );
}

export default App;
these are not regular JavaScript syntaxes. This App.js will be rendered in the place of that <div class="root">...</div> with an id of root.
This is how a basic ReactJS application can be created. But there are a few steps to continue working with a ReactJS application.
Remove <header>...</header> tag with its elements inside of it.
//src/App.js

import logo from './logo.svg';
import './App.css';

function App() {
  return (
    <div className="App">

      {/* remove this header tag */}
      <header className="App-header">
        <img src={logo} className="App-logo" alt="logo" />
        <p>
          Edit <code>src/App.js</code> and save to reload.
        </p>
        <a
          className="App-link"
          href="https://reactjs.org"
          target="_blank"
          rel="noopener noreferrer"
        >
          Learn React
        </a>
      </header>
    </div>
  );
}

export default App;
After removing <header>,
//src/App.js

import logo from './logo.svg';
import './App.css';

function App() {
  return (
    <div className="App">

      {/* removed this header tag and add any kind of HTML tag here with elements here */}

    </div>
  );
}

export default App;
Any kind of HTML code added inside this <div> tag that the App function’s returning can be seen in the browser preview. Let’s add a heading, <h1> that says, ‘Hello React’.
//src/App.js

import logo from './logo.svg';
import './App.css';

function App() {
  return (
    <div className="App">
      {/* added hello react with h1 tag */}

      <h1>Hello React</h1>
    </div>
  );
}

export default App;

This is the basic procedure to create a simple ReactJS project that says, “Hello React”.