Sooner or later in time, you will foray into the domain of web development. With the numerous frameworks out there, you might be be regarding where to begin. Our recommendation is Django for building applications flawlessly and proficiently, with a database of your decision. (Pretty much every web application needs a database.) In this tutorial, we’ll use PostgreSQL for instance of how to set up a Django application with a PostgreSQL database, all done through the Windows command prompt.
What is PostgreSQL?
PostgreSQL is an advanced, enterprise class open source relational database that supports both SQL (relational) and JSON (non-relational) querying. It is a highly stable database management system, backed by more than 20 years of community development which has contributed to its high levels of resilience, integrity, and correctness. PostgreSQL is used as the primary data store or data warehouse for many web, mobile, geospatial, and analytics applications. The latest major version is PostgreSQL 11.
PostgreSQL has a rich history for support of advanced data types, and supports a level of performance optimization that is common across its commercial database counterparts, like Oracle and SQL Server.

Installation
At first check you have Python installed or not. To check that type the following on your command prompt
python –version
If you have python installed already, you should see:
Python [the version that is installed]
If the Python you installed is version 3 or above, pip is as of now automatically installed.
Now we’ll have to set up a virtual environment. This is incredibly significant as you’re building a huge application and you don’t need various versions of various components to conflict with each other.
Install virtualenv and virtualenvwrapper by entering the following in your command prompt:
pip install virtualenvwrapper-win
Install PostgreSQL
Go to the download page for PostgreSQL installers and install the latest version of PostgreSQL that is suitable to your system.
- In the PostgreSQL Setup Wizard, in the Select Components page, uncheck the components that you would prefer not to install, or simply leave it be. If you uncheck anything, don’t stress, simply launch the installer later and select the component you need, and PostgreSQL will be updated accordingly.
- At the Password page, enter the password for the database superuser (postgres). This account will be used to access your SQL Shell (pqsl) later on.
- At the Port page, choose the port number that the server should listen on, or stick to the default 5432. Just make sure that the port is not currently used by any other applications.

- Open the command line. Accept the default for the Server, Database, Port, and Username fields by pressing Enter. However, at the Password field, you must enter the password that you chose during in the Setup Wizard.
Install Django and integrate with PostgreSQL
With pip, Django can be easily installed from the command line with a simple one-line instruction.
Once you’re in that directory, create a virtual environment by typing:
virtualenv newprojectenv
You can give the environment any name you want. Now activate the environment with:
newprojectenv\Scripts\activate
This must be done before we install any applications within the virtual environment.
If the virtual environment is activated, you would see (newprojectenv) in the command prompt as shown below. To exit the virtual environment, simply type “deactivate,” but leave the virtual environment
With the virtual environment active, install Django.
pip install Django
We will also need to install psycopg2. psycopg2 is a package that will allow Django to use the PostgreSQL database that we just configured. Similarly, to install, write:
pip install psycopg2
Now, it’s time to start a Django project! This is done within our newproject directory. Start the project by typing: (Make sure to add the dot at the end of the command so that this is set up correctly.)
Django-admin startproject newproject .
We now need to make changes in settings.py of our app. We need to make changes in the “DATABASES” of settings.py, since the connectivity present by default is of SQLite
DATABASES = {
‘default’: {
‘ENGINE’: ‘django.db.backends.sqlite3’,
‘NAME’: os.path.join(BASE_DIR, ‘db.sqlite3’),
}
}
We’ll need to change this section to tell Django to use PostgreSQL instead. The change is simple.
DATABASES = {
‘default’: {
‘ENGINE’: ‘django.db.backends.postgresql_psycopg2’,
‘NAME’: ‘yourproject’,
‘USER’: ‘yourprojectuser’,
‘PASSWORD’: ‘password’,
‘HOST’: ‘localhost’,
‘PORT’: ‘’,
}
}
The username and password you set there will be used later when we create a superuser for the database. Create the administrative account by typing:
python manage.py createsuperuser
You will be prompted to provide login credentials.
Now that everything is set up, test whether your database is performing by running the Django development server.
python manage.py runserver
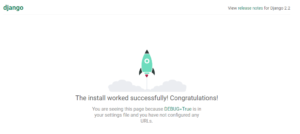
On running the server, if you get the following, you have successfully deployed your app.