Django is a Python-based web framework which allows you to quickly create web application without all of the installation or dependency problems that you normally will find with other frameworks.
Django is based on MVT (Model View Template) architecture and revolves around CRUD (Create, Retrieve, Update, Delete) operations. CRUD can be best explained as an approach to building a Django web application.
In general, CRUD means performing Create, Retrieve, Update, and Delete operations on a table in a database.
Let’s discuss what actually CRUD means,

The first reference to CRUD operations came from Haim Kilov in 1990 in an article titled, “From semantic to object-oriented data modeling.” However, the term was first made popular by James Martin’s 1983 book, Managing the Data-base Environment. Here’s a breakdown:
- CREATE procedures: Performs the INSERT statement to create a new record.
- READ procedures: Reads the table records based on the primary keynoted within the input parameter.
- UPDATE procedures: Executes an UPDATE statement on the table based on the specified primary key for a record within the WHERE clause of the statement.
- DELETE procedures: Deletes a specified row in the WHERE clause.
Django ModelForm Example Overview
We will be doing the following in this Django ModelForm Example
- Create a Page for entry of Student Details(Name, Email, Password) and save it into the database(which will be done automatically by model forms).
- Create the index page where we would view the student entries in an unordered list.
- Have options to retrieve, update and delete data i.e. perform CRUD Operations
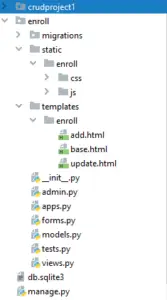
Create the project according to the following tree:
Coding the app
As usual, we need to deal with some data(Name, Email, Password). So, we need to create the model of the data and implement that model into the SQLite DB of Django.
- To do so, look for the file models.py in your app folder and add the code below:-
from django.db import models

# Create your models here.
class User(models.Model):
    name = models.CharField(max_length=70)
    email = models.EmailField(max_length=100)
    password = models.CharField(max_length=100)
- Also, add your application in the installed_apps of settings.py
Adding Bootstrap and JavaScript
- To create an overview of our form we are adding bootstrap and javascript in our code.
- Add the following code in enroll\static\enroll\css\bootstrap.css
- Download the zip file of bootstrap from here and to option Compiled CSS and JS and download it.
- After extracting in both CSS and js file keep only bootstrap.min.css and bootstrap.min.js file and copy the files in \static\enroll\js\ folder.
- Create a \static\enroll\js\jquery.js file and add the following code
- Create a \static\enroll\js\popper.js file and add the following code
Making Migrations
- Make sure that the shell is navigated into the Registration folder and run the following command.
python manage.py makemigrations
- Next, run the command below to actually implement it into the database.
python manage.py migrate
Configuring the view
- Yes, the class-based views reduce our efforts to quite an extent.
- So, look for the file views.py in your app folder and add the following code:
from django.shortcuts import render, HttpResponseRedirect
from .forms import StudentRegistration
from .models import User
# Create your views here.

#adding and retrieving data
def add_show(request):
    if request.method == 'POST':
        fm = StudentRegistration(request.POST)
        if fm.is_valid():
            nm = fm.cleaned_data['name']
            em = fm.cleaned_data['email']
            pw = fm.cleaned_data['password']
            reg = User(name=nm, email=em, password=pw)
            reg.save()
            fm = StudentRegistration()
    else:
        fm = StudentRegistration()
    stud = User.objects.all()
    return render(request, 'enroll/add.html', {'form':fm, 'stu':stud})

#edit and update function
def update_data(request,id):
    if request.method == 'POST':
        pi = User.objects.get(pk=id)
        fm = StudentRegistration(request.POST, instance=pi)
        if fm.is_valid():
            fm.save()
    else:
        pi = User.objects.get(pk=id)
        fm = StudentRegistration(instance=pi)

    return render(request,'enroll/update.html', {'form':fm})

#delete function

def delete_data(request,id):
    if request.method == 'POST':
        pi = User.objects.get(pk=id)
        pi.delete()
        return HttpResponseRedirect('/')
Creating UI for Django ModelForm
- Now, in the templates folder, create another directory named enroll and it should be like /enroll/templates/enroll/.
- In the enroll folder present in the templates directory, create a new HTML file called base.html and add the following code:-
<!DOCTYPE html>
{% load static %}
<html lang="en">
<head>
    <meta charset="UTF-8">
    <title>CRUD Operations</title>
    <link rel="stylesheet" href="{%static 'enroll/css/bootstrap.css' %}">
</head>
<body>
<div class="container mt-5">
    <h2 class="text-centre alert alert-danger">CRUD Functions ModelForm</h2>

    {% block content %}
    {% endblock content %}
</div>


<script src="{% static 'enroll/js/jquery.js' %}"></script>
<script src="{% static 'enroll/js/popper.js' %}"></script>
<script src="{% static 'enroll/js/bootstrap.js' %}"></script>

</body>
</html>
- In the same directory, create another HTML file named add.html and add the code below:
{% extends 'enroll/base.html' %}
{% block content %}
<div class="row">
    <div class="col-sm-4">
     <h4 class="text-center alert alert-info">Add New Student</h4>
      <form action="" method="POST">
        {% csrf_token %}
        {{form.as_p}}
        <input type="submit" class="btn btn-success" value="Add">
      </form>
    </div>
    <div class="col-sm-7 offset-1">
        <h4 class="text-center alert alert-info"> Show Student Information</h4>
    {% if stu %}
        <table class="table table-hover">
          <thead>
            <tr>
              <th scope="col">ID</th>
              <th scope="col">Name</th>
              <th scope="col">Email</th>
              <th scope="col">Password</th>
              <th scope="col">Action</th>

            </tr>
          </thead>
          <tbody>
          {% for st in stu %}
            <tr>
              <th scope="row">{{st.id}}</th>
              <td>{{st.name}}</td>
              <td>{{st.email}}</td>
              <td>{{st.password}}</td>
              <td>
                  <a href="{% url 'updatedata' st.id %}" class="btn btn-warning">Edit</a>
                  <form action="{% url 'deletedata' st.id%}" method="POST" class="d-inline"> {% csrf_token %}
                      <input type="submit" class="btn btn-danger" value="Delete">
                  </form>
              </td>
            </tr>
          {% endfor %}
          </tbody>
        </table>
    {% else %}
        <h4 class="text-center alert alert-warning">"No Data</h4>
    {% endif %}
    </div>

</div>
{% endblock content %}
- In the same directory, create another HTML file named update.html and add the code below:
{% extends 'enroll/base.html' %}
{% block content %}
<h4>Update Student</h4>
<div class="col-sm-8 offset-2">
    <h4 class="alert alert-info">Update Student Information</h4>
    <form action="" method="post">
        {% csrf_token %}
        {{form.as_p}}
        <input type="submit" class="btn btn-success" value="Update">
        <a href="{% url 'add'%}" class="btn btn-info">Back</a>
    </form>
</div>
{% endblock content %}
- Also, create a forms.py inside the app and add the following code
from django import forms
from .models import User
from django.core import validators

class StudentRegistration(forms.ModelForm):
    class Meta:
        model = User
        fields = ['name', 'email', 'password']
        widgets = {
            'name': forms.TextInput(attrs={'class':'form-control'}),
            'email': forms.EmailInput(attrs={'class': 'form-control'}),
            'password': forms.PasswordInput(render_value=True, attrs={'class': 'form-control'}),

        }
Configuring the urls.py and admin.py
- To redirect our website to certain pages we need to make the following changes in the urls.py file:
from django.contrib import admin
from django.urls import path
from enroll import views
urlpatterns = [
    path('admin/', admin.site.urls),
    path('',views.add_show, name="add"),
    path('delete/<int:id>/',views.delete_data, name="deletedata"),
    path('<int:id>/',views.update_data, name="updatedata"),
]
- Just to crosscheck whether our data are being added in the backend and then being retrieved we need to create a superuser and make the following changes in admin.py
from django.contrib import admin
from .models import User
# Register your models here.
@admin.register(User)
class UserAdmin(admin.ModelAdmin):
    list_display = ('id','name', 'email', 'password')
- Create a superuser now so as to get access to the backend also.
Running the app
- Now let’s try running the app. Make sure your development server is running. If not you can use the following command in your Windows PowerShell to run your development server.
python manage.py runserver
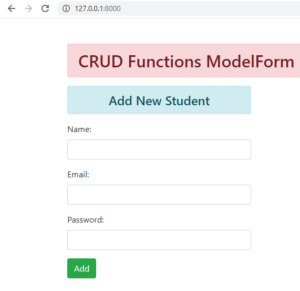
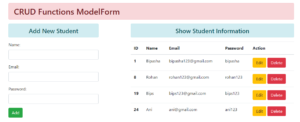
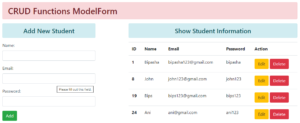
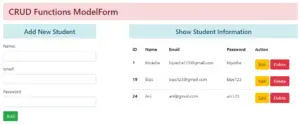
- Now let’s try to add data and check whether it is retrieving data or not
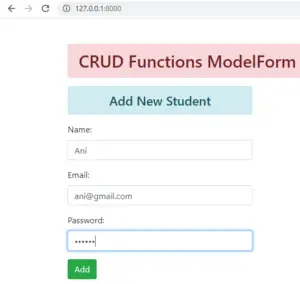
- On clicking the add button we can see the details is being added
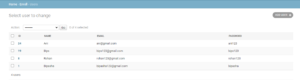
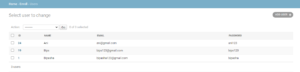
- Now, let’s check whether it is added in the backend or not:
- Now, let’s update ID 8 and change the name to John and email to john123@gmail.com and password to john123
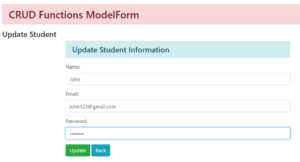
- On clicking Update and then back we can see the updated data in ID 8
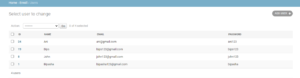
- On checking the backend also we can see that the data is updated
- Now, let’s try to delete ID 8 and check whether the delete option is working or not.
- On clicking the delete option we can see that the data is deleted.
- Now, let’s check whether our data is deleted from the backend or not.
- Hence, we can conclude in our app CRUD(create, retrieve, update and delete) functions are working perfectly
