How to Launch a web server to run the Django application. In this tutorial, We will perform some examples on Web Server in Django. Now let’s see the process in detail.
Make a plan
After all the hard work of making an Internet service, you obviously want to see the result. What does it take to launch a Django web server? If you already have an application in your project, there are only a few steps left:
- Configure settings.py file;
- Launch the server on your local machine;
- Fix the errors (if any) with the help of the debug page.
Prepare a simple project
First, let’s prepare a new project.
We’ll create the project “smithee” itself, the application “movies”, one template and one view handler. Run this code from your shell in any directory you want:
# Unix
django-admin startproject smithee
cd smithee
django-admin startapp movies
mkdir -p movies/templates/movies


# Windows
django-admin startproject smithee
cd smithee
django-admin startapp movies
mkdir movies\templates\movies
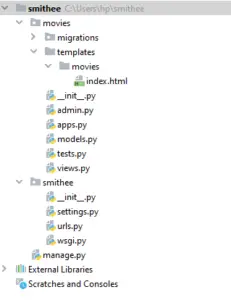
Your tree should look like this:
Add this code to the movies/templates/movies/index.html file:
<!DOCTYPE html>
<title>Movies</title>

<h1>Films by {{ director }}</h1>

<ul>
{% for movie in movies %}
  <li>{{ movie.year }} - {{ movie.title }}</li>

</ul>
Add this code to the movies/views.py module:
from django.conf import settings
from django.shortcuts import render
from django.views import View

movies = [
    {
        'title': 'Catchfire',
        'year': 1990,
    },
    {
        'title': 'Mighty Ducks the Movie: The First Face-Off',
        'year': 1997,
    },
    {
        'title': 'Le Zombi de Cap-Rouge',
        'year': 1997,
    },
]


class MovieView(View):
    def get(self, request, *args, **kwargs):
        return render(
            request, 'movies/index.html', context={
                'director': settings.DIRECTOR,
                'movies': movies,
            }
        )
In this example, we use the settings.DIRECTOR variable from the settings.py module. A bit further we shall see how to define it.
Since it is just a single page on the site, we add one path to the urlpatterns list in smithee/urls.py:
from django.urls import path
from movies.views import MovieView

urlpatterns = [
    path('', MovieView.as_view()),
]
Now that the preparation is done, we should configure the settings.py module to launch the server.
Configure settings.py
Having the code, the only thing left is to tweak some configs in the settings.py module to make it work.
Remember that changing settings is a flexible way to control the work of your service. In addition to the existing variables, you can add your own so that they can be reachable throughout the project.
Settings.py is a usual Python module. The difference is that in this file you only define the variables and do not write any functions or classes. You can locate the module in the <project_name> directory: in our case, it is smithee/settings.py. Let’s look more closely at what we need to work with a basic Django project.
BASE_DIR = os.path.dirname(os.path.dirname(os.path.abspath(__file__)))
BASE_DIR is the name of the folder where your project is located in the file system. You don’t need to modify it because Django provides an OS independent way to find a base directory for your project.
However, you should use it if you want to manipulate the included files. For example, if you want to define the name for a log file, it can be LOG_FILE = os.path.join(BASE_DIR, ‘smithee.logs’)
ALLOWED_HOSTS = ['localhost']
When you run your server on the local machine, you should add ‘localhost’ to the ALLOWED_HOSTS. Localhost is an alias for the local address of your computer.
But if your server is meant to be reachable via the Internet, you also need to add the name of your web host. If you were Google, the ALLOWED_HOSTS might look like this: ALLOWED_HOSTS = [‘www.google.com’].
DATABASES = {}
By default, Django generates config with a sqlite3 database for you. Since we don’t use a database in our application, we can remove the default configuration and save DATABASES as an empty dictionary.
Add Applications to the Settings
To include your applications in the project, you should modify the INSTALLED_APPS variable in the settings.py module.
INSTALLED_APPS = [
    'django.contrib.admin',
    'django.contrib.auth',
    'django.contrib.contenttypes',
    'django.contrib.sessions',
    'django.contrib.messages',
    'django.contrib.staticfiles',
    'movies',
]
By default, Django prepares this list with applications you can use for your web service. Right now we don’t get too deep with what django.contrib.* modules are, but it’s necessary to add your own application to the INSTALLED_APPS. In our case, it is the “movies” app.
If you forget to include your app, you may see an exception upon starting your server or accessing a page. For example, the server will not be able to find a template because you do not register an app where this template is placed.
With that, we finish our work with the default configuration; but if you’re curious, you can tweak some more.
Custom Variables
In settings.py you can include other values of your project. You may have constants that stay the same for several modules or even applications. For example, the name of the director for whom we’re making a site may appear on different pages of our project, so we save his name in settings.py module:
DIRECTOR = 'Alan Smithee'
You may define this variable in any place in the settings.py. After that, you can access the DIRECTOR’s name through the import django.conf.settings.DIRECTOR.
You can pass it to your templates or use it for any other purpose you wish. It’s convenient to save it in the settings: if you accidentally made a mistake and wrote DIRECTOR = ‘John Doe’, you can easily fix it in just one place instead of a dozen.
Starting the Local Server
We have an application and we configured the settings: looks like we’re finally ready to start the server! To launch the server on your local machine, you should run the runserver command from your terminal in the project’s root directory:
python manage.py runserver
If you see “Error: That port is already in use.”, it means that the default port 8000 is in use by some other application. In this case, you can choose any other available port and pass it as the last argument to the command:
python manage.py runserver 9090
So python manage.py runserver is an equivalent to python manage.py runserver 8000.
Congratulations! Django starts the server and now you can access it through the browser.
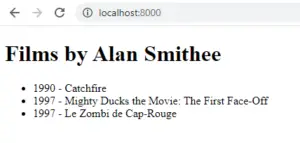
Type the address http://localhost:8000 or http://localhost<port_you_used> and you will see a part of Alan Smithee filmography.
Django Debug Mode
Let’s be honest however: bugs occur. In the case of something turned out wrong, you need to know where in the application it is.
You can start the debug mode adding DEBUG = True in your settings.py module. Debug mode is a condition of an application when it shows tracebacks and other helpful data in your program when the server fails.
It’s strongly recommended to set DEBUG = False when you launch the server for your clients. You can unintentionally disclose some secret data through the tracebacks. To prevent such circumstances, remember to turn off the debug mode for the production servers.
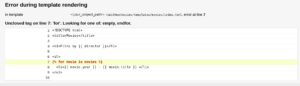
At the point when the application was under development, we intentionally did not mention the {% endfor %} tag in the movies/templates/movies/index.html to make you familiar with how to debug errors:
<!DOCTYPE html>
<title>Movies</title>

<h1>Films by {{ director }}</h1>

<ul>
{% for movie in movies %}
  <li>{{ movie.year }} - {{ movie.title }}</li>
</ul>
When we try to access the page with the films, we get this instead:
Hence, your movies/templates/movies/index.html should be:
<!DOCTYPE html>
<title>Movies</title>

<h1>Films by {{ director }}</h1>

<ul>
{% for movie in movies %}
  <li>{{ movie.year }} - {{ movie.title }}</li>
  {% endfor %}
</ul>
Now, on running the server you will get:
Try to solve this question now:
Consider you want to read the variable IS_RELEASE_SERVER from the standard input. If the variable is “true”, it means it’s a production server, and if “false”, then it’s a development server.
You should convert IS_RELEASE_SERVER to type bool after you’ve read it.
Define the DEBUG variable so that on the production server it’s set to False, and on the development server it is set to True.
IS_RELEASE_SERVER = input() == 'true'
DEBUG = not IS_RELEASE_SERVER