Django lets us interact with its database models, i.e. add, delete, modify and query objects, using a database-abstraction API called ORM(Object Relational Mapper).
For demonstration purposes, we will use the following Django models.
Django ModelForm Example Overview
We will be doing the following in this Django ModelForm Example
- Create a Page for entry of Student Details(No, Name, Age, Mob No, Address) and save it into the database(which will be done automatically by model forms).
- Create the index page where we would view the student entries in an unordered list.
Creating a new Project
- Run your Windows PowerShell in Administrator Mode and run the following command to navigate into the desktop directory :
cd Desktop
- Run the command below to start a project new django project:
django-admin startproject Registration
- As you do, you will see a folder on your desktop containing the django files named website
- Open the folder in any Django IDE or any text editor will work fine.
- Run the command below to change the directory of PowerShell to the folder “Registration”:
Creating a new App inside the Project
- Run the command below to start a new app into your project.
python manage.py startapp Regapp
- Here, Regapp is the name of your app. As your run the above command, a folder named Regapp will show up in the Registration folder.
Coding the app
As usual, we need to deal with some data(No, Name, Age, Mob No, Address). So, we need to create the model of the data and implement that model into the sqlite db of django.
To do so, look for the file models.py in your app folder and add the code below:-
from django.db import models

class Student(models.Model):
    No = models.IntegerField()
    Name = models.CharField(max_length=25)
    Age = models.IntegerField()
    Mob = models.IntegerField()
    Add = models.CharField(max_length=64)
- Add the ‘Regapp’, in the installed app of settings.py
Making Migrations
- Make sure that the shell is navigated into the Registration folder and run the following command.
python manage.py makemigrations
- Next, run the command below to actually implement it into the database.
python manage.py migrate
- By now, the database is created into the sqlite db.
Configuring the View
- Yes, the class based views reduce our efforts to quite an extent.
- So, look for the file views.py in your app folder and add the following code:
from django.shortcuts import render

# Create your views here.
from django.shortcuts import render,redirect
from .models import Student
from .forms import StudentForm


def form_view(request):
    form = StudentForm()
    if request.method == 'POST':
        form = StudentForm(request.POST)
        if form.is_valid():
            form.save()
        return redirect('/')
    return render(request,'star/Home.html',{'form':form})
Creating UI for Django ModelForm
- Firstly create a directory named templates into the folder Regapp.
- Now, in the templates folder, create another directory named star and it should be like /Regapp/templates/star/.
- In the Regapp folder present in templates directory, create a new HTML file called Base.html and add the following code:-
<!DOCTYPE html>
{%load staticfiles%}
<html lang="en">
<head>
    <meta charset="UTF-8">
    <title>Homepage</title>
    <link rel="stylesheet" href="https://maxcdn.bootstrapcdn.com/bootstrap/3.3.7/css/bootstrap.min.css" integrity="sha384-BVYiiSIFeK1dGmJRAkycuHAHRg32OmUcww7on3RYdg4Va+PmSTsz/K68vbdEjh4u" crossorigin="anonymous">
    <link rel="stylesheet" href="{%static 'css/style.css'%}">
</head>
<body>
    <div class = "container" align="center">
        {%block child_block%}
        {%endblock%}
    </div>
</body>
</html>
In the same directory, create another html file named Home.html and add the code below:
<!DOCTYPE html>
{% extends 'star/Base.html'%}
{% load staticfiles %}
{%block child_block%}
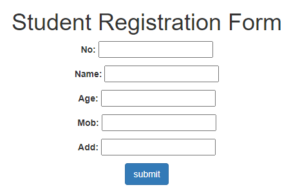
<h1>Student Registration Form</h1>
<form method="post">
{{form.as_p}}
{% csrf_token %}
<input type = 'submit' class="btn btn-primary" value="submit">
</form>
{%endblock%}
Running the app
- At first create a superuser. To add, edit and delete the posts we’ve just modeled, we will use Django admin. So, to create a superuser run the following command and enter details of your choice:
python manage.py createsuperuser
- Now lets try running the app. Make sure your development server is running. If not you can use the following command in your Windows PowerShell to run your development server.
python manage.py runserver
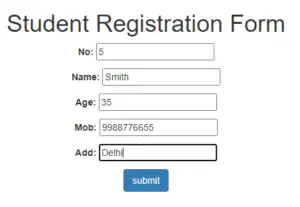
Let’s try to add the following details
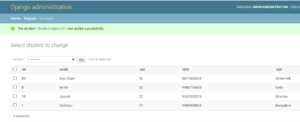
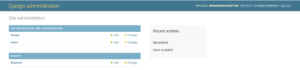
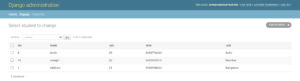
Now, let’s check whether the data is entered in the admin panel or not i.e. to the database. To check the admin panel you must change your server to http://127.0.0.1:8000/admin/ and enter your superuser user details to login. According to our application our backend will look like this:
On checking the Students table we will see the student details have been added:
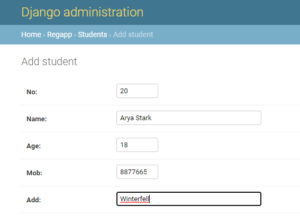
Similarly, to add students from backend, just opt for add students and fill the required details:
On once again checking the table, we should be able to see the latest details of the student entered: